How to Use Face Swap the Right Way in 2026

Ryan Bennett • October 17, 2026
Learn how to use face swap tools safely and effectively in 2026. Step-by-step tutorial covering prep, AI tools, realism tips, ethics, and post-editing.
You've got two portraits open, a campaign deadline approaching, and a face-swap tool that promises a quick result. You click generate, then notice the skin tones don't match and the jawline appears twice. That doesn't mean the tool is useless. It means the work starts before the button.
Learning how to use face swap well means treating it as an image-editing workflow, not a one-click filter. You'll get more dependable results by preparing the images, generating the composite, checking it closely, and disclosing the edit when it could be mistaken for a real photo or endorsement.
Why Your First Face Swap Looks Fake and How to Fix It
A marketer can upload two attractive portraits and still get an awkward composite. If one person faces the camera while the other is turned slightly away, the swapped face may sit at the wrong angle. If the light falls differently, the inserted skin can look like a flat patch. A ghosted jawline or doubled edge is a common sign that the source face and target geometry don't line up.
A face swap isn't one set of pixels pasted over another. The software estimates facial landmarks and identity features, then blends the result with the target image's pose, expression, and surrounding context. A survey of face-swap methods traces the shift from traditional computer-vision approaches to neural techniques and identity-transfer systems, helping explain why the output is a generated composite rather than a direct copy of a face (research on face-swapping methods).
The reliable workflow has four stages: prep, generate, inspect, and disclose. Preparation matters most because a tool can't easily compensate for incompatible angles, expressions, or lighting. If you're thinking about the edge between two images, this guide to blending two images offers a useful companion perspective on making separate visual elements sit together naturally.
Practical rule: If the source and target don't look like they belong in the same photo, don't expect a blending tool to make them belong.
Before opening a tool, check image rights and consent, then compare pose, lighting, expression, and resolution. After generation, inspect the details instead of trusting the thumbnail. Finally, decide whether viewers need a clear label to understand that the image has been altered.
Picking Source and Target Images That Actually Work
A strong source-and-target pair saves editing time. Put both images side by side and compare four things before you upload them: pose, lighting, expression, and resolution. Each mismatch gives the software a different problem to solve.
Start with pose. A near-frontal source face is much easier to place on a near-frontal target than on a pronounced profile. Match expression next: a broad smile and an unsmiling target can produce a mouth that looks stretched or strangely relaxed. Then compare the direction and softness of the light. Overhead light on one face and side light on the other can leave the new face looking oddly flat or shadowed in the wrong place.
Resolution matters because the tool needs enough facial detail to estimate the features and blend the edges. A sharp target paired with a small, blurry source can produce a face that looks soft against a crisp background. Choose images with similar detail and avoid heavily compressed files when you have a clearer option.
Sort candidates before processing
For a batch, make three piles: ship-ready images that match well, fixable pairs with a modest mismatch you can correct, and rejects with problems that would take more than sensible editing to overcome. Reject severe head turns, heavy occlusion by hair or hands, motion blur, and distinctly different color temperatures. If the face is partly hidden in one image, the software may not have enough visible information to build a convincing result.
| Input Problem | Artifact It Creates | What to Do |
|---|---|---|
| Source and target face different directions | Warped features or a face that appears pasted on | Find a pair with more similar angles |
| Different light direction or color | A visible skin-tone patch or misplaced shadows | Choose better-matched lighting or adjust color carefully |
| Smile paired with a neutral expression | Stretched mouth or an unnatural expression | Match expressions more closely |
| Blurry or low-detail source | Soft face against a sharp image | Use a clearer source image |
| Hair, hand, or another object covers the face | Missing or distorted facial areas | Reject the pair if the obstruction crosses important features |
If the pair fails several checks, choose a different image rather than planning to repair every mismatch afterward. Good inputs give both the software and the editor a better chance.
Running the AI Face Swap Tool Step by Step
Whether you're using a dedicated editor or a batch feature, the underlying work follows a similar sequence. The software estimates facial geometry, places the source features into the target's structure, and blends the composite. Knowing those operations helps you spot where an output went wrong.
Follow the image through the pipeline
-
Detect landmarks. The tool locates facial reference points such as the eyes, nose, and mouth. Check that the points appear to follow the face rather than hair, glasses, or a shadow.
-
Align and warp. The software adjusts the source face to the target's position and proportions. A small pose mismatch can still create distortion here, so don't use alignment as a substitute for choosing compatible photos.
-
Create the mask. A mask marks which parts of the inserted face should show. Landmark-guided workflows can use the outline of facial points to define this region. Keep the mask away from unrelated details such as glasses or hair that belong to the target.
-
Feather the edge. Softening the mask boundary reduces a hard cut line. If the edge becomes too blurry, the face can look airbrushed, so preserve natural skin texture instead of smoothing everything.
-
Match color. Adjust the inserted area so its tone and brightness sit comfortably with the target. A color correction that fixes the cheeks but makes the forehead look wrong usually needs a gentler touch.
-
Inspect the composite. Zoom to 100% and check the eyes, hairline, jawline, and places where objects cross the face. Don't approve an image based only on its small preview.
FaceForensics++ describes a conventional approach that uses facial landmarks and a fitted 3D template to align the model with the face (technical overview of face manipulation). That's why a result is an estimate built from facial features and context, not a pixel-for-pixel transfer.

For a one-off edit, you can handle these checks manually. For repeated creative work, Bulk Image Generation includes a batch editor with face-swap functionality, while an AI avatar generator can be relevant when your project needs an avatar-style visual rather than a direct photo composite.
Realism Tips From Detection Research You Can Apply Today
A polished result isn't automatically safe to present as an authentic photograph. In a study summarized in the academic literature, human observers detected a simple face swap at 84.7% in one test condition and 96.6% in another. More complex manipulations were harder to identify: FaceFusion morphs were detected by 75.1% and 86.7%, while UBO morphs were detected by 65.7% and 75.5% (research on people's ability to detect manipulated faces).
The practical lesson isn't that you should make an edit harder to detect. It's that audiences won't reliably identify every alteration for themselves. Use permission and clear disclosure when the edit could influence how viewers interpret an image.
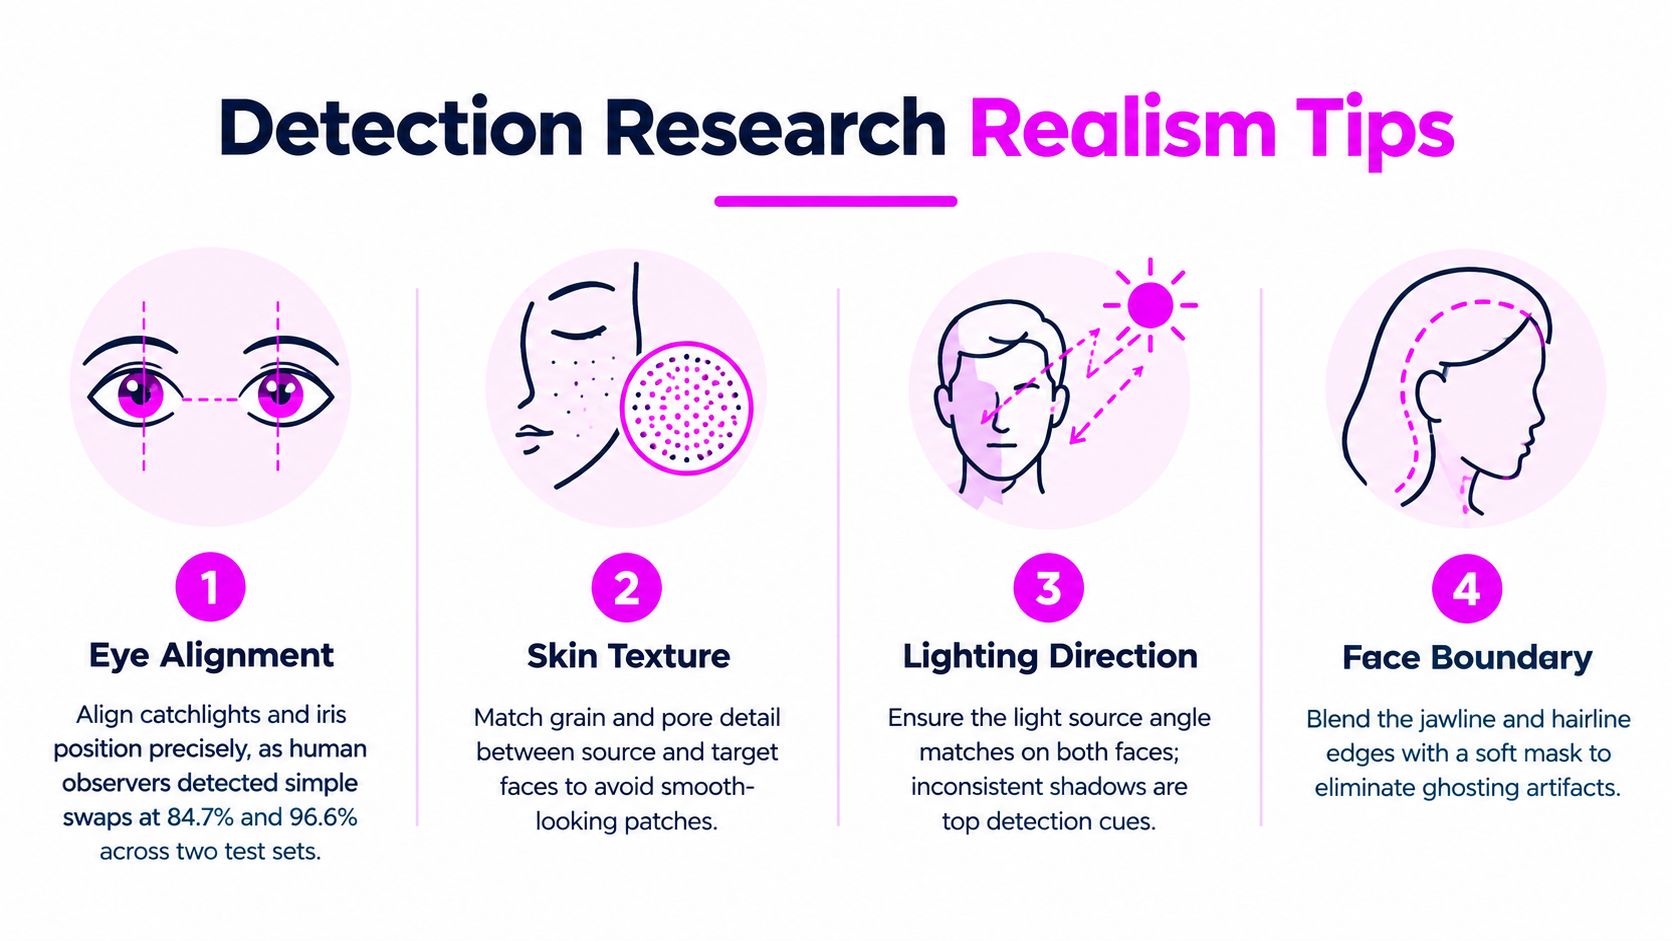
For a natural-looking result, focus on consistency rather than tricks:
- Match the light. Keep the source and target's light direction and color temperature as close as possible. If the target has a warm indoor cast and the source looks cool and blue, the face may stand out even when the mask edge is clean.
- Align the eyes. Compare iris position and gaze direction. Eyes draw attention, and a face that seems to look in a different direction from the target's body can feel wrong.
- Preserve texture. Avoid blurring away pores and natural grain to hide an edge. Excessive smoothing makes a face look like a sticker.
- Soften boundaries. Blend the jawline and hairline carefully. A soft mask can reduce ghosting, but it won't fix a source face that has the wrong shape or angle.
- Keep expressions coherent. Don't layer an open smile onto a target whose lips are closed and relaxed. Pick a better match rather than trying to reshape the expression by hand.
If you need a general explanation of how image manipulation can be assessed, this guide to deepfake detection tools provides further context. Treat realism as a craft concern, not proof of authenticity.
Post-Editing Checklist for a Clean Final Image
A thumbnail can hide defects that become obvious in a campaign image, classroom presentation, or printed asset. Inspect each output at 100% zoom and move across the face systematically. If an area is badly distorted, going back to a better source image is often cleaner than patching it in Photoshop.
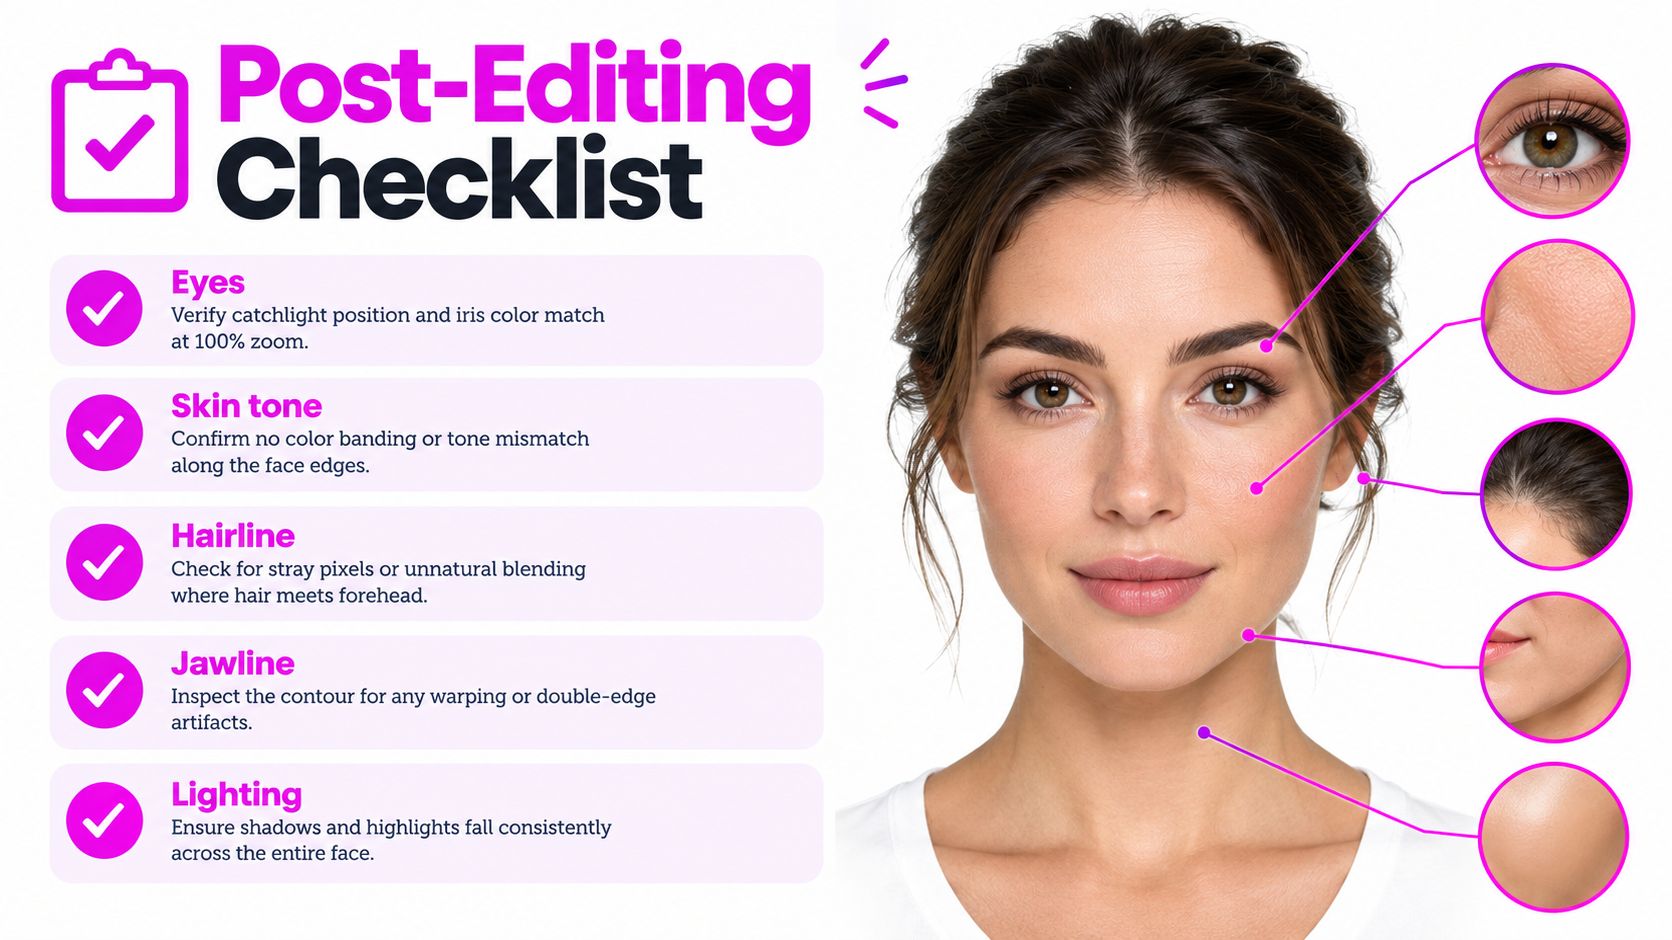
Inspect the details in order
- Eyes: Look for a doubled iris, misplaced catchlight, or gaze that doesn't match the target. Correct a small alignment issue if the image supports it; replace the source if the eyes are distorted.
- Hairline: Check for a hard edge, stray pixels, or hair that appears to change direction at the boundary. Refine the mask where the hair is clearly visible, but don't invent missing strands.
- Jawline: Look for a sharp seam, a second contour, or a jaw that seems to float above the neck. A gentle boundary adjustment can help; persistent warping usually means the faces don't match well enough.
- Neck and ears: Compare skin tone and sharpness where the inserted face meets the target. A visible color band may need a careful correction. If the source hides the relevant area, select a different image.
- Occlusions: Inspect glasses, hair, microphones, hands, and other objects that cross the face. If the swap puts an object behind the wrong facial layer, redo the composite with a better-matched pair.
For color mismatches, make restrained adjustments rather than flattening all the image's natural variation. This guide to color correction for photos can help when the composite needs tone balancing.
For a batch, spot-check a random sample of 10% of the outputs, record the failure mode for rejected images, and keep originals in a separate folder. That makes it easier to identify recurring problems and audit or revert an edit later.
Consent Disclosure and the Categories That Require Extra Caution
A face swap may feel like harmless fun to the editor, but publication changes the context. A person might accept a private joke and object to the same image appearing in a campaign. Keep image ownership, permission to depict someone, and permission to publish the composite separate. Having rights to a photo doesn't automatically mean the person shown has agreed to a face swap or its distribution.
Before you publish, confirm that you have rights to both source files and agreement from every identifiable person. Make sure that agreement covers the intended audience and channel, explains that the image is synthetic, and can be withdrawn. Decide who will respond to a takedown request and how you'll remove the image from places you control.
Make a go, modify, or no-go decision
A go means the image rights, each person's consent, intended distribution, and disclosure are all clear. Modify the plan if the edit can be made less misleading, used in a more limited setting, or labeled more plainly. Choose no-go when you can't get permission or the context depends on viewers believing the composite is real.
Use heightened caution, or exclude the use entirely, when a project involves minors, public figures, intimate imagery, identity verification, or deceptive impersonation. These situations can carry serious personal or practical consequences, even if the creator meant the edit as a joke. For general context on the risks around using someone's likeness, review relevant rules before deciding to publish. Commercial projects should also check commercial license requirements, since image rights and a person's consent are distinct questions.
Label the image whenever it could be mistaken for an authentic photograph or endorsement. Disclosure is its own responsibility. Consent from the people depicted doesn't tell the audience what they're seeing.
Your Reusable Face Swap Pipeline and Quick Answers
Keep the workflow in your project notes so each image gets the same review, whether you're editing one portrait or working through a batch.
- Confirm rights to the source and target images.
- Secure specific consent from every identifiable person.
- Match pose and lighting, then check expression and image detail.
- Run the face swap using a tool suited to the project.
- Inspect at 100% for alignment, seams, and occlusions.
- Patch small artifacts or reselect the source if the mismatch is structural.
- Label and archive the output, permission details, and original files.
Quick answers
Is face swap legal? There's no blanket yes. The answer depends on the jurisdiction, consent, image rights, and context, so get appropriate advice for a consequential use.
Can people detect a face swap? Sometimes. Detection depends on the manipulation method and viewing conditions, so don't assume an audience will recognize an edit.
How long does a good swap take? A straightforward single image may process quickly, but choosing inputs and reviewing the result take longer. Batch jobs need time for quality control and consent checks.
What if the same swap keeps failing? Stop patching the same mismatch. Choose a clearer source and target pair, especially if the pose, expression, lighting, or visible features don't line up.
Bulk Image Generation offers an image workflow with batch editing that includes face swaps, alongside tools for generating and preparing visuals. If you're planning a campaign or a set of creator assets, visit Bulk Image Generation to explore whether it fits your production process.
