
10 Creative Photo Ideas to Inspire You in 2025

Aarav Mehta • August 1, 2025
Discover 10 creative photo ideas to inspire your next project. Explore unique techniques perfect for AI image generation, from levitation to light painting.
In a world saturated with visuals, finding unique and creative photo ideas can feel like a daunting task. Whether you're a seasoned photographer, a social media manager, or a marketer looking for fresh campaign visuals, the pressure to produce standout content is constant. But what if you could bypass the technical complexities of traditional photography and bring ambitious concepts to life in seconds? This article is your guide to ten powerful and artistic photography techniques, re-imagined for the age of AI.
We'll explore timeless methods, from forced perspective to light painting, and show you how to use these concepts to generate stunning, unique images in bulk. These ideas serve as the perfect creative launchpad for AI image tools, allowing you to transform a simple description into a hundred different visual realities. As you seek to expand your horizons, exploring the art and techniques of drone photography can introduce entirely new creative perspectives from above.
This curated collection moves beyond generic advice to provide specific, actionable prompts and examples for each technique. Get ready to move beyond the ordinary and unlock a new level of creative efficiency, turning classic photographic styles into compelling digital art.
1. Forced Perspective Photography
Forced perspective is a photographic technique that creates compelling optical illusions by manipulating scale and depth perception. By strategically placing objects and subjects at different distances from the camera, you can make them appear larger, smaller, closer, or farther away than they actually are. This method challenges the viewer's understanding of spatial relationships, resulting in mind-bending and highly shareable images. It's one of the most engaging creative photo ideas for capturing audience attention.
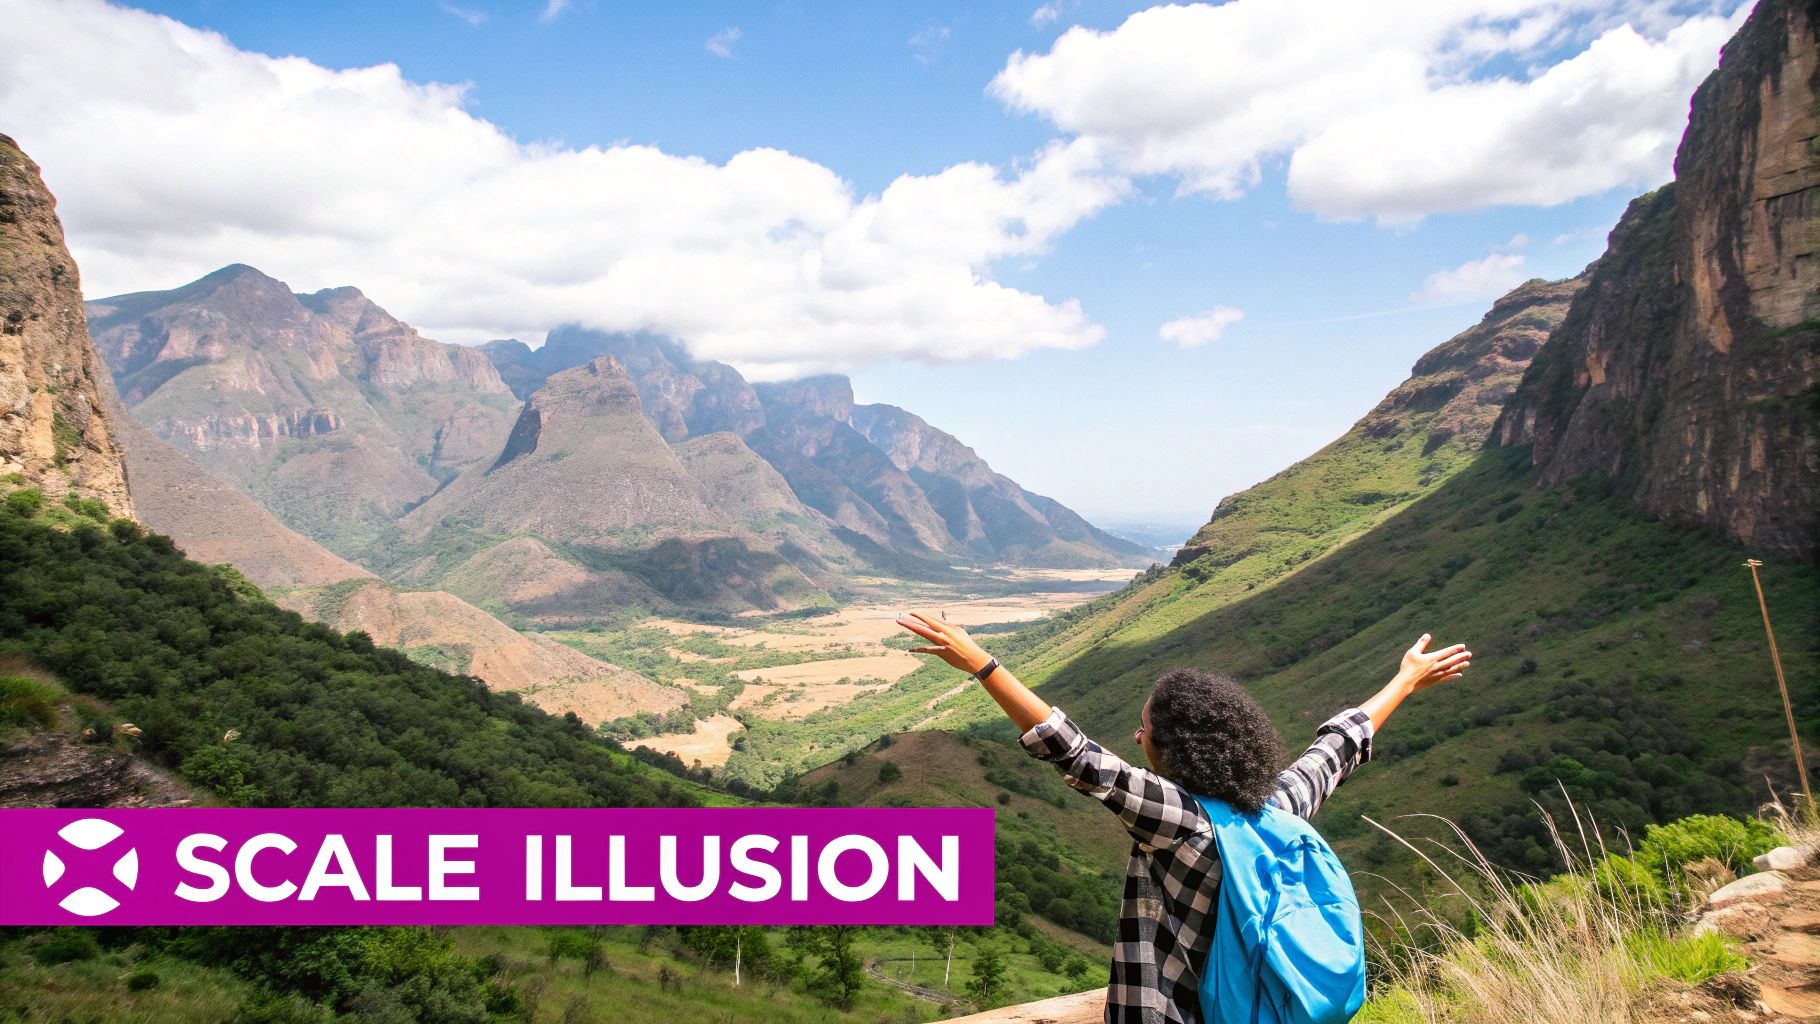
How It Works
This technique relies on flattening a three-dimensional scene into a two-dimensional image. An object placed close to the lens will appear significantly larger than a subject positioned much farther away in the background. The key is to align them perfectly so they appear to interact, like a person "holding" the sun or "stepping" on a skyscraper. This illusion is enhanced by a deep depth of field, ensuring both the foreground and background elements are in sharp focus.
Actionable Tips for Implementation
- Use a Small Aperture: Set your camera to a smaller aperture (a higher f-stop, like f/11 or f/16) to maximize the depth of field. This keeps both your near and far subjects sharp, which is critical for selling the illusion.
- Careful Subject Placement: Precise positioning is everything. Use a tripod to keep the camera steady and direct your subjects with small, incremental movements until the alignment is perfect.
- Choose a Simple Background: A busy or cluttered background can distract from the illusion and reveal the trick. Opt for open spaces like beaches, fields, or clear skies.
2. Double Exposure Photography
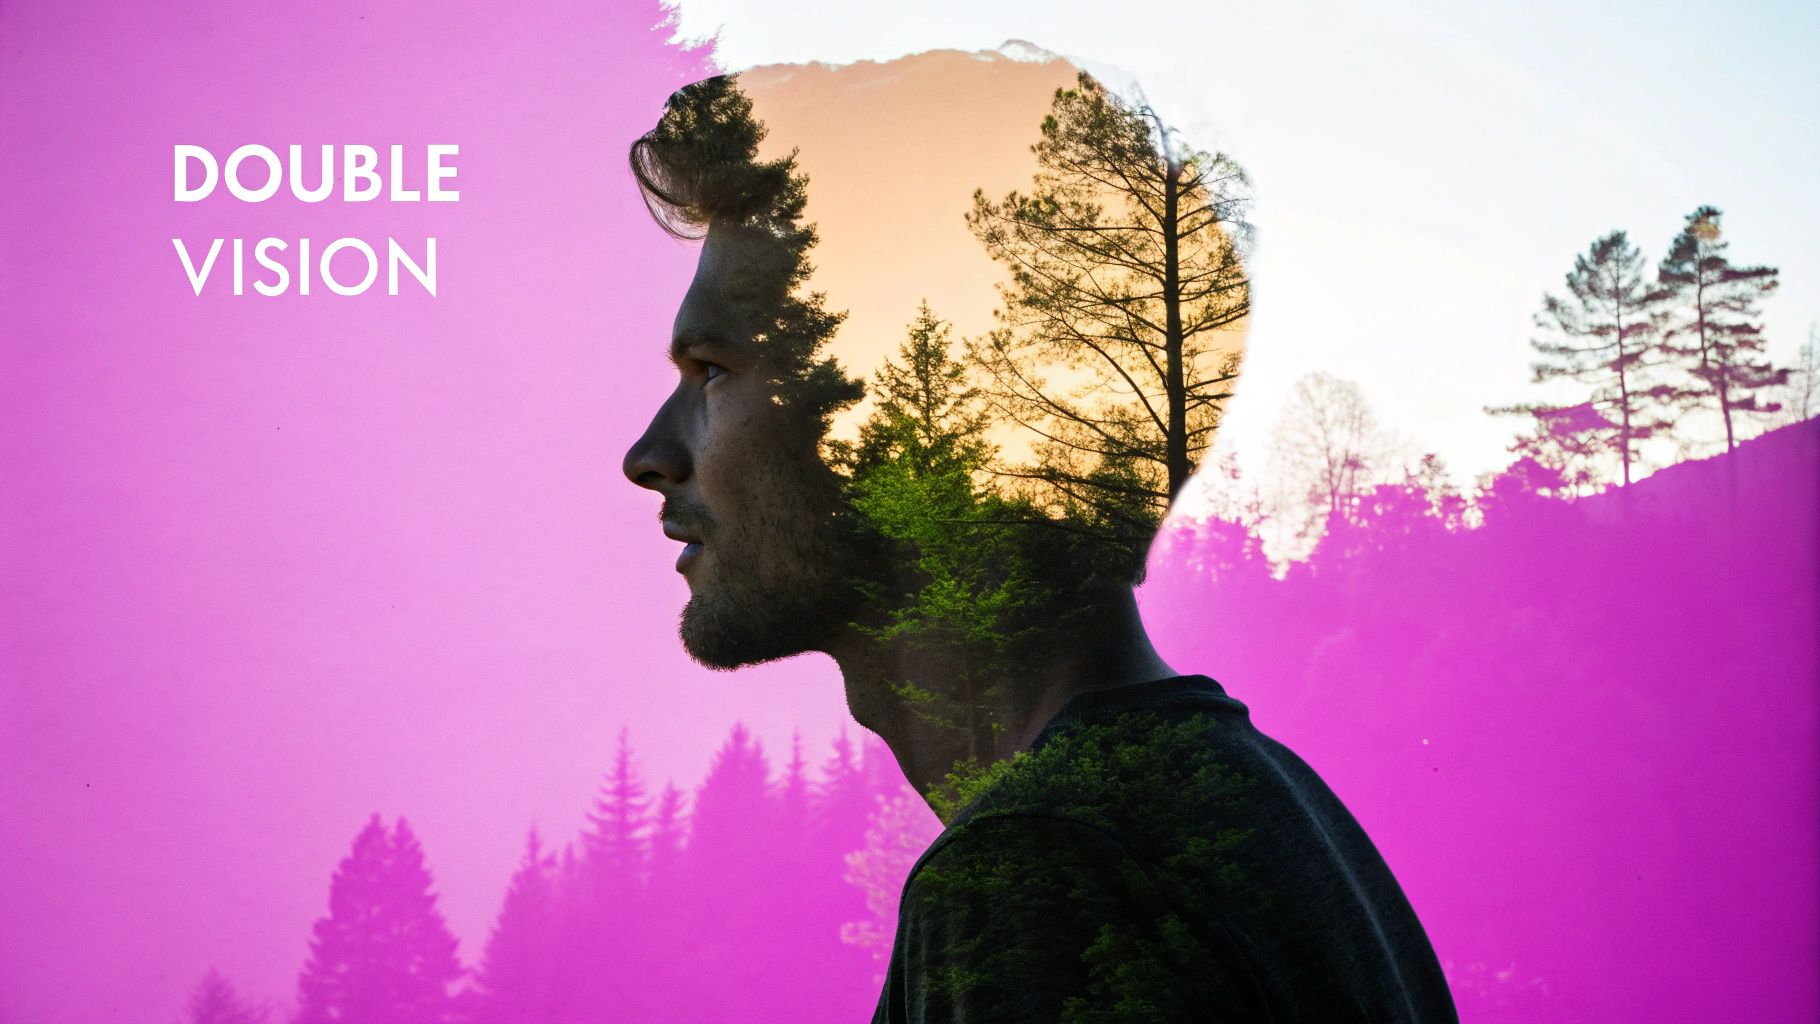
Double exposure is a creative technique where two distinct images are superimposed to create a single, layered photograph. This method produces ethereal, dreamy, or surreal compositions that tell a complex story within one frame. Originally achieved by exposing the same piece of film twice, modern digital methods offer precise control over blending, opacity, and positioning. It's an excellent creative photo idea for adding artistic depth and intrigue to your visuals.
How It Works
The technique involves combining a "base" image, often a silhouette or a high-contrast portrait, with a "fill" image, such as a landscape, cityscape, or abstract texture. The brighter areas of the base image reveal the fill image, while the darker areas remain opaque. This interplay creates a seamless blend where one image appears to be contained within the other, famously used by artists like Dan Mountford and Christoffer Relander. For those using AI tools, you can explore this concept with our free AI image prompt generator.
Actionable Tips for Implementation
- Start with a Strong Silhouette: Choose a base image with a clean, well-defined outline against a simple, bright background. This creates a perfect "container" for your second image.
- Use Contrasting Subjects: Combine different themes to create compelling visual narratives. Blend an urban cityscape with a forest, or a portrait with an element from nature, to evoke powerful emotions and ideas.
- Experiment with Blending Modes: In post-processing software, don't just stick to the default blend. Try modes like "Screen," "Lighten," or "Overlay" to achieve different artistic effects and find the best combination for your images.
3. Levitation Photography
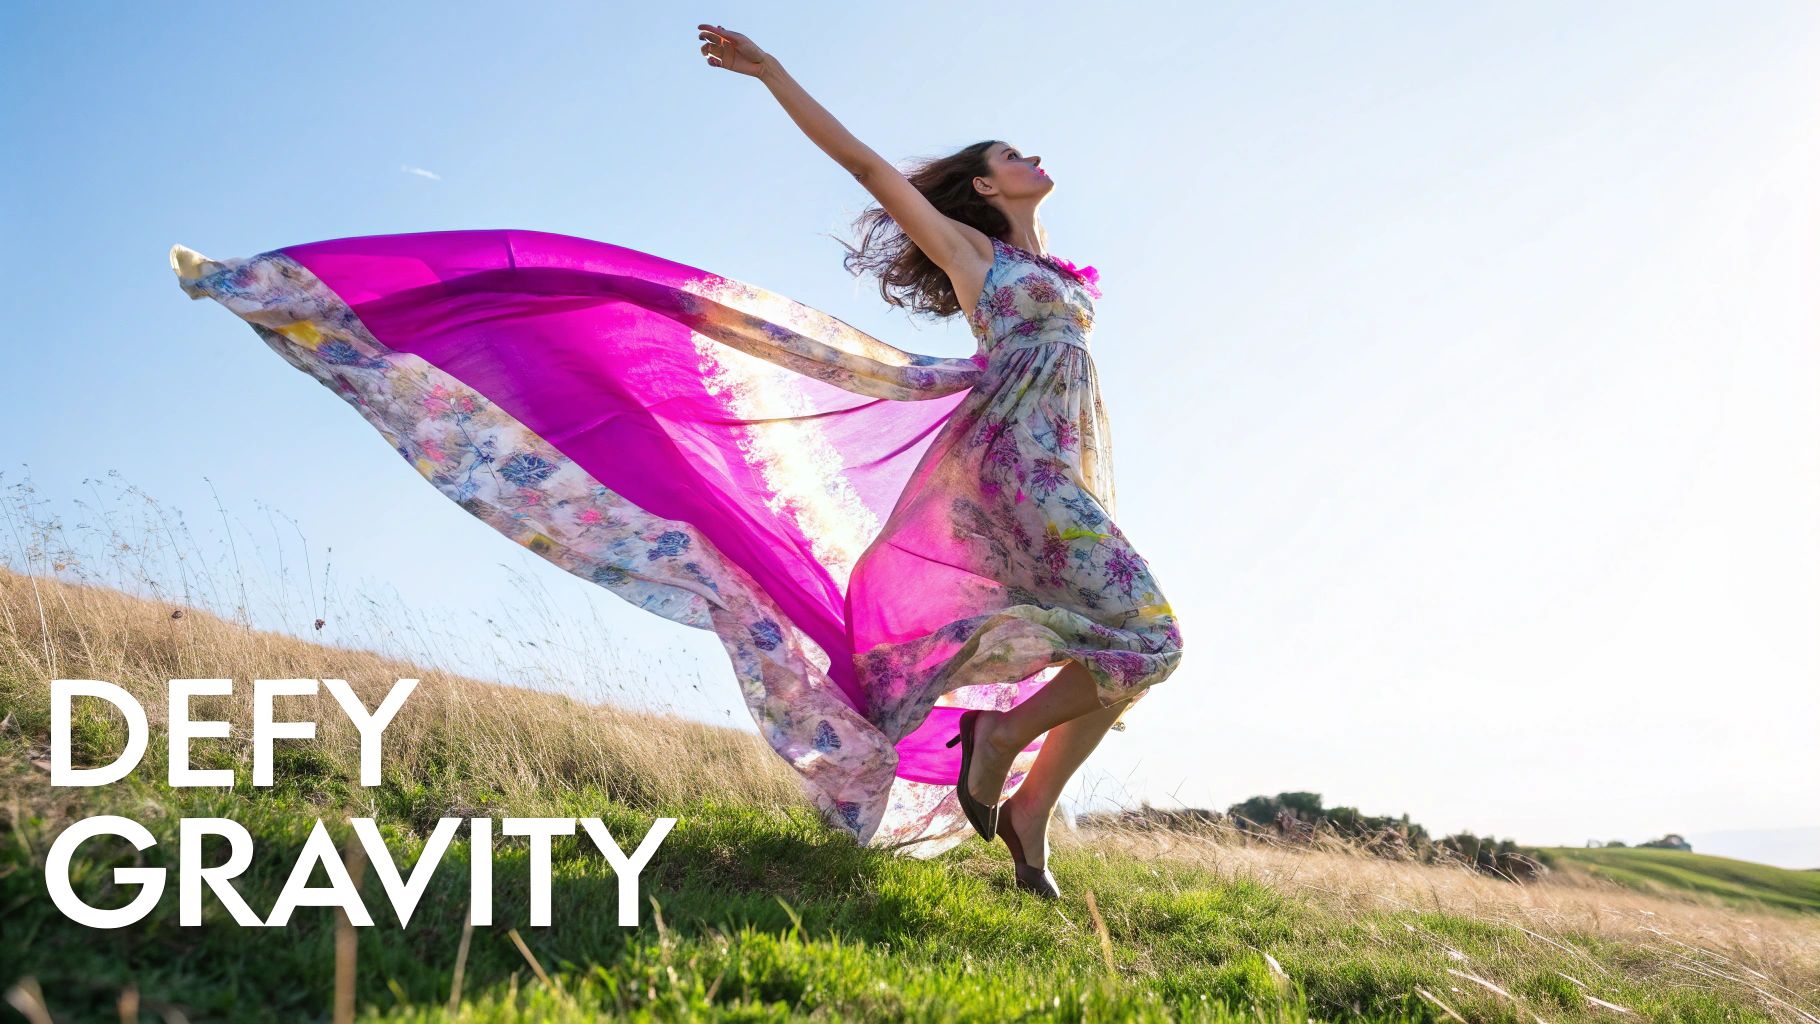
Levitation photography is a captivating technique that creates the illusion of subjects floating or flying through the air, seemingly defying gravity. This method produces dreamlike and surreal images by making it appear as though people or objects are weightlessly suspended. Often used in fine art and conceptual portraits, levitation is one of the most imaginative creative photo ideas for storytelling, adding a sense of wonder, magic, and fantasy to your visuals.
How It Works
The magic of levitation photography is typically created either in-camera or with post-processing. One common approach involves the subject jumping while the photographer uses a fast shutter speed to freeze them in mid-air. Another method involves using props like stools or boxes to support the subject, taking one photo with them and another of just the background. In post-production, the support is edited out, leaving the subject appearing to float. This technique, popularized by artists like Natsumi Hayashi, transforms ordinary scenes into extraordinary spectacles.
Actionable Tips for Implementation
- Use a Fast Shutter Speed: Set your camera to a shutter speed of 1/500s or faster. This is crucial for freezing the motion of a jumping subject and preventing any motion blur, ensuring the final image is sharp and believable.
- Shoot in Continuous Mode: Use burst or continuous shooting mode to capture a rapid sequence of photos as your subject jumps. This increases your chances of capturing the perfect moment at the peak of their jump, where they appear most weightless.
- Plan for Compositing: If using supports, place your camera on a tripod to ensure the background remains identical in every shot. Take a "clean plate" shot of the empty scene to make removing the prop in post-production seamless.
4. Smoke Bomb Photography
Smoke Bomb Photography is a dramatic technique that uses colored smoke grenades to create vibrant, ethereal backgrounds and atmospheric effects. This method injects instant mood, mystery, and a blast of color into a scene, making it a favorite for portrait, fashion, and conceptual photoshoots. The dense, billowing clouds add texture and dynamism, transforming an ordinary setting into something surreal and captivating. It’s one of the most visually impactful creative photo ideas for producing unforgettable images.
How It Works
The core of this technique is the controlled release of non-toxic colored smoke from a purpose-built grenade or bomb. This smoke interacts with light and the environment, creating beautiful, unpredictable patterns. The photographer's job is to capture the fleeting moment when the smoke forms the perfect shape, color blend, or backdrop for the subject. Success depends on timing, understanding how wind affects the smoke's flow, and positioning the subject to interact with the colorful cloud effectively.
Actionable Tips for Implementation
- Mind the Wind: Before you start, check the wind direction. You want the smoke to drift away from or around your subject, not directly into them or the camera. Position the subject upwind from the smoke source.
- Shoot in Burst Mode: Smoke moves and changes incredibly fast. Use your camera's continuous shooting or burst mode to capture a rapid sequence of shots, ensuring you get the perfect billow of smoke.
- Prioritize Safety: Use only smoke bombs designed for photography. Have your subject hold the device at arm's length, pointing away from their body and face, and always have water or a fire extinguisher on hand. Check local regulations, as some areas restrict their use.
5. Long Exposure Photography
Long exposure photography is a technique that uses a slow shutter speed to capture the cumulative effect of motion over time. This method blurs moving elements into ethereal streaks and smooth surfaces while keeping stationary objects perfectly sharp. It transforms dynamic scenes like flowing water or bustling city streets into surreal, artistic images, effectively painting with time and light. This approach is one of the most powerful creative photo ideas for adding a dreamlike quality to landscapes and urban environments.
How It Works
This technique involves leaving the camera's shutter open for an extended period, from a few seconds to several minutes. During this time, any light source or object that moves across the frame is recorded as a continuous trail or a soft blur. For example, waves crashing on a shore blend into a smooth, misty surface, and car headlights become vibrant ribbons of light. The contrast between the sharp, static background and the fluid motion creates a visually stunning and often minimalist composition.
Actionable Tips for Implementation
- Use a Sturdy Tripod: Absolute stability is non-negotiable to keep stationary elements sharp. A sturdy tripod and a remote shutter release (or a self-timer) are essential to prevent camera shake.
- Add an ND Filter: To achieve long exposures in daylight without overexposing your image, use a Neutral Density (ND) filter. This darkens the scene, allowing you to use a much slower shutter speed.
- Master Your Focus: Autofocus can struggle in low light or with an ND filter attached. Focus on your subject before you place the filter on your lens, then switch to manual focus to lock it in.
6. Light Painting Photography
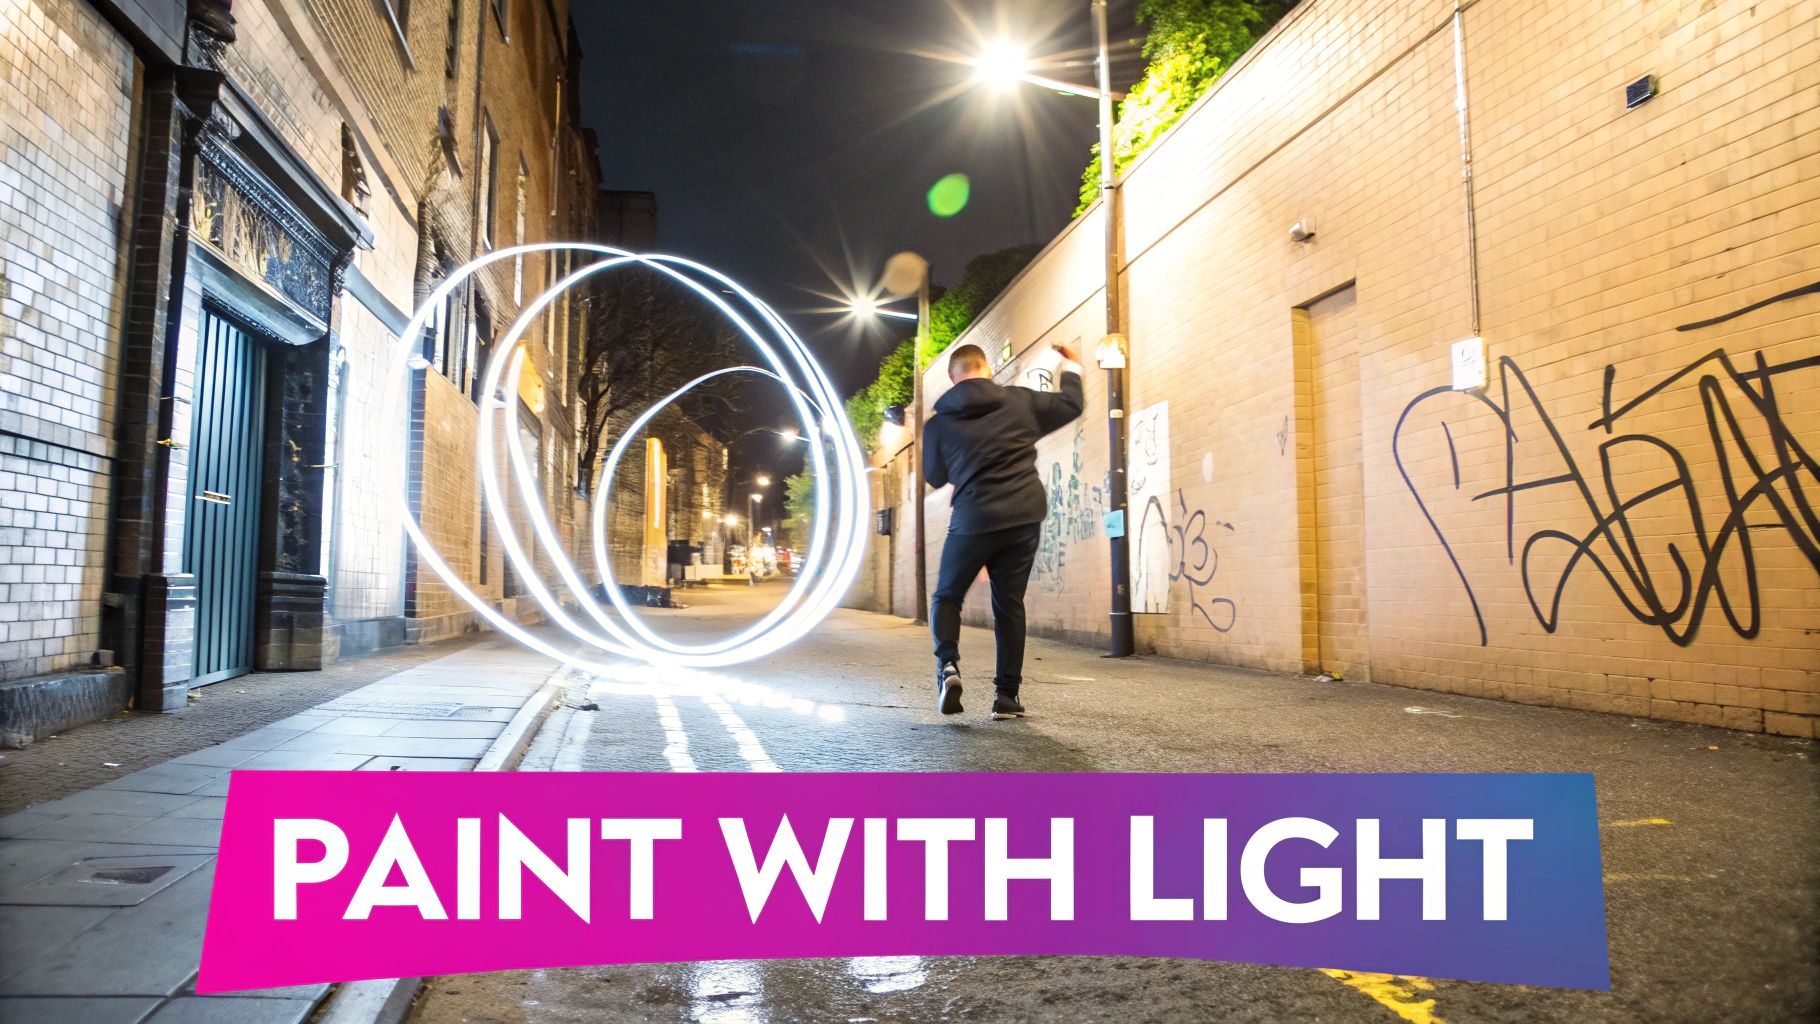
Light painting is a long-exposure technique that transforms darkness into a canvas. By moving a light source during a long exposure, photographers can "paint" trails, shapes, or words into an image, or selectively illuminate parts of a scene. This creative photo idea merges photography with performance, allowing for unique compositions ranging from fiery steel wool spirals to ethereal, abstract patterns created with LEDs. The result is a dynamic image captured entirely in-camera.
How It Works
This method relies on setting your camera for a long shutter speed (from several seconds to minutes) in a dark environment. While the shutter is open, you introduce light into the frame using tools like flashlights, LED sticks, or even steel wool. The camera sensor records the path of the moving light as continuous streaks. Because the environment is dark, only the illuminated parts are captured, giving you precise control over what appears in the final photograph.
Actionable Tips for Implementation
- Use a Tripod and Remote Shutter: A completely stable camera is non-negotiable for a sharp background. Use a sturdy tripod and a remote shutter release or self-timer to avoid camera shake when starting the exposure.
- Wear Dark Clothing: To avoid appearing as a ghostly figure in your shot, wear dark, non-reflective clothing. This helps you move through the scene without being captured by the camera's sensor.
- Experiment with Light Sources: Don't limit yourself to a simple flashlight. Use colored gels to create vibrant hues, attach LED light sticks to tools for abstract patterns, or try spinning ignited steel wool (safely) for dramatic, fiery effects.
7. Miniature/Tilt-Shift Photography
Miniature/tilt-shift photography is a creative technique that transforms life-sized scenes into enchanting miniature models. By selectively blurring parts of the image, it creates an extremely shallow depth of field, mimicking the look of macro photography. This effect makes sprawling cityscapes, busy beaches, or stadiums appear as if they are detailed dioramas or toy sets, offering a whimsical and captivating perspective on the everyday world. This approach is one of the most imaginative creative photo ideas for turning ordinary scenes into something magical.
How It Works
The illusion hinges on creating a very narrow band of sharp focus, typically horizontally across the frame, while aggressively blurring the foreground and background. This technique was originally achieved with specialized tilt-shift lenses that allow the plane of focus to be tilted. Today, the same effect can be convincingly replicated in post-processing or with AI-powered tools. The key is to make the viewer’s eye believe it is looking at a small-scale model, where only a tiny portion would naturally be in focus.
Actionable Tips for Implementation
- Shoot from a High Angle: An elevated vantage point, looking down on the scene, enhances the model-like perspective. Think rooftops, bridges, or hillsides overlooking a city or event.
- Enhance Color and Contrast: Real miniature models are often brightly painted. Increase the saturation and contrast of your image in post-production to amplify the artificial, toy-like appearance.
- Choose Scenes with Detail: Look for scenes with lots of small, distinct elements like cars, people, or buildings. These details become the "miniature" pieces that sell the illusion. This effect can also be applied in specialized fields; for instance, you can explore AI product photography to see how similar focus techniques highlight features.
8. Reflection Photography
Reflection photography is a versatile and elegant technique that uses reflective surfaces to create symmetrical compositions, add depth, and offer unique visual perspectives. By capturing subjects along with their reflections in water, glass, mirrors, or polished metal, you can craft images that are layered, symbolic, and visually striking. This method turns ordinary scenes into artistic compositions, making it one of the most compelling creative photo ideas for adding a touch of sophistication.
How It Works
This technique captures both a subject and its mirrored image in a single frame. The key is to find a suitable reflective surface that acts as a natural mirror. The quality of the reflection depends on the stillness and clarity of the surface, such as the glassy water of a lake at dawn or a clean skyscraper window. The camera’s angle is crucial in determining the symmetry and composition, allowing you to create perfect mirror images or abstract, distorted reflections for a more artistic effect.
Actionable Tips for Implementation
- Look for Still Water: For classic landscape reflections like those captured by Ansel Adams, shoot early in the morning when the wind is calm and the water is perfectly still. This creates a sharp, mirror-like reflection.
- Get Low to the Ground: When shooting puddles after a rainstorm, position your camera as close to the ground as possible. This perspective maximizes the size of the puddle in the frame and creates dramatic, immersive reflections of the surrounding environment.
- Use a Polarizing Filter: A circular polarizing filter gives you creative control over the intensity of the reflection. You can rotate it to either enhance the reflection for a stronger effect or reduce it to see through the surface of the water.
- Experiment with Symmetry: While perfect symmetry is powerful, intentionally breaking it can lead to more dynamic compositions. Try positioning your subject off-center or capturing a ripple in the water to add visual tension and interest.
9. Silhouette Photography
Silhouette photography is a dramatic technique that captures subjects as dark shapes against a bright background. This method intentionally underexposes the subject, stripping away details like color and texture to emphasize form, gesture, and emotion. By focusing on the outline, photographers can create powerful, minimalist images that rely on strong composition and clear shapes to tell a compelling story. It's one of the most evocative creative photo ideas for conveying mood and narrative.
How It Works
This technique is achieved by placing your subject directly in front of a strong light source, like a setting sun or a bright window, and then setting your camera's exposure for the background. This makes the background correctly exposed while rendering the foreground subject as a dark, solid shape. The contrast between the bright, vibrant background and the dark, featureless subject creates a high-impact visual that draws the viewer's attention to the subject's form.
Actionable Tips for Implementation
- Backlight Your Subject: Position your subject so that the main light source is behind them and pointing toward the camera. Sunrises and sunsets provide ideal natural lighting for this effect.
- Expose for the Background: Set your camera's exposure manually or use spot metering mode. Meter off the brightest part of the background (like the sky, but not the sun itself) to ensure the subject remains a dark silhouette.
- Choose Distinctive Shapes: Silhouettes work best with subjects that have a recognizable and clean outline. Avoid overlapping shapes, as this can create a confusing, muddled form. Think of couples holding hands, a lone tree, or an architectural skyline.
10. Motion Blur Photography
Motion blur photography is a dynamic technique that intentionally captures movement through a slower shutter speed, creating streaks and blurs that convey energy, speed, and the passage of time. Unlike a static long exposure, this method often involves deliberate camera movement, such as panning to follow a subject, which blurs the background while keeping the subject relatively sharp. This contrast creates a powerful sense of dynamism, making it one of the most effective creative photo ideas for injecting life into a scene.
How It Works
This technique works by leaving the camera's shutter open long enough to record the movement of a subject or the camera itself. In panning, you follow a moving object (like a cyclist or car) with your camera, using a moderately slow shutter speed. This motion keeps the subject in the same position within the frame, rendering it focused, while the stationary background blurs into horizontal streaks. Alternatively, intentional camera movement (ICM) uses random or deliberate camera motions to turn static scenes into abstract, painterly images.
Actionable Tips for Implementation
- Start with Shutter Priority: Set your camera to Shutter Priority mode (S or Tv) and begin with a shutter speed between 1/15th and 1/60th of a second. This range is a great starting point for most panning shots.
- Practice Smooth Panning: To track a subject, stand with your feet shoulder-width apart and twist from your torso, not your arms. Follow the subject smoothly before, during, and after you press the shutter button for the cleanest results.
- Use Burst Mode: Capturing the perfect motion blur shot can be difficult. Shooting in continuous or burst mode gives you multiple frames to choose from, significantly increasing your chances of getting a sharp subject with a beautifully blurred background.
- Experiment with ICM: For abstract art, try intentionally moving your camera vertically, diagonally, or in a circular motion while the shutter is open. This can transform simple landscapes or cityscapes into unique works of art.
Creative Photo Ideas: Feature Comparison Table
| Technique | Implementation Complexity | Resource Requirements | Expected Outcomes | Ideal Use Cases | Key Advantages |
|---|---|---|---|---|---|
| Forced Perspective | Moderate - precise alignment | Minimal equipment; tripod helpful | Optical illusions of scale and depth | Creative travel, social media | Striking illusions, low equipment |
| Double Exposure | Moderate - mastering blending | Photo editing software or camera | Surreal, layered artistic images | Portraits, conceptual storytelling | Unique storytelling, creative freedom |
| Levitation | Moderate to high - timing critical | Basic gear; possible post-processing | Magical floating/flying illusions | Fantasy, conceptual photography | Eye-catching, versatile setups |
| Smoke Bomb | Low to moderate - safety concerns | Colored smoke bombs, outdoor space | Dramatic, colorful atmospheric effects | Fashion, portraits, promo shoots | Instant drama, affordable tool |
| Long Exposure | Moderate - needs stable setup | Tripod, ND filters, remote shutter | Smooth motion blur, ethereal effects | Landscapes, light trails | Artistic time effects, professional look |
| Light Painting | High - requires practice | Light sources, dark environment | Abstract light trails, selective lighting | Creative performance, abstract art | Infinite creativity, precise control |
| Miniature/Tilt-Shift | Moderate - requires skill or software | Tilt-shift lens or editing software | Scenes appear as miniature models | Urban, landscape photography | Eye-catching toy-like effects |
| Reflection | Low to moderate - positioning key | No special gear needed | Symmetrical, layered images | Landscapes, portraits, architecture | Accessible, adds depth and interest |
| Silhouette | Low - depends on lighting | Any camera or smartphone | Dramatic, minimalistic subject shapes | Portraits, dramatic scenes | Emotional impact, simple to execute |
| Motion Blur | Moderate to high - timing and control | Tripod optional, camera with manual | Dynamic energy, movement depiction | Sports, action, abstract art | Conveys speed, artistic motion |
From Idea to Image: Your Next Creative Step
We have journeyed through ten distinct and powerful creative photo ideas, from the mind-bending illusions of forced perspective to the ethereal glow of light painting. Each technique offers a unique language for visual storytelling. These concepts are no longer gatekept by expensive equipment or years of technical training; they are accessible starting points for your next project, especially when amplified by AI.
The core takeaway is that inspiration is a launchpad, not a destination. The true magic happens when you move from passive reading to active creation. Whether you were captivated by the dramatic silhouettes, the dynamic energy of motion blur, or the dreamlike quality of double exposures, the next step is to translate that spark into a tangible asset.
Transforming Concepts into Campaigns
Think of these ideas not just as standalone photographic styles but as strategic frameworks. For a digital marketer, a single concept like levitation photography can become the basis for an entire social media campaign, generating hundreds of surreal, eye-catching images that stop the scroll. A small business owner can use tilt-shift effects to create charming, miniature-style product photos that stand out in a crowded marketplace. Educators can use these prompts to generate endless coloring pages or visual aids, making complex topics more engaging.
Key Insight: The value of these creative photo ideas lies in their adaptability. By combining them with your specific brand, message, or subject, you create something entirely new and resonant.
Actionable Steps to Ignite Your Creativity
To truly leverage the potential of these concepts, you must put them into practice. Here’s a simple, actionable path forward:
- Select Your Core Concept: Choose one or two ideas from this list that most align with your project’s goals or personal aesthetic. Is it the gritty, urban feel of smoke bomb photography or the serene beauty of reflection shots?
- Define Your Scene: Don't just prompt for "long exposure." Get specific. Describe the setting (e.g., "a neon-lit Tokyo street at night"), the subject ("a vintage sports car"), and the mood ("energetic, futuristic"). The more detail you provide, the more tailored your AI-generated results will be.
- Iterate and Refine: Generate a small batch of images. Analyze what works and what doesn’t. Perhaps the lighting needs to be softer, or the colors more vibrant. Use these insights to refine your prompts and generate a new, improved set.
Once you have your creative concept dialed in, the next crucial step is ensuring the final output is polished and professional. Learning a few foundational professional photography tips can elevate your results, helping you understand composition and lighting, even when applied to niche areas like tattoo photography or AI-generated art.
The ultimate goal is to build a robust library of unique, high-quality visuals that you can deploy across all your channels. By mastering the art of the creative prompt, you are no longer just a content creator; you become a visual architect, building worlds one image at a time. The barrier to entry for producing stunning, imaginative visuals has never been lower. Your biggest asset is your vision, and the time to bring it to life is now.
Ready to turn these creative photo ideas into a high-volume reality? With Bulk Image Generation, you can use these concepts as prompts to instantly create hundreds of unique, high-quality images for your marketing, branding, or creative projects. Stop brainstorming and start generating with Bulk Image Generation today.