
How to Create a Watermark for Photos That Protects Your Work

Aarav Mehta • December 28, 2025
Learn how to create a watermark for photos to protect your images and build your brand. This guide covers design, placement, and batch watermarking.
Protecting your digital photos starts with a simple, powerful step: learning how to create a watermark for photos. It’s the most direct way to claim ownership and discourage theft, turning your vulnerable files into branded assets. Think of it as your first line of defense in the digital world.
Why Watermarking Your Photos Is Non-Negotiable
In a world where a single right-click can get your work shared, repurposed, or straight-up stolen, a watermark is so much more than a signature. It’s a vital tool for copyright protection, a booster for brand recognition, and a clear statement of ownership over your creative work. Without one, your images are anonymous and ripe for the picking.

Picture this: a small e-commerce brand uses AI to generate a stunning batch of unique product photos. They post them online, and a few go viral. The problem? Without a watermark, competitors quickly download and use those same high-quality visuals to sell their own knockoffs. Suddenly, the original creator loses control, brand authority, and sales—all because their work was left unprotected.
This isn't just a hypothetical scenario. It’s a daily struggle for social media managers, photographers, and online businesses who pour time and money into creating visuals that pop. Your photos are a direct reflection of your brand's quality and effort; they deserve to be protected.
Visible vs. Invisible Watermarks
Your first big decision is choosing between two main types of watermarks. Your choice really depends on what you're trying to achieve—obvious branding or stealthy security.
- Visible Watermarks: These are what most people think of—a semi-transparent logo or text layered over the image. Their main job is to be a visible warning against theft while also promoting your brand.
- Invisible Watermarks: This is a more covert approach, also known as steganography. It embeds digital information directly into the image file itself. While you can't see it, this hidden data can be used to prove ownership if a dispute ever comes up.
For most creators, a well-designed visible watermark strikes the perfect balance between protection and promotion. It sends a clear message that the image isn't up for grabs.
Visible vs Invisible Watermarks At a Glance
Here’s a quick comparison to help you decide which type of watermark best suits your needs, from branding visibility to covert copyright protection.
| Feature | Visible Watermark | Invisible Watermark |
|---|---|---|
| Primary Goal | Brand promotion and theft deterrence | Copyright proof and ownership tracking |
| Appearance | Logo, text, or pattern overlaid on the image | Undetectable to the naked eye |
| Common Use Cases | Social media, e-commerce, portfolio websites | Legal evidence, high-value art, stock photography |
| Pros | Builds brand recognition, immediately discourages misuse | Doesn't alter image aesthetics, provides solid proof |
| Cons | Can be distracting, may be cropped or removed by thieves | Requires special software to detect, offers no deterrent |
Ultimately, visible watermarks are great for everyday brand building, while invisible ones are your ace in the hole for proving ownership down the line.
The need for this kind of protection is exploding. The global AI watermarking market, valued at USD 535.1 million in 2025, is projected to rocket to an incredible USD 5,104.4 million by 2035. This massive growth is fueled by the urgent need to protect AI-generated content—like the bulk images you can create in under 20 seconds on modern platforms.
Your watermark acts as a constant, silent ambassador for your brand. Every time your photo is shared, your brand gets exposure. It’s a simple yet powerful way to build recognition and drive traffic back to you.
While adding a visual mark is a huge step, it helps to understand the bigger picture of intellectual property. For a deeper dive into safeguarding all your creative assets, check out this comprehensive guide to protecting intellectual property rights. At the end of the day, applying a watermark is a proactive move that transforms your images from simple pixels into protected property.
Designing a Watermark That Enhances Your Brand
The best watermark is one that protects your work without stealing the show. It should feel like an intentional part of your brand, not some distracting sticker you slapped on at the last minute. A great watermark strikes a delicate balance, adding a professional touch while clearly saying, "This is mine."
Your approach will change depending on whether you go with simple text or a full-on logo. Each has its own playbook for looking clean, legible, and true to your brand. The goal is always the same: create something that enhances your beautiful images, not detracts from them.
Crafting a Professional Text Watermark
Putting a text watermark on your photos is more than just typing out your name. The choices you make—font, content, style—have a huge impact on how professional it looks and how well it works. Think of it as your digital signature; it needs to be clear and represent you.
A common and highly effective format includes your name or business, the copyright symbol (©), and the current year. This simple combo sends a clear, legally recognized message of ownership.
- © Your Brand Name 2024
- yourwebsite.com
- Photography by [Your Name]
The font you pick is critical. Stay away from overly decorative or script fonts that turn into an unreadable smudge when you scale them down. A clean, simple sans-serif font like Montserrat or Lato is usually a safe bet because it stays legible even when tucked into the corner of an image.
Pro Tip: Keep it simple. A busy watermark design just becomes a visual distraction. Its main jobs are protection and attribution, so clarity and subtlety should always be the priority. A clean design just blends in better.
Also, think about the font weight. A super thin font can easily get lost in a busy background, while an extra bold one can feel aggressive. A regular or medium weight usually hits that sweet spot for visibility without being overpowering.
Using Your Logo as a Watermark
If you already have a business logo, using it as a watermark is a fantastic way to build brand consistency. But hold on—not every logo is ready for watermark duty straight out of the box. A complex logo packed with fine details or multiple colors can quickly become an unidentifiable blob when shrunk down.
The secret to a great logo watermark is simplicity.
- Simplify Your Design: Think about creating a stripped-down or monochrome version of your main logo just for watermarking. This could mean using only the icon (logomark) or a streamlined version of the text (wordmark).
- Ensure Transparency: Your logo file absolutely must have a transparent background. A PNG file is the industry standard for this. Using a JPG with a solid white or black box around your logo looks amateurish and will ruin your photos' composition. Transparency lets the logo sit cleanly on the image.
- Monochrome is King: A single-color version of your logo—usually white, black, or gray—is the most versatile option by far. This ensures it’s visible against any background, whether your photo is light, dark, or has a mix of tones.
If you're just starting out and don't have a logo, plenty of tools can help you create a professional one in minutes. You can even use an AI logo generator to whip up a clean, simple design that’s perfect for watermarking and building your brand from the ground up.
Common Design Mistakes to Avoid
Knowing what not to do is just as important. A poorly designed watermark can make your work look amateurish and cheapen its quality. Just steer clear of these common mistakes, and your watermark will look polished every single time.
Avoid using loud, bright colors that clash with your photos. Stick to neutral tones like white, black, or a muted gray. And please, resist the urge to add drop shadows or other flashy effects; they usually just add visual clutter. The goal is for your mark to complement the image, not compete with it.
Where to Place Your Watermark (and How Visible to Make It)
You've got a great-looking watermark. Now for the tricky part: deciding where to put it and how much it should stand out. This is where a lot of people go wrong. A badly placed watermark can either be cropped out in two seconds or completely hijack the photo it’s supposed to be protecting. It's a balancing act, for sure, but a few simple strategies will make your watermark feel like a natural part of the image.
The classic move—sticking a logo in the bottom-right corner—isn't always your best bet. It’s clean and stays out of the way, but it's also the first place an image thief will look to crop. A smarter placement works with the photo's composition, guiding the eye where you want it to go while still doing its job.
Strategic Placement for Real Protection
Think of your photo like a map with busy cities and empty fields. If you place your watermark over a simple, clean area—like a clear blue sky or a solid wall—it can be edited out in seconds using basic clone tools.
Instead, place it over a complex or detailed part of the image. Think textured fabrics, a dense patch of leaves, or the intricate lines of a cityscape. This makes it a nightmare to remove cleanly without leaving obvious digital scars.
Here are a few common approaches I've seen work well:
- Corner Placement: Still the most popular and least distracting option. It keeps the focus on your subject but, as I mentioned, it’s the easiest to crop.
- Edge Placement: A little more secure. Placing your watermark along the middle of a vertical or horizontal edge makes cropping it out feel less natural, as it forces a more significant chunk of the image to be lost.
- Central Placement: This is your high-security option. A large, semi-transparent watermark right in the middle offers the strongest protection against misuse. I see this a lot with photographers sending proof images to clients before the final payment is made. It renders the photo unusable for anything else.
- Tiled Pattern: For ultimate protection, a repeating pattern of your watermark across the entire photo is nearly impossible to scrub away. This is overkill for most, but it’s perfect for high-value stock photos or digital art where preventing theft is the absolute number one priority.
This decision tree can help you nail down whether a text or logo-based approach is the right starting point for you.
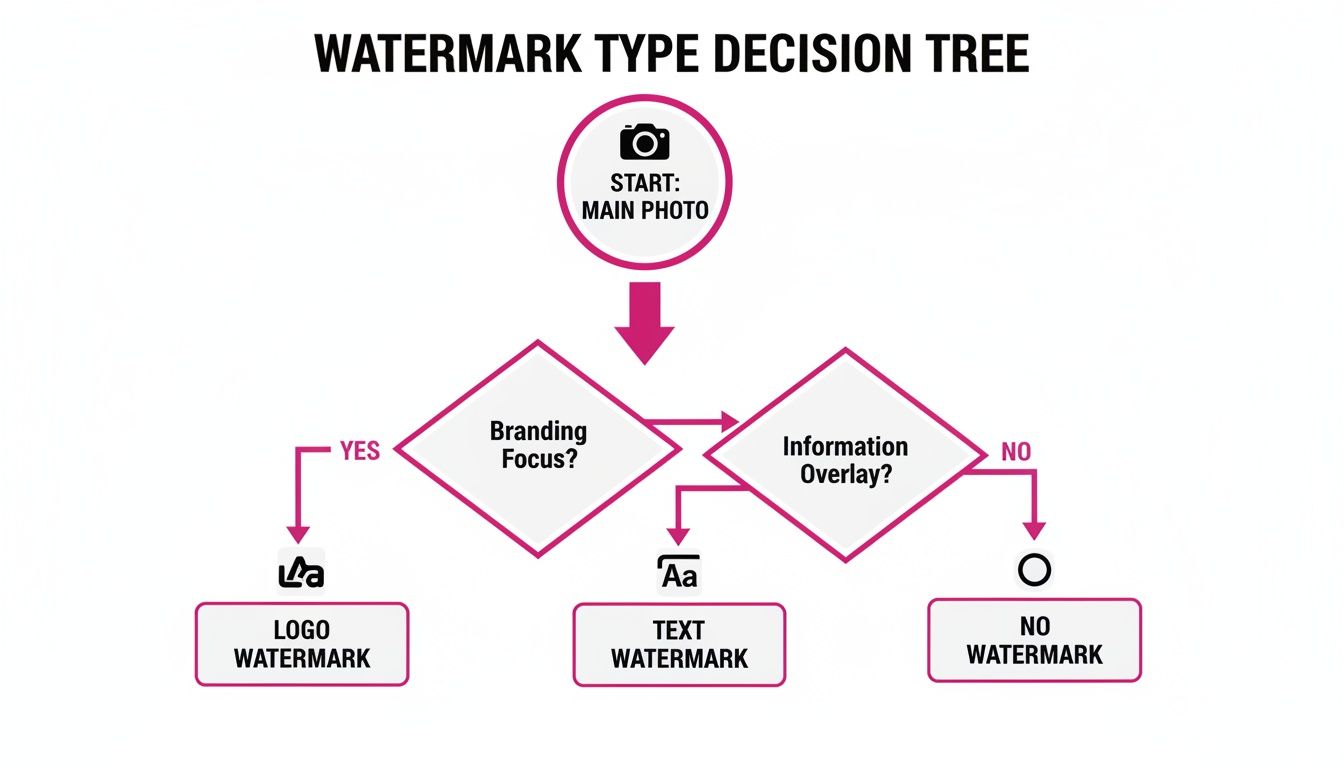
As you can see, your choice from the get-go—whether you have a logo ready or just need a simple text signature—shapes the entire process.
Finding the Sweet Spot for Opacity and Size
Opacity is just a fancy word for how transparent your watermark is. If it's too opaque, it overpowers your photo. Too transparent, and it’s basically invisible and useless.
From my experience, a good starting point is an opacity between 20% and 40%. This range usually makes the watermark noticeable enough to stake your claim but subtle enough that it doesn't become the main event.
The goal is deterrence, not distraction. A successful watermark protects your image without screaming for attention. It should complement the photo, not compete with it.
Size is just as critical. A watermark should be big enough to read easily but not so big that it covers up the best parts of your shot. As a general rule, try to keep it from taking up more than 5-10% of the total image. This ensures it's present but doesn't feel like an ad slapped on top of your art.
Keeping your watermark size consistent across all your images is also a huge part of building a recognizable brand. You can dive deeper into this by exploring how to create a brand kit for consistent image generation.
One Size Doesn't Fit All
There’s no single perfect setting for placement, size, or opacity. The right combination is different for every photo and every goal.
For instance, a wedding photographer might use a delicate, light-gray text watermark at 25% opacity tucked over a detailed part of the bride's dress, preserving the romantic mood.
On the other hand, an e-commerce brand showing off a new product against a plain white background might use their logo at a bolder 40% opacity to reinforce their brand. These small tweaks matter—some studies have shown that well-placed, visible watermarks can cut down on unauthorized use by as much as 65%.
The best advice I can give is to experiment. Play around with different positions and settings for each photo. Take a minute to see what feels right with the composition. Over time, you’ll get a feel for what looks best and provides the right amount of protection for your work.
Alright, theory is one thing, but getting your hands dirty is where the real learning happens. Let's walk through the process of adding a watermark to a single photo using any standard, layer-based editing software. This is your crash course in turning a vulnerable image into a branded, protected asset.
We're going to keep it simple and focus on the core moves. It doesn't matter if you're a photographer trying to protect a new landscape shot or a small business owner securing a website banner—these steps are universal. My goal here is to make this feel intuitive, not like a technical chore.
Getting Your Workspace Ready
First up, pop open your main photograph in whatever editing program you're using. Make sure you're working with the high-resolution, original file. You never, ever want to work on a low-quality copy.
With your photo on the canvas, the next step is to bring in your watermark.
Your watermark should be a separate file, and I can't stress this enough: it needs to be a transparent PNG. This is non-negotiable. The PNG format lets your logo or text sit cleanly on the photo without that ugly white or black box around it. You'll add this file as a brand-new layer right on top of your main image.
- Open your primary photograph.
- Import or Place your watermark file (like
my-logo.png). - Check that the watermark is on its own layer, sitting above the photo layer.
This layer separation is the secret to non-destructive editing. It gives you total freedom to move, resize, and tweak the transparency without permanently messing up the original picture underneath. It's a fundamental part of a professional workflow.
Positioning and Fine-Tuning Your Watermark
Now for the fun part. Since your watermark is on its own layer, you're in complete control. Drag it around the canvas and test out different spots. Remember the strategic placement ideas we talked about earlier? Try placing it over an area with a bit of texture or detail; this makes it much harder for someone to just clone it out.
Next, you'll want to dial in the size and opacity. The goal is a watermark that does its job without screaming for attention.
My two cents: The rookie mistake is making the watermark huge and loud. Trust me, subtlety is almost always more professional and effective. A well-placed, semi-transparent mark feels like it belongs there, instead of being slapped on as an afterthought.
Find the opacity slider for your watermark layer—it’s usually in the layers panel. I’ve found that a good starting range is somewhere between 20% and 40%. This is usually enough to be a deterrent without overpowering your actual photo. Play around with it until it just feels right. Do the same with the size—make sure it’s legible but not covering up the best parts of your image.
Finalizing and Exporting
Once you’re happy with how the watermark looks, it's time to merge the layers and save your work. Merging (or "flattening") basically bakes the watermark into the photo, creating a single, final image. This step can't be undone, which is why you must save the result as a new file.
Do not, under any circumstances, overwrite your original, un-watermarked photo. Keep that pristine original safe.
When you're ready to export, the file format you pick is important.
- For anything on the web (social media, your blog, etc.), save it as a JPEG. A quality setting around 80-90% usually gives you a great balance between a small file size and crisp visuals.
- If for some reason you need to keep the transparency, PNG is your go-to, but just know the file will be bigger.
And that's it! By following this simple flow—open, layer, position, adjust, and export—you’ve just protected your work. This single-image method is the foundation for everything else, one picture at a time.
How to Watermark Photos in Bulk and Save Hours
Adding a watermark to one photo is easy enough. But a hundred? Or a thousand? Let's be real—manually watermarking an entire gallery is a soul-crushing task that tanks your productivity. Whether you're a photographer delivering a client's wedding album, an e-commerce manager prepping a new product line, or a social media pro scheduling content, this is where batch processing becomes your best friend.
Applying your watermark to an entire library of photos at once transforms a multi-hour chore into a task that takes just a few clicks. Instead of the repetitive cycle of open, place, adjust, save, and repeat, you simply set up a reusable action. This guarantees every single image gets the same professional, consistently placed watermark, saving you a ridiculous amount of time and effort.
What Exactly Is Batch Processing?
Batch processing is just a fancy way of saying you apply the same set of edits to a bunch of files all at once. For watermarking, it means you decide on your watermark's look and placement once, then tell your software to apply those exact settings to an entire folder of images.
Think of it like an assembly line for your photos. You set up the machinery (your watermark rules), and then you just let it run. This doesn't just save time; it ensures brand consistency, which is absolutely critical for building a recognizable online presence. A watermark that's a few pixels off or slightly more transparent from one photo to the next looks sloppy, and batch processing completely eliminates that risk.
Modern batch editors give you a great visual interface to manage this, letting you apply edits across tons of images in one go.

This kind of setup lets you see your changes in real-time on a sample image before you commit them to the entire batch, giving you total control over the final look.
Building Your Bulk Watermarking Workflow
Getting a batch watermarking process up and running follows the same general idea, no matter what tool you’re using. The core concept is to "record" what you do to one image and then "play it back" across all the others.
Here's the usual flow:
- Pick Your Tool: First, choose a software or online platform that supports batch editing. Many modern image editors have this built-in, often calling it "Actions," "Presets," or "Batch Process."
- Dial In Your Settings: Open a single, representative photo from your set. Add your transparent PNG watermark, stick it exactly where you want it, and get the size and opacity just right.
- Save Your Action: Now, use your tool’s function to save these steps as a reusable action or preset. Give it a memorable name like "Blog Post Watermark" or "Client Proof Watermark."
- Run the Batch: Finally, select the entire folder of images you need to watermark. Apply your new preset and—this is important—tell the software to save the new files in a separate output folder. This keeps your originals safe and untouched.
Pro Tip: Always, always apply bulk watermarks to copies of your photos, never the originals. This is called a non-destructive workflow. It protects your master files so you can use them later for something else without a permanent watermark burned in.
For maximum efficiency, you can fold this task into broader content batching strategies to seriously streamline your entire workflow. Why stop at watermarks? You can batch resize, rename, and optimize images all in a single pass. A dedicated bulk image resizer is perfect for handling multiple edits at once.
AI Is Making This Even Easier
The whole process is getting even smarter with the help of AI. Some of the more advanced tools now let you handle watermarking intelligently during the image generation phase itself.
For example, platforms that integrate with OpenAI can automatically apply watermarks as you generate images in bulk. You can just describe what you need in plain English—like "add my logo as a subtle watermark to the bottom right"—and the AI handles the placement and application for you. This approach can easily cut your manual editing time in half and is similar to the strategies big players like Meta and Google use to protect images at scale.
Common Questions About Photo Watermarking
Even with a solid game plan, you’re bound to have questions when you first start watermarking photos. It’s normal. Getting the hang of image protection can feel a little tricky, but the good news is, most creators hit the same speed bumps. Let's clear up some of the most common questions with some straight, practical answers.
Think of this as your cheat sheet for making smarter decisions about protecting your work. Once we tackle these common sticking points, you'll have a much clearer strategy for branding and protecting your images.
Can a Watermark Be Removed From a Photo?
Let's be honest: yes, a determined person with the right software can probably remove your watermark. But here's the thing—the real purpose of a watermark isn't to be some unbreakable digital lock. It's about being a powerful deterrent. A casual content thief is just looking for the easiest possible target.
When they stumble upon an image with a well-placed watermark, especially one that overlaps a detailed part of your photo, they know it’s going to be a real pain to remove. That extra effort is almost always enough to make them give up and find an unprotected image instead.
Your watermark isn't a vault; it's a very visible security camera. It sends a clear signal that this property is monitored, making would-be thieves think twice.
A watermark slapped on a solid-colored background, like a clear blue sky? That’s pretty easy to edit out. But one that's carefully placed over complex patterns, hair, or facial features? That becomes a huge headache to remove cleanly and often leaves behind ugly digital artifacts that just ruin the image.
Does Adding a Watermark Reduce Image Quality?
This is a huge misconception. The act of placing the watermark itself does absolutely nothing to degrade your original photo's quality. The real culprit behind quality loss is almost always the saving or export process, especially if you're using a compressed file format like a JPEG.
Every single time you re-save a JPEG, the file gets compressed a little bit more, which can slowly chip away at its quality. The trick is to follow a non-destructive workflow to avoid this trap completely.
Here’s how to keep your quality pristine:
- Start with Your Best: Always, always begin with your highest-resolution original file.
- Work in Layers: Apply your watermark on its own separate layer. This lets you make all the adjustments you want without ever touching the actual image underneath.
- Export a New Copy: Never save over your original. Instead, export a brand-new, watermarked version of the photo. Aim for high-quality export settings—a JPEG quality level between 80-90% is usually the perfect balance between file size and image clarity.
By never overwriting that master file, you keep it in perfect condition for any future use, while your watermarked copy is ready to go online.
Should I Watermark Every Photo I Post Online?
The answer really comes down to your goals and the kind of images you're sharing. This is more of a strategic decision than a hard-and-fast rule. You have to weigh the need for protection against the context of where you're posting the photo.
As a good rule of thumb, you should definitely watermark any image that has commercial value, is part of your professional portfolio, or is something you absolutely would not want someone else using without your permission.
Here’s a simple way to think about it:
- Professional Work: If you're a photographer, artist, or designer, watermarking every piece you show online is non-negotiable. It's about both protection and branding.
- E-commerce and Business: Any product photos or marketing visuals for your business need to be watermarked. The last thing you want is a competitor snagging your images.
- Personal Photos: For casual snapshots you're sharing with friends and family on a private social media profile, a watermark is probably overkill and might just look out of place.
Remember, consistency is everything for brand recognition. If you're a pro, using the same style of watermark across all your public-facing work helps build a cohesive and instantly recognizable brand identity.
What Is the Difference Between a Watermark and a Logo?
This one trips up a lot of people, but the distinction is actually pretty simple. A logo is a specific graphic, symbol, or emblem that identifies a company. A watermark, on the other hand, is any identifying text or image placed on a photo to claim ownership.
In other words, your logo can be used as a watermark, but not all watermarks are logos.
A watermark can be almost anything:
- A simple text signature (like "Photography by Jane Doe")
- A copyright notice (e.g., © Your Brand 2024)
- Your website URL (yourwebsite.com)
The real difference is their main job. A logo’s primary function is brand identity—it's the visual handshake of your business. A watermark's primary function is image protection and attribution—it stakes your claim of ownership right on the asset itself. Using your logo as your watermark is a brilliant move because it does both jobs at the same time.
Ready to create stunning, protected images without all the manual work? Bulk Image Generation lets you generate up to 100 professional-quality visuals in seconds and apply edits—including watermarks—across your entire batch with just a few clicks. Stop wasting time and start creating at scale by visiting us at https://bulkimagegeneration.com.