
Optimal Image Resolution for Print: Tips for Perfect Quality

Aarav Mehta • September 3, 2025
Learn the ideal image resolution for print. Discover tips on DPI vs. PPI and ensure professional results with our easy-to-follow guide.
Ever sent a beautiful photo to the printer, only to get back something fuzzy, blocky, and just plain disappointing? It’s a super common frustration, and it almost always comes down to one thing: image resolution.
Getting this right is the absolute foundation of any print project. Whether it's a tiny business card or a massive poster, the secret to professional quality lies in the data you start with.
The Secret to Perfect Print Quality
The magic number you'll hear over and over again in the printing world is 300 DPI, which stands for Dots Per Inch. Think of it as the gold standard. Hitting this target ensures your photos and designs come out looking crisp, clear, and professional—no weird pixelation in sight.
This standard has been around for a long time because it strikes the perfect balance between incredible print clarity and file sizes that won’t crash your computer.
So, what does that look like in practice? For a standard 8x10 inch print, you'd need a digital file that is 2400x3000 pixels to achieve that beautiful 300 DPI quality. Sure, a museum printing a fine art piece might push it to 600 DPI, but for almost everything else you'll ever need, 300 is your number.
Why Resolution Matters So Much
Let's break it down with an analogy. Imagine your digital image is a mosaic made from thousands of tiny colored squares. Those squares are your pixels.
The more pixels you can pack into every inch of paper, the smoother and more detailed your printed image will be. If you don't have enough pixels for the size you want to print, the printer is forced to stretch those little squares, making them bigger and more obvious. That's when you get that dreaded blocky, pixelated mess.
A great print starts with great data. Sending a low-resolution file to a printer is like asking a chef to make a gourmet meal with subpar ingredients—the final product will always be limited by its source.
This concept is a cornerstone of mastering book design and layout and applies to just about any print project you can imagine.
Ready for a shortcut? Here's a quick cheat sheet to help you figure out the exact pixel dimensions you need for the most common print sizes.
Quick Guide to Print Size and Required Pixels at 300 DPI
Use this table as your go-to reference. Just find the size you want to print, and you'll know the minimum pixel dimensions your digital file needs to have for a high-quality result.
| Print Size (Inches) | Required Pixel Dimensions (Width x Height) |
|---|---|
| 4 x 6 | 1200 x 1800 pixels |
| 5 x 7 | 1500 x 2100 pixels |
| 8 x 10 | 2400 x 3000 pixels |
| 8.5 x 11 | 2550 x 3300 pixels |
| 11 x 14 | 3300 x 4200 pixels |
| 16 x 20 | 4800 x 6000 pixels |
| 18 x 24 | 5400 x 7200 pixels |
| 24 x 36 | 7200 x 10800 pixels |
Bookmark this page or save this table! It's a lifesaver that will help you avoid the headache of a bad print run by ensuring your files are properly prepared from the very beginning.
Pixels vs. Printers: Decoding the Language
When you're prepping an image for print, you'll inevitably run into two acronyms that cause a world of confusion: PPI and DPI. People throw them around like they mean the same thing, but they absolutely don't. Getting this right is the first step to making sure what you see on your screen is what you get on paper.
What’s the Real Difference?
Think of Pixels Per Inch (PPI) as the language of your screen. It's a digital measurement, telling you how many pixels are crammed into one inch of your image file. A high PPI means your photo is packed with data, which translates to a sharp, detailed picture on your monitor. This is the raw material, the digital DNA of your image.
Then you have Dots Per Inch (DPI), which is the language of your printer. This is a physical measurement. It describes how many tiny dots of ink a printer can physically squeeze onto a one-inch line of paper. The printer’s job is to look at your digital pixels (PPI) and translate them into a pattern of ink dots (DPI) to recreate the image in the real world.
Bridging the Gap From Screen to Paper
Here’s a classic mistake I see all the time: someone takes a low-quality, 72 PPI image from the web, opens it in Photoshop, changes the PPI value to 300, and expects it to magically become print-ready.
It doesn't work. All you've done is tell the software to stretch the existing pixels over a smaller area—you haven't actually added any new information. It's like trying to make a small, pixelated photo bigger by just zooming in. The image just gets blurry and jagged.
For a print to look sharp, the original digital file needs enough pixel data to begin with. When you send a true 300 PPI file to a printer, it has a rich blueprint to work from. The machine can then create a dense, detailed pattern of ink dots, giving you that crisp, professional finish. This concept is mission-critical for everything from simple flyers to more complex projects, like the kind of high-quality images you'd create for AI product photography where every detail matters.
The bottom line is simple: High PPI on your screen is what makes high DPI on paper possible. You can't get professional quality print without having enough digital data to start with.
Of course, the file is only half the battle. The printing method itself plays a huge role. Sending a perfect file to a cheap thermal printer will still yield cheap-looking results. That's why it's also worth understanding the pros and cons of direct thermal printing compared to other methods like inkjet or laser. Knowing your final destination helps you prepare the files perfectly for the journey.
Why the 72 PPI Web Myth Will Ruin Your Prints
You’ve probably heard it a thousand times: "Save your images at 72 PPI for the web." It's one of those old-school rules that just won't die, but let me be clear: following that advice for a print project is a recipe for disaster. It’s a guaranteed way to get blurry, pixelated prints that look completely unprofessional.
This isn’t just a small mistake. It’s the difference between a sharp, vibrant product and a fuzzy mess.
So where did this stubborn myth come from? We have to go back to the mid-1980s and the very first Apple Macintosh. Its 9-inch screen had a resolution of exactly 72 pixels per inch, which conveniently lined up with their ImageWriter printer's 144 dots per inch. This created a clean, simple 2:1 ratio between what you saw on screen and what came out on paper. It was a neat trick for its time, but that time was almost 40 years ago.
The Screen vs. Paper Disconnect
Here’s the problem: that 72 PPI standard was designed for a specific piece of hardware that’s now a museum piece. Today’s high-resolution screens and professional printers are worlds apart in terms of technology. Your screen can display a 72 PPI image just fine because it’s a digital display, but paper is a physical medium that demands a lot more data to look good.
A 72 PPI file simply doesn’t have enough pixel information for a modern printer. When you send it to print, the printer is forced to guess and stretch each pixel, which results in that blocky, amateur look we all want to avoid.
Think of it like trying to build a detailed Lego castle using only giant Duplo blocks. You just don't have the small, fine pieces you need to create anything intricate. The same logic applies here, especially when you're working on projects where detail is everything.
If you’re generating visuals that need to look crisp and professional, you have to start with a high-resolution file built for the physical world, not the digital one. For more on this, check out our guide on how to create stunning digital product images using AI generators.
When to Break the 300 DPI Rule
While 300 DPI gets thrown around as the gold standard for high-quality prints, it's not some universal law you can never break. Think of it less as a rigid rule and more as a super helpful starting point. The real secret to the perfect print resolution comes down to two things: how far away someone will be when they look at it, and what you're printing on.
Getting a feel for this flexibility is what separates the pros from the amateurs.
Take a massive billboard on the side of a highway. It doesn’t need anywhere near the same pixel density as a glossy art book you’re holding inches from your face. From that distance, your brain does all the heavy lifting and blends the dots together, making an image at 30 DPI—or even lower—look perfectly sharp.
On the flip side, a super-detailed print meant for close inspection might need to push beyond 300 DPI to really pop.
Resolution and Viewing Distance
The core idea is incredibly simple: the farther away the viewer is, the lower the DPI you actually need. Your brain naturally fills in the visual gaps from a distance, so you can get away with fewer dots per inch to create that illusion of a crisp, high-quality image.
This plays out across all kinds of print projects.
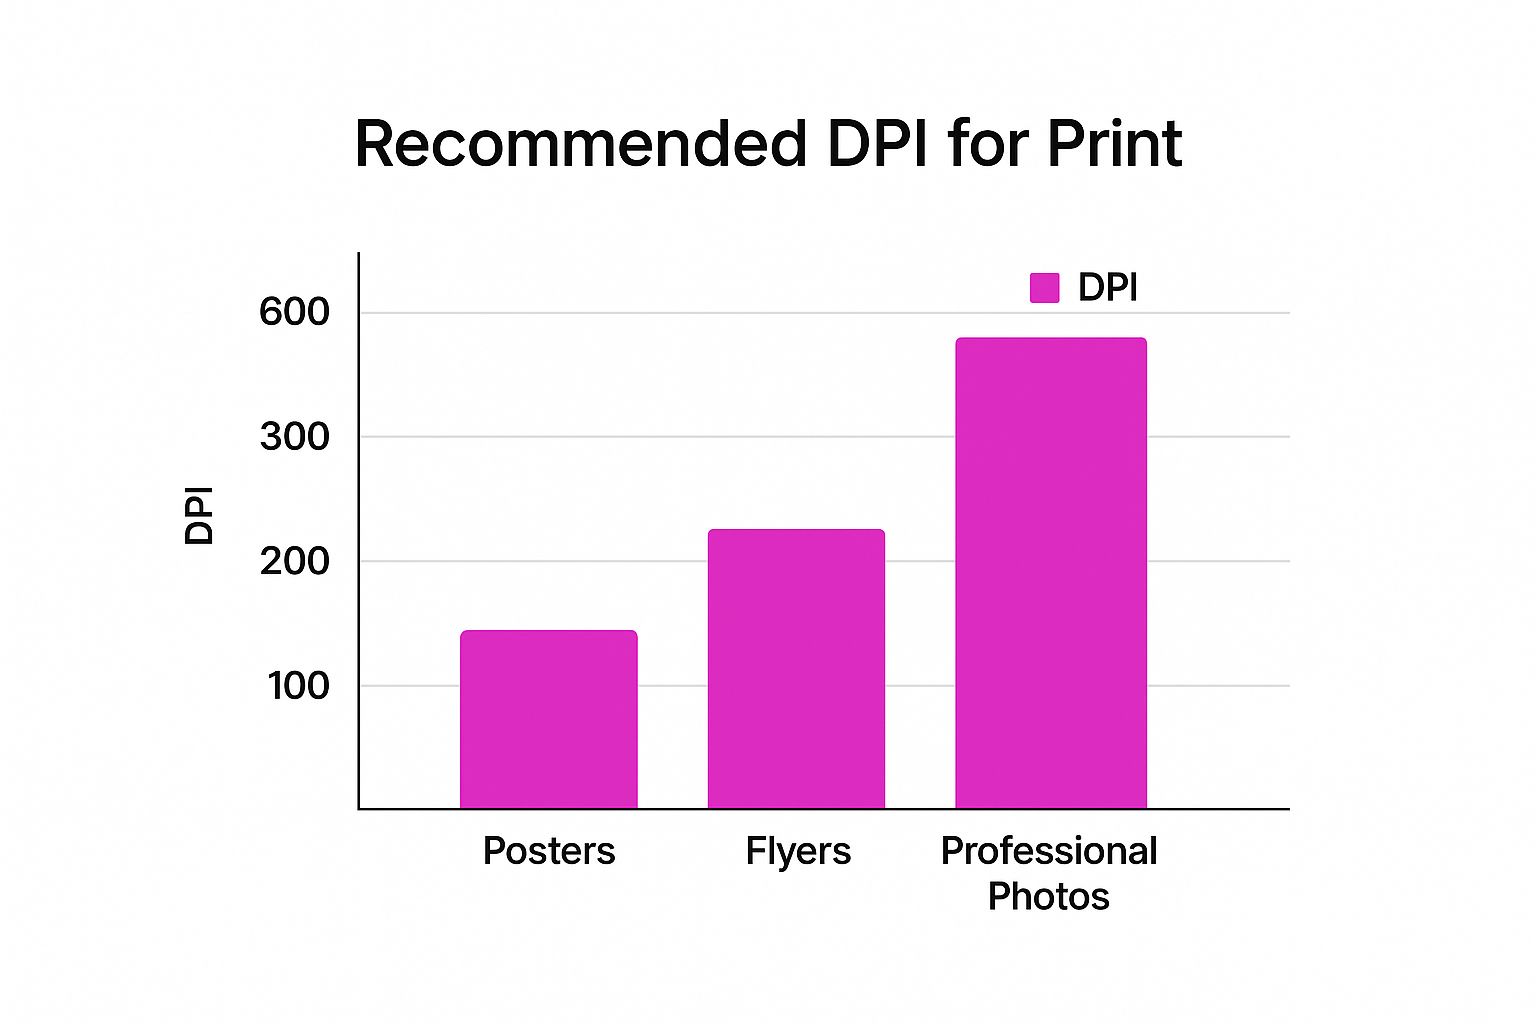
- Close-Up Viewing: For things people hold in their hands—like brochures, flyers, and professional photos—sticking to 300 DPI (or even a bit higher) is non-negotiable. This is where every detail counts.
- Mid-Range Viewing: Think about a poster on a wall. You're usually looking at it from a few feet away, right? For that, you can often drop down to 150-200 DPI and it will still look fantastic, plus your file size will be much more manageable.
- Distant Viewing: This is the billboard category. Large-format items like trade show banners or signage viewed from across a room can get by with resolutions as low as 30-100 DPI.
The relationship between how an object is viewed and the DPI it needs is a crucial concept for anyone preparing images for print.
To make this crystal clear, here’s a breakdown of common print types and the DPI ranges that work best for their typical viewing distances.
Optimal DPI by Print Type and Viewing Distance
| Print Type | Typical Viewing Distance | Recommended DPI Range |
|---|---|---|
| Business Cards & Flyers | Less than 2 feet | 300 - 600 DPI |
| Magazines & Books | Less than 2 feet | 300+ DPI |
| Posters & Wall Art | 2 - 5 feet | 150 - 250 DPI |
| Banners & Signage | 5 - 20 feet | 75 - 150 DPI |
| Billboards | 50+ feet | 20 - 50 DPI |
As you can see, the required pixel density drops off dramatically as the viewer gets farther away. A business card needs to be razor-sharp, but a billboard just needs to look good from a moving car.
The material you print on also changes the game. A glossy magazine page can hold a lot of detail, but newspaper is much more absorbent and porous. That's why newspapers often print at a lower 200 to 250 DPI. For something with super crisp edges, like detailed line art, you might even need to crank it up to 400 to 600 DPI. You can dive deeper into how different print mediums affect resolution over at prepressure.com.
Your Pre-Print Quality Checklist
Alright, let's turn all that theory into action. This is the final, crucial step to getting prints that look just as good on paper as they do on your screen.
Think of this as your pre-flight check. Running through these steps before sending anything off to the printer can save you a world of headaches—not to mention the cost of a botched print run. Each step here builds on the last, getting your file from a digital asset to a print-ready masterpiece.
First Things First: Check Your Pixel Dimensions
Before you even think about color or file types, look at the raw pixel count. Is your image big enough for what you want to print at 300 DPI?
For a standard 8x10 inch print, that means your image needs to be at least 2400 x 3000 pixels. If you start with a smaller image, you’re setting yourself up for a soft, blurry result. There’s no magic wand to create detail that isn't there.
Got a whole batch of images to get ready? Doing this one by one is a recipe for boredom. A good bulk image resizer can knock this out for you in minutes, saving a ton of time.
Set the Right Color Mode and File Format
Next up, color space. Your screen speaks RGB (Red, Green, Blue), but printers speak CMYK (Cyan, Magenta, Yellow, Key/Black). It's a critical translation. If you send an RGB file to a professional printer, their software will convert it, and you might get some nasty surprises with your colors. Always convert to CMYK yourself so you know what you're getting.
The format you save your file in is just as important for keeping that quality locked in.
- TIFF (Tagged Image File Format): This is the undisputed king for print quality. It uses lossless compression, which is a fancy way of saying it doesn't throw away any pixel data to save space. The files are huge, but it's worth it.
- JPEG (Joint Photographic Experts Group): Only use a JPEG for print if you absolutely have to. When you do, make sure you save it at the highest possible quality setting (100% or 12). JPEGs use "lossy" compression, so you lose a little bit of quality every time you save.
Pro Tip: Never, ever edit and re-save the same JPEG over and over. Each save degrades the image a little bit more. Always work from your original high-quality file (like a TIFF or PSD) and only save as a JPEG at the very end.
Configure Bleed and Margins
Finally, let's deal with the physical world of printing. Paper shifts, and trimming machines aren't always perfect down to the micrometer. To prevent ugly white slivers along the edge of your finished print, you need to add a bleed.
This just means you extend your image or background color slightly past the final trim line—usually by 0.125 inches (or 3mm) on every side. That extra bit gets trimmed off, leaving you with a perfect edge-to-edge design.
Just as important is the "safe zone." Keep your important text, logos, or faces well inside the trim line. This ensures nothing critical gets chopped off during trimming. It's the final touch that guarantees a professional, polished result.
Common Questions About Image Resolution
Diving into the world of image resolution for print can feel like learning a new language. A few common questions always pop up, and getting them sorted makes the difference between a frustrating print job and a fantastic one. Let's clear up some of the most frequent head-scratchers.
Think of this as the cheat sheet that will build your confidence and get you ready for any print project that comes your way.
Can I Just Make a Low-Resolution Image High-Resolution?
You've probably heard of upsampling—using software to increase an image's DPI. The problem is, you can't magically create detail that wasn't there to begin with. The software is essentially guessing what those new pixels should look like, which almost always leaves you with a soft, blurry, or weirdly artificial-looking image.
Sure, modern AI upscaling tools are lightyears ahead of older methods, but even they can't perfectly replicate an image that was captured in high resolution from the start.
The golden rule of printing has always been this: start with an image that has more pixels than you need. You can always scale down without losing quality, but you can never truly scale up.
What's the Difference Between Image Size and File Size?
These two get mixed up all the time, but they measure completely different things. Getting this straight is fundamental.
- Image Size is all about the dimensions in pixels (like 3000 x 2400 pixels). This is what dictates how large you can physically print the image while keeping it sharp at 300 DPI.
- File Size is simply how much space the file eats up on your hard drive, measured in megabytes (MB). This is influenced by the pixel dimensions, but also by the file format (an uncompressed TIFF is a beast compared to a JPEG) and how complex the image is.
A good, print-ready high-resolution image is naturally going to have a larger file size. It's just part of the deal.
How Does My Camera's Megapixel Count Affect Print Quality?
This is where it all begins. Your camera's megapixel count is directly tied to print quality because it determines the total number of pixels your camera can capture in a single shot. More megapixels mean larger pixel dimensions right out of the gate, giving you the freedom to print bigger without sacrificing that crisp detail.
For instance, a 24-megapixel camera will give you an image around 6000 x 4000 pixels. That’s plenty of data to create a stunning 20 x 13.3-inch print at 300 DPI. On the other hand, a 12-megapixel camera is still fantastic, but it's better suited for top-quality prints up to about 14 x 9.3 inches.
Ready to create stunning, high-resolution images for your next project without the hassle? Bulk Image Generation uses powerful AI to generate hundreds of print-ready visuals in seconds. Start creating for free at bulkimagegeneration.com.