
Top Creative Photography Ideas to Elevate Your Shots in 2025

Aarav Mehta • August 16, 2025
Discover innovative creative photography ideas to inspire your next shoot. Perfect for capturing stunning images in 2025. Click to learn more!
Feeling stuck in a creative rut? The world of photography is brimming with innovative techniques that can transform ordinary scenes into extraordinary works of art. This guide explores a curated list of creative photography ideas, blending classic methods with modern twists, including how AI can accelerate your workflow and unlock new visual possibilities. We'll move beyond generic advice to provide actionable steps, specific examples, and expert tips for each concept.
Whether you're a seasoned professional looking for fresh inspiration or a hobbyist eager to experiment, these ideas will challenge you to see the world through a new lens and capture images that truly stand out. From defying gravity with levitation shots to painting with light using long exposures, each technique offers a unique way to express your vision.
We'll also touch on how tools like Bulk Image Generation can help conceptualize and refine these concepts, turning a spark of inspiration into a full-fledged creative project. For a broader range of visual concepts that go beyond specific techniques, you can explore additional creative Instagram content ideas to further boost engagement and brand storytelling. This collection is your starting point for creating compelling, memorable photographs that captivate your audience.
1. Levitation Photography
Levitation photography is a captivating technique that creates the illusion of subjects floating, flying, or defying gravity. This effect can be achieved through two primary methods: capturing a subject mid-jump with a fast shutter speed or by using composite photography to digitally remove props and supports in post-production. It's one of the most visually stunning creative photography ideas for adding a surreal, magical quality to your images, making it perfect for fashion editorials, conceptual art, and dynamic brand campaigns.

This technique transforms an ordinary scene into something extraordinary, immediately grabbing the viewer's attention. Artists like Natsumi Hayashi, known for her "Today's Levitation" series, popularized the jump method, while creators like Ravshaniya use elaborate props and composites to build whimsical, floating worlds.
How to Implement Levitation Photography
For the composite method, the process involves two key shots. First, capture your subject positioned on a stool, box, or ladder. Second, without moving the camera, take another photo of just the empty background. In an editing program like Adobe Photoshop, you layer the two images and use a layer mask to erase the prop, revealing the clean background underneath and creating a seamless floating effect.
Actionable Tips for Success
- Fast Shutter Speed: Use a shutter speed of at least 1/250s, or faster, to freeze motion and prevent blur, especially when capturing jumps.
- Use Burst Mode: When shooting a jumping subject, burst mode captures a rapid sequence of photos, increasing your chances of getting the perfect airborne pose.
- Low Camera Angle: Shooting from a lower angle enhances the illusion of height, making the subject appear to be floating higher than they actually are.
- Tripod is Essential: For composite shots, a tripod is non-negotiable. It ensures both your subject photo and your background plate are perfectly aligned for easy editing.
2. Long Exposure Light Painting
Long exposure light painting is a creative photography idea that uses a slow shutter speed to capture the movement of light sources as luminous trails and abstract patterns. While the camera's shutter is open, artists move lights like flashlights, LEDs, or even sparklers to "paint" designs into the frame, turning a dark scene into a vibrant canvas. This technique is perfect for creating unique portraits, abstract art, and striking commercial visuals that command attention.
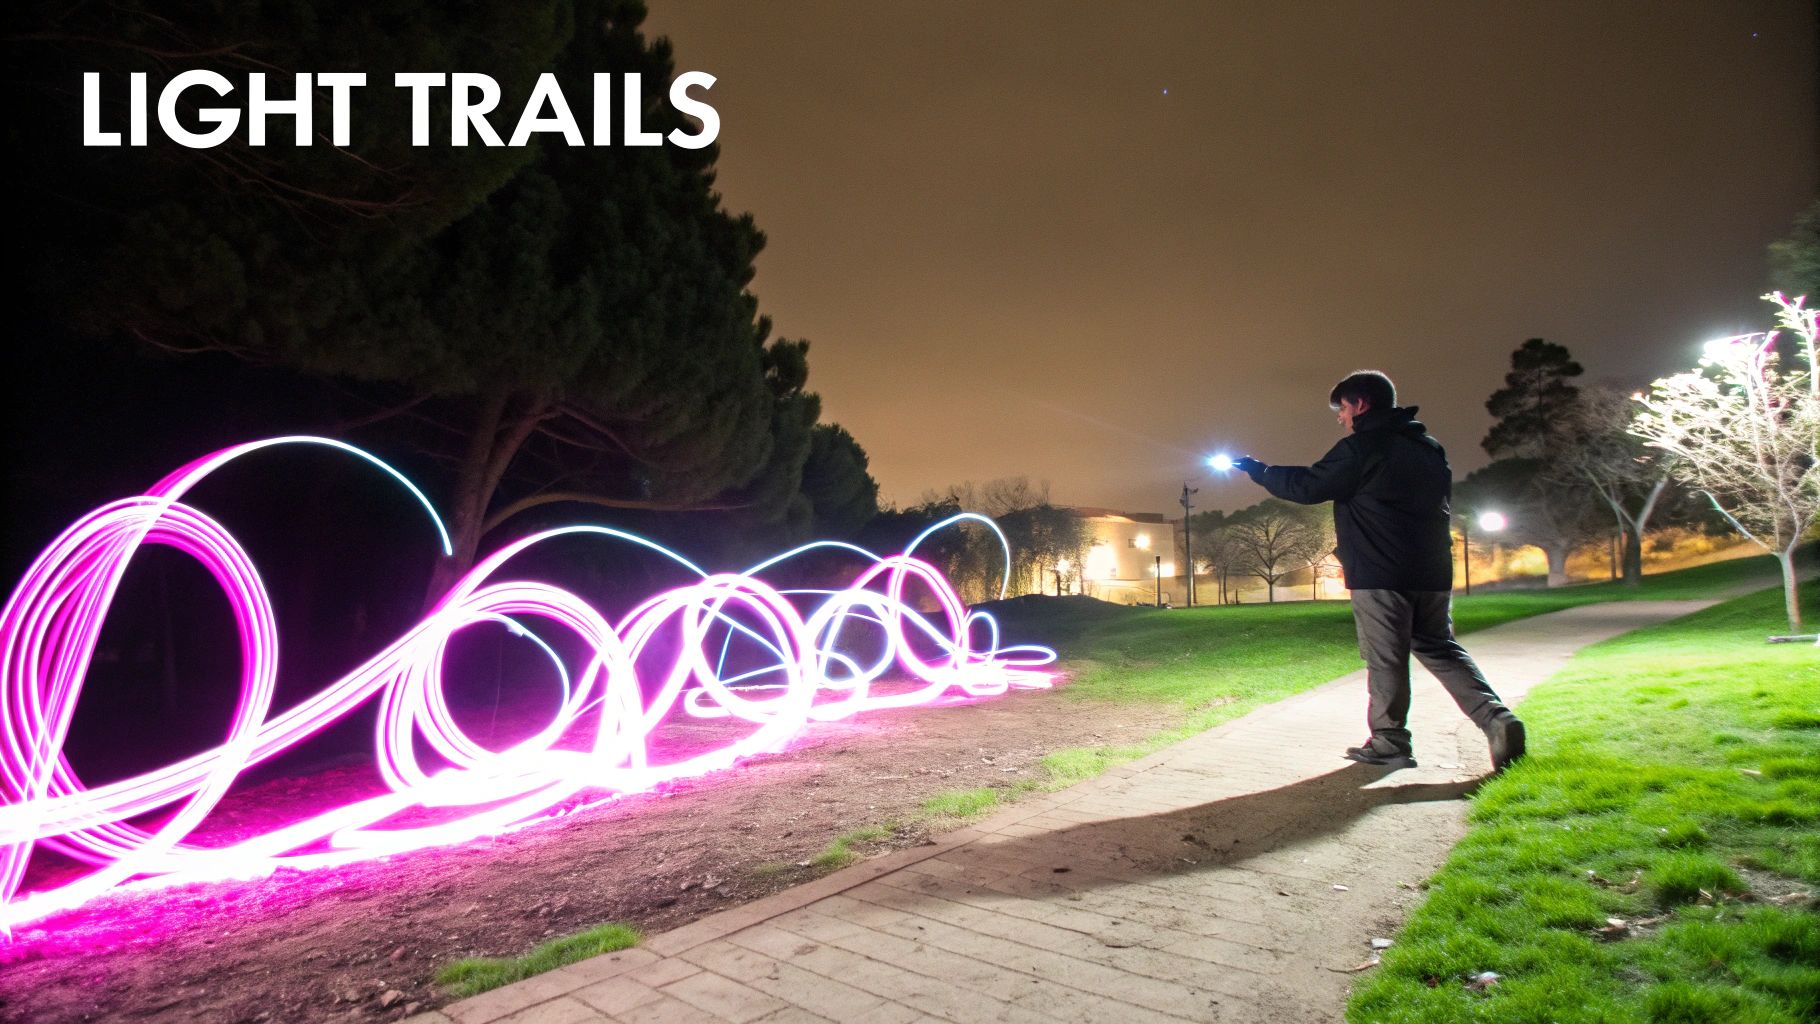
This method transforms darkness into an opportunity for expression, producing images that are impossible to see with the naked eye. Artists like Denis Smith and Darren Pearson have popularized the technique, creating everything from ethereal light orbs in landscapes to intricate, glowing characters that interact with their environment.
How to Implement Long Exposure Light Painting
To begin, find a dark location and place your camera on a sturdy tripod. Set your camera to manual mode, select a long shutter speed (start with 15-30 seconds), and use a small aperture (like f/8 or f/11) to ensure sharpness. Once you trigger the shutter, you or a subject can move through the scene with your chosen light source, drawing shapes and patterns in the air before the shutter closes.
Actionable Tips for Success
- Manual Focus is Key: Autofocus will struggle in the dark. Set your focus manually on your subject or a specific point before you begin shooting.
- Wear Dark Clothing: If you are the one painting with light, wear dark, non-reflective clothing to avoid appearing as a ghostly blur in the final image.
- Use Various Light Sources: Experiment with different tools. A flashlight produces a solid beam, while LED strings create dotted lines and steel wool spinning results in a shower of sparks.
- Practice Your Movements: Rehearse the design or pattern you want to create before you open the shutter. This helps ensure your final light trail is smooth and intentional.
3. Forced Perspective Photography
Forced perspective is an optical illusion technique that manipulates visual perception, making objects appear larger, smaller, farther away, or closer than they actually are. By carefully positioning subjects at different distances from the camera and controlling the angle, you can create playful and surreal interactions between them. This is one of the most accessible creative photography ideas because it requires no special equipment, just a clever eye for composition and placement.
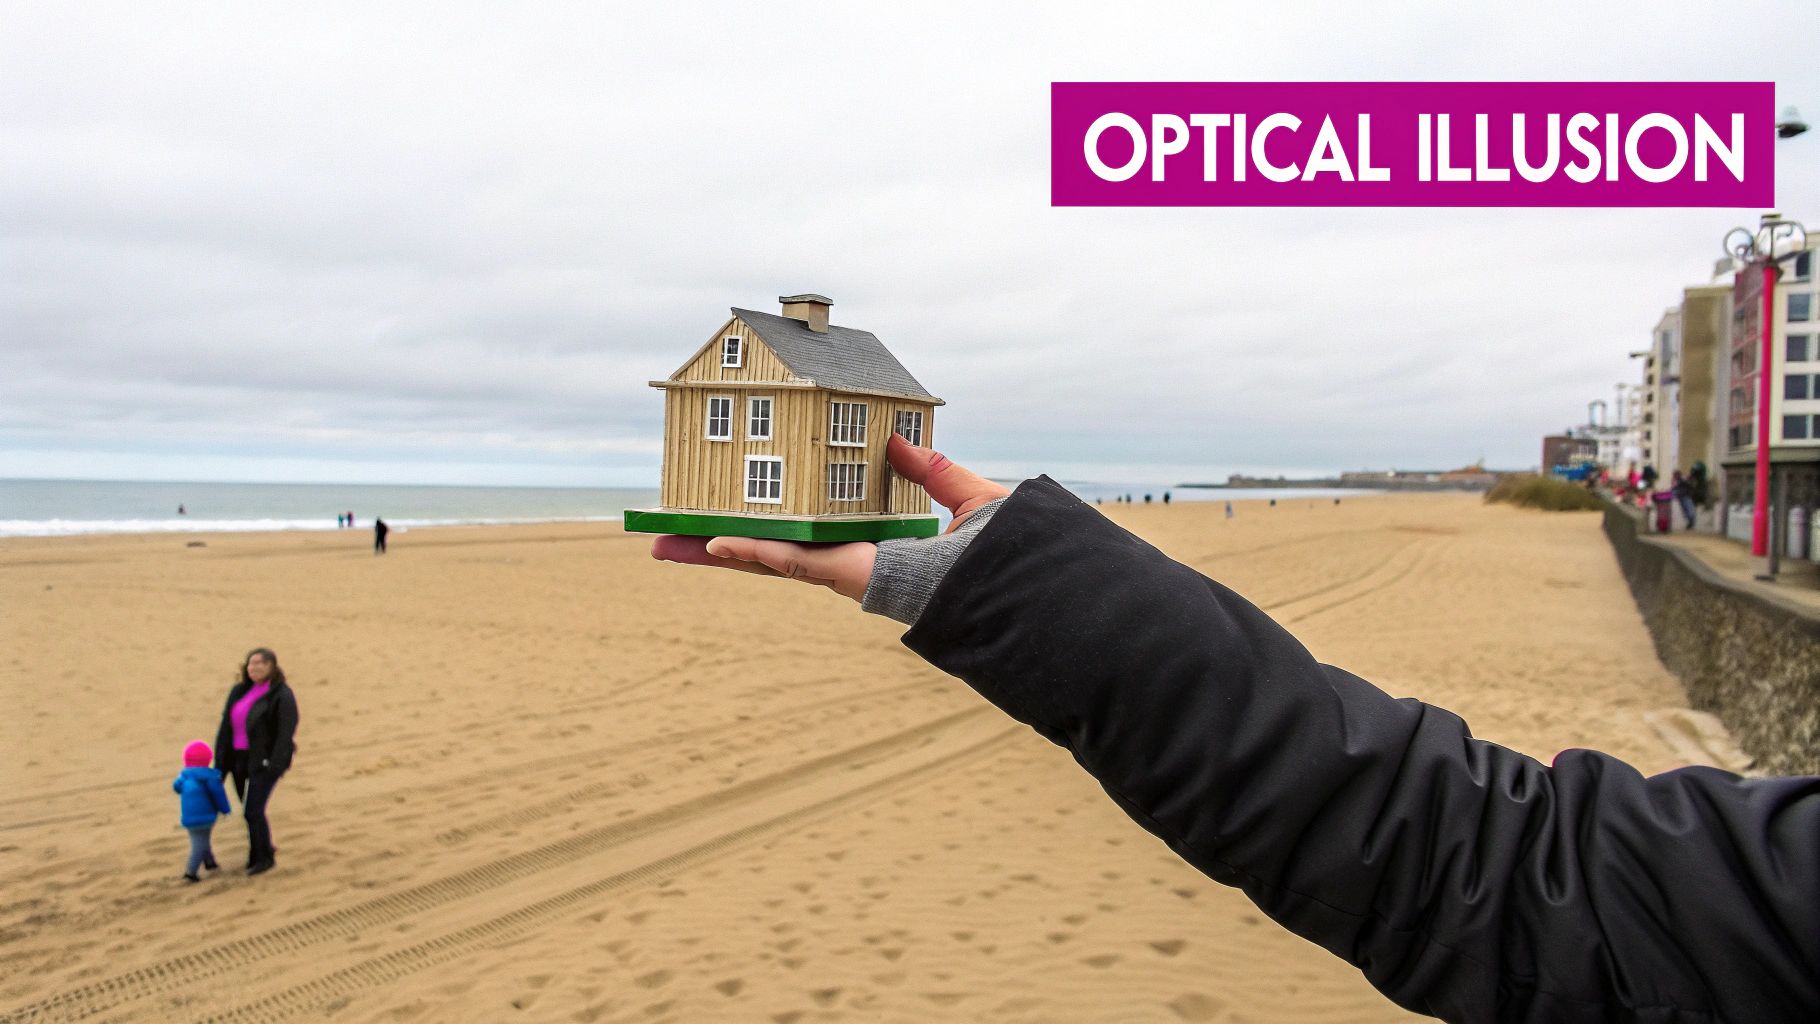
This method is famous for tourist photos like "holding up" the Leaning Tower of Pisa and has been elevated to an art form by photographers like Michael Hughes in his "Souvenirs" series. It’s perfect for engaging social media content, humorous brand advertisements, and unique travel photography that breaks away from the ordinary. You can also generate forced perspective concepts using tools designed for image creation, which can help you brainstorm new ideas.
How to Implement Forced Perspective Photography
The key to forced perspective is creating a relationship between two objects that are on very different planes. Place the "smaller" object (often a person) much closer to the camera and the "larger" object (like a building or the sun) far in the background. By lining them up perfectly, you trick the viewer's eye into seeing them on the same plane, creating the illusion that the person is interacting with the distant object.
Actionable Tips for Success
- Use a Small Aperture: Set your aperture to f/8, f/11, or higher to achieve a greater depth of field. This ensures both your foreground and background subjects are in sharp focus, which is crucial for selling the illusion.
- Precise Positioning is Key: Use your camera's Live View mode to meticulously align your subjects. Tiny adjustments in your position or your subjects' positions can make or break the effect.
- Communicate Clearly: Since your subjects are far apart, clear communication is essential. Plan the pose and interaction beforehand so everyone knows what to do.
- Choose a Simple Background: A cluttered background can distract from the illusion. Opt for a simple, open space like a beach, a field, or the sky to make your subjects stand out.
4. Double Exposure Photography
Double exposure is a classic yet endlessly creative photography idea where two different exposures are combined into a single image. This technique merges subjects, textures, and landscapes to create layered, dreamlike visuals that tell a deeper story. It can be achieved in-camera with certain digital and film models or more commonly in post-production, offering limitless artistic possibilities for conceptual portraits, album art, and compelling ad campaigns.
The technique blends reality and abstraction, allowing photographers to convey emotions and complex narratives in one frame. Artists like Christoffer Relander and Dan Mountford have popularized this style, often merging human silhouettes with natural elements like forests and mountains. The rise of AI tools has further expanded these possibilities, making complex compositions more accessible. You can explore how AI is shaping these trends and get more insights into the future of creative image generation.
How to Implement Double Exposure Photography
For a digital composite, start with a high-contrast portrait, ideally a silhouette or a subject against a plain, bright background. Your second image should be a texture or scene, like a cityscape or a forest, that will fill the dark areas of your first image. In a program like Adobe Photoshop, place the texture layer over the portrait layer and experiment with different Blending Modes (like Screen or Lighten) to achieve the desired effect.
Actionable Tips for Success
- Use Strong Silhouettes: The most effective double exposures often start with a clearly defined silhouette. The dark areas of the silhouette will act as a "window" for the second image to show through.
- Shoot Against a Bright Background: To create a clean silhouette for your base layer, photograph your subject against an overexposed or pure white background. This makes it easier to isolate them during editing.
- Plan Complementary Images: Choose two images that have a thematic or visual connection. A portrait paired with a meaningful landscape, for instance, can create a powerful narrative.
- Experiment with Blend Modes: In post-production, don't just stick to one blend mode. Cycling through options like Screen, Lighten, and Overlay can produce vastly different and unexpected results.
5. Miniature/Tilt-Shift Photography
Miniature/Tilt-Shift photography is a creative technique that makes real-life scenes look like miniature scale models or dioramas. This charming illusion is achieved either with a specialized tilt-shift lens that manipulates the plane of focus or through digital post-processing that selectively blurs the top and bottom portions of the image, creating an extremely shallow depth of field. It's a fantastic creative photography idea for transforming sprawling cityscapes, busy streets, or landscapes into whimsical, toy-like worlds.
This method provides a unique and playful perspective on otherwise ordinary scenes, compelling viewers to look closer. Photographers like Vincent Laforet and Olivo Barbieri have famously used this technique to create mesmerizing aerial shots and art series that re-contextualize urban environments, making them appear both vast and tiny simultaneously.
How to Implement Miniature/Tilt-Shift Photography
Digitally recreating the tilt-shift effect is highly accessible. In a program like Adobe Photoshop, you can apply a "Tilt-Shift" blur filter from the Blur Gallery. This tool allows you to define a sharp horizontal focus area while progressively blurring the image above and below it. Adjusting the blur amount and the transition feathering helps fine-tune the miniature look, turning a standard photo into a captivating diorama.
Actionable Tips for Success
- Shoot from a High Vantage Point: An elevated perspective, looking down on the scene, is crucial for selling the miniature illusion, as it mimics how we view a model playset.
- Focus on Busy Scenes: Locations with lots of detail, like cars, people, and buildings, enhance the effect by making the subjects look like tiny, intricate toys.
- Increase Saturation and Contrast: Boosting the color saturation and contrast in post-production mimics the vibrant, often plastic-like appearance of miniature models.
- Keep Focus in the Middle Third: Position your sharp plane of focus across the middle third of the frame to create a natural-looking depth of field transition.
6. Reflection Photography
Reflection photography is a versatile technique that uses reflective surfaces like water, mirrors, glass, or even wet pavement to create compelling compositions. This method adds depth, symmetry, and an artistic layer to an image by capturing both a subject and its mirrored image. It's one of the most accessible creative photography ideas, allowing photographers to transform ordinary scenes into visually intricate and thought-provoking art, ideal for landscape, street, and abstract photography.
This technique encourages viewers to see the world from a different perspective, often creating a story within a story. Masters like Steve McCurry have famously used puddle reflections to add context in street photography, while Michael Kenna's minimalist landscapes rely on the serene symmetry of lake reflections to evoke a sense of calm and wonder.
How to Implement Reflection Photography
The core principle is to find a reflective surface and compose your shot to include both the subject and its reflection in a meaningful way. Pay close attention to your angle and the quality of light, as these will dramatically alter the clarity and mood of the reflection. For water reflections, a perfectly still surface will produce a mirror-like image, whereas ripples can create a more abstract, painterly effect.
Actionable Tips for Success
- Go Low: Position your camera close to the reflective surface, especially with water or puddles. This low angle creates a more dramatic and immersive reflection that fills more of the frame.
- Use a Polarizing Filter: A circular polarizing filter gives you control over the reflection's intensity. You can rotate it to either enhance the reflection for a clearer image or reduce it to see through the surface.
- Focus on the Reflection: For a sharp, clear reflection, manually set your focus point on the reflected image itself rather than the actual subject. This ensures the most important part of your composition is crisp.
- Shoot During Golden Hour: The soft, warm light during sunrise or sunset enriches the colors in reflections, creating a more vibrant and atmospheric scene.
7. Macro Photography Close-Up Details
Macro photography is the art of capturing extreme close-ups of small subjects, revealing intricate details invisible to the naked eye. This technique typically involves shooting at a 1:1 magnification ratio or greater, transforming everyday objects like insects, flowers, or water droplets into fascinating, abstract landscapes. It's one of the most rewarding creative photography ideas for discovering hidden beauty and showcasing the complexity of the world around us.
This method allows photographers to create compelling images that draw viewers into a miniature universe. Artists like Thomas Shahan, known for his stunning jumping spider portraits, and Levon Biss, with his "Microsculpture" insect series, have elevated macro photography to a fine art form, demonstrating its power to be both scientific and breathtakingly beautiful.
How to Implement Macro Photography
True macro photography requires specialized equipment, such as a dedicated macro lens that can achieve 1:1 magnification. Alternatively, you can use more budget-friendly options like extension tubes or close-up filters that attach to your existing lenses. The key is getting physically close to your subject and managing the extremely shallow depth of field to keep the most important details in sharp focus.
Actionable Tips for Success
- Use Focus Stacking: To overcome a very shallow depth of field, take multiple shots with different focus points and blend them in post-production. This creates a final image that is sharp from front to back.
- Invest in Good Lighting: Small, directional lights or a ring flash are essential for illuminating tiny subjects without creating harsh shadows.
- Use Manual Focus: Autofocus systems often struggle at such close distances. Use manual focus combined with your camera's live view magnification for precise, tack-sharp results.
- Shoot at Smaller Apertures: While it seems counterintuitive, a smaller aperture (higher f-stop like f/8 or f/11) will increase your depth of field, which is crucial when your focus plane is razor-thin.
8. Silhouette Photography
Silhouette photography is a dramatic technique that captures subjects as dark shapes against a bright background. This creative photography idea strips away color, texture, and fine detail, forcing the viewer to focus on the power of form, gesture, and outline. By underexposing the subject, you create a powerful, minimalist composition that evokes emotion and tells a story through shape alone, making it ideal for travel, portraiture, and narrative-driven imagery.
This technique transforms a scene by concealing identity and emphasizing the universal language of body posture and environment. Photographers like Fan Ho masterfully used silhouettes to capture the soul of urban landscapes, while Elliott Erwitt employed them for their humorous and poignant storytelling potential, proving the style’s versatility.
How to Implement Silhouette Photography
To create a silhouette, position your subject directly in front of a strong light source, like a setting sun or a bright window. The key is to set your camera’s exposure for the brightest part of the scene (the background), not your subject. This forces the camera to correctly expose the background, plunging your subject into a deep, well-defined shadow.
Actionable Tips for Success
- Expose for the Background: Use your camera's spot metering mode and point it at the brightest part of the background. Lock in that exposure setting before recomposing your shot to capture the perfect silhouette.
- Shoot During Golden or Blue Hour: The low, intense light of sunrise and sunset provides the perfect natural backlight needed for stunning silhouettes with vibrant, colorful skies.
- Look for Interesting Shapes: Since details are hidden, the subject's outline is everything. Choose subjects with recognizable and clean shapes, and encourage poses that create clear, separated forms.
- Get Low: Shooting from a lower angle helps separate your subject from a cluttered horizon, placing them squarely against the bright sky for a cleaner and more impactful silhouette.
9. Motion Blur and Panning
Motion blur and panning are dynamic creative photography ideas that use a slow shutter speed to convey movement, energy, and the passage of time. Panning involves tracking a moving subject with your camera to keep it relatively sharp while the background blurs into horizontal streaks. Motion blur, more broadly, captures the trace of any moving element, creating abstract patterns or giving a powerful sense of speed, making it a go-to technique for sports, automotive, and street photography.
This technique adds a painterly feel to photos, turning a chaotic city street or a fast-paced race into a fluid, artistic composition. Pioneering photographers like Ernst Haas used motion blur to capture the spirit of a place, while contemporary artists continue to push its boundaries with techniques like Intentional Camera Movement (ICM) to create unique, abstract imagery.
How to Implement Motion Blur and Panning
To achieve a panning effect, select a slow shutter speed, typically between 1/15s and 1/60s. As your subject moves past, smoothly swivel your camera at the same speed, pressing the shutter button mid-pan. For general motion blur, mount your camera on a tripod, use a slow shutter speed, and let elements like car headlights or flowing water paint light trails across the frame.
Actionable Tips for Success
- Select the Right Shutter Speed: Start around 1/30s for panning and adjust based on the subject's speed and desired blur. A slower speed creates more blur.
- Follow the Subject Smoothly: For panning, the key is a steady, fluid motion. Twist from your hips, not just your arms, to follow the subject’s path before, during, and after you press the shutter.
- Use Continuous Autofocus: Set your camera to continuous autofocus (AF-C or AI Servo) to track the moving subject and maintain focus as you pan.
- Practice Your Movement: Before the subject arrives, practice the panning motion a few times to get a feel for the speed and ensure a smooth trajectory.
Creative Photography Techniques Comparison
| Technique | Implementation Complexity | Resource Requirements | Expected Outcomes | Ideal Use Cases | Key Advantages |
|---|---|---|---|---|---|
| Levitation Photography | Moderate: timing and editing skills | DSLR/mirrorless camera, tripod, editing software | Surreal, gravity-defying images | Creative portraits, advertising, social media | Eye-catching, beginner-friendly, creative problem-solving |
| Long Exposure Light Painting | High: requires timing and darkness | Manual camera, tripod, various light sources | Magical light trails and patterns | Night photography, artistic light art | Unique, experimental, one-of-a-kind images |
| Forced Perspective Photography | Low to moderate: positioning focused | No special equipment needed | Optical illusions altering scale & distance | Travel, landmarks, creative illusions | Viral content, easy equipment, creative thinking |
| Double Exposure Photography | Moderate to high: planning & editing | In-camera multiple exposure or editing software | Dreamlike, surreal layered images | Artistic storytelling, social media | Highly creative, versatile, artistic |
| Miniature/Tilt-Shift Photography | Moderate: requires special lens or software | Tilt-shift lens or editing software, elevated spot | Toy-like scenes with selective blur | Urban/landscape photography | Unique perspective, enhances ordinary scenes |
| Reflection Photography | Low to moderate: depends on conditions | No special gear beyond camera | Symmetrical, depth-enhanced images | Various environments, street, nature | Widely available, adds depth, natural symmetry |
| Macro Photography Close-Up | High: specialized gear and technique | Macro lens, lighting, tripod, focus rail | Detailed, microscopic views of subjects | Nature, scientific, abstract photography | Reveals hidden details, artistic, educational |
| Silhouette Photography | Low: requires backlighting knowledge | Minimal equipment | Dramatic, minimalist high-contrast images | Emotional storytelling, sunsets, portraits | Dramatic impact, simple setup, storytelling |
| Motion Blur and Panning | Moderate to high: timing and skill needed | Camera with manual control | Dynamic images showing motion and speed | Sports, street, abstract art | Conveys energy, dynamic, transforms scenes |
From Idea to Image: Your Next Creative Step
We've journeyed through a diverse collection of creative photography ideas, from the gravity-defying magic of levitation to the dynamic energy of motion blur and panning. Each technique explored, whether it's the intimate world of macro photography or the dramatic narrative of a silhouette, serves as a powerful tool in your artistic arsenal. The goal was not just to present a list, but to provide a launchpad for your imagination.
The true value of these concepts is unlocked through action. Reading about long exposure is one thing; standing in the dark, painting the air with a flashlight, and seeing the vibrant streaks materialize on your screen is another entirely. The most impactful images are born from curiosity and a willingness to step outside of comfortable, conventional framing.
Synthesizing Techniques for a Unique Vision
The next level of creativity often involves combination. Imagine merging the surrealism of forced perspective with the ethereal glow of light painting to create a scene where a tiny figure appears to be drawing constellations in the night sky. Or consider applying a double exposure effect to a powerful silhouette, layering a landscape within the subject's outline to tell a deeper, more complex story.
These creative photography ideas are not isolated rules; they are flexible ingredients. Your unique artistic voice emerges when you start mixing them to create a recipe that is distinctly your own.
Key Takeaway: The most innovative photography doesn't just replicate a technique. It reinterprets and combines multiple ideas to forge a new visual narrative that captivates and surprises the viewer.
Your Actionable Path Forward
To avoid creative paralysis, choose one idea from this list that genuinely excites you and commit to exploring it this week. Don't aim for perfection on the first try. Instead, focus on the process of discovery.
Here are your next steps:
- Select Your Concept: Pick one technique, such as reflection or tilt-shift photography, that sparked your interest the most.
- Plan a Small Project: Dedicate a specific time and location to practice. For reflections, you might scout for puddles after a rainstorm. For macro, you could simply explore your own backyard.
- Embrace Experimentation: Failure is part of the process. Your first levitation shot might look clumsy, and your initial panning photos may be blurry messes. Analyze what went wrong and adjust your settings, composition, or timing. Each attempt is a lesson learned.
Once you've captured your unique photographic masterpiece, you might also explore other ways to give your images new life, such as learning how to transform a photo into a painting and turning your digital creation into a tangible piece of art. The journey of an image doesn't have to end with the final edit.
Ultimately, mastering these creative photography ideas will make you a more versatile, confident, and compelling visual storyteller. Whether you're a digital marketer building a brand, a hobbyist exploring a passion, or an educator inspiring others, the ability to translate an abstract thought into a powerful image is an invaluable skill. Go forth and create something extraordinary.
Ready to accelerate your creative workflow and test concepts faster than ever? Bulk Image Generation allows you to visualize hundreds of variations on your creative photography ideas in minutes, helping you refine compositions and storyboards before you even pick up your camera. Unlock endless inspiration and bring your most ambitious ideas to life at Bulk Image Generation.