
How to Create ID Card Easily with AI Tools | Step-by-Step Guide

Aarav Mehta • September 14, 2025
Learn how to create an ID card effortlessly using AI tools. Our step-by-step guide helps you design, prepare data, and generate ID cards quickly.
Creating professional ID cards used to be a massive headache. Now, it’s a simple three-part dance: get your data ready, design one solid template, and let an AI tool spit out all the individual cards for you. What was once a painfully manual task becomes a slick, scalable operation. You can genuinely produce hundreds of professional IDs in just a few minutes.
Why a Professional ID Card Is a Strategic Asset
It’s easy to dismiss an ID card as just another piece of plastic with a photo, but that’s missing the bigger picture. A thoughtfully designed ID is a serious tool for any organization today. It's not just about identification; it’s a core piece of your brand, your security, and your daily workflow.
Think about it. For a new employee, contractor, or even a visitor, that ID is often the very first physical thing they interact with that represents your company.
Imagine a fast-growing tech startup. Every employee ID has a clean, minimalist design that perfectly matches the company's innovative vibe. Or picture a massive music festival where all the staff, vendors, and VIPs have color-coded cards. Suddenly, you can see at a glance who belongs where, making crowd control a breeze. In both cases, the ID is doing strategic work, way beyond just showing a name.
More Than Just a Name Tag
A well-executed ID card quietly handles several critical jobs that boost an organization's security and success. Seeing it this way turns a simple admin task into a smart investment.
- Brand Ambassador: It's a silent communicator of your brand’s attention to detail. When your branding is consistent everywhere—including your IDs—it builds a cohesive and trustworthy image.
- Enhanced Security: It’s your first line of defense. An ID provides immediate visual proof that someone has the right to be in a specific area, a fundamental security layer for any building or event.
- Operational Efficiency: Good IDs can do more than just open doors. They can speed up check-in, manage access to sensitive zones, and even integrate with systems for time tracking or cashless payments.
Creating high-quality ID cards isn't just about looking good. It's a strategic move that tightens up security, reinforces your brand identity, and makes day-to-day operations run a whole lot smoother.
The Modern Approach to ID Creation
Not too long ago, making professional-grade ID cards in-house was a complicated and expensive ordeal. But modern AI platforms have blown that wide open, making the process accessible to anyone. The demand for secure, reliable identification has exploded; the global market for ID card printers was valued at around $1.44 billion in 2021 and is projected to climb to $1.76 billion by 2025.
You can see more details on this growth at cognitivemarketresearch.com. This isn't just a random statistic—it shows how seriously businesses are taking identification. The great news is that AI tools now give you the power to meet this need without buying specialized hardware or hiring a designer.
Laying the Groundwork for Flawless ID Generation

Before you even think about firing up a design tool, let's talk about what really guarantees a smooth ID card project: solid prep work. I've seen it time and time again—the projects that go off the rails are the ones that skip this crucial first phase. Getting your ducks in a row now prevents countless frustrating errors and saves hours of rework later.
It all boils down to one simple question: what is this card actually for?
Is it for simple visual identification for a small startup? Or does it need to handle swipe access for a secure facility? Defining the card's main job dictates every other decision, from the information it displays to the security features you might need.
Gather and Organize Your Core Data
With your purpose clear, it's time to collect all the personnel data. Think of this as building the engine for your ID generation machine. You need consistent, accurate information for every single person, without exception.
I always recommend starting with a simple spreadsheet in Excel or Google Sheets. This file will become your single source of truth.
At a bare minimum, you’ll want columns for:
- Full Name (e.g., Jane Doe)
- Job Title or Department (e.g., Marketing Manager)
- Unique ID Number (e.g., EMP-0451)
- Photo File Name (e.g., jane_doe.jpg)
This organized approach is the secret sauce when you need to create ID cards in bulk. An AI tool will pull directly from this sheet, so accuracy here translates to perfection later.
The most common point of failure in bulk ID generation isn't a design flaw—it's messy data. A clean, well-organized spreadsheet is your most valuable asset in this entire process.
To help you get started, here's a quick checklist of everything you should gather before you start designing. Thinking through these items now will prevent headaches down the road.
ID Card Planning Checklist
| Category | Essential Item | Example/Consideration |
|---|---|---|
| Data & Information | Personnel Spreadsheet | Is your CSV/Excel file complete and error-free? |
| Unique Identifiers | Employee ID numbers, student numbers, etc. | |
| Branding & Visuals | Company Logo File | High-resolution PNG with a transparent background. |
| Brand Colors | Hex codes for primary and secondary colors. | |
| Font Files | Official company fonts (TTF or OTF files). | |
| Photography | Headshot Photos | Consistent background, lighting, and resolution. |
| Naming Convention | e.g., FirstName_LastName.jpg or EmployeeID.jpg | |
| Card Details | Card Dimensions | Standard CR80 (3.375" x 2.125") or custom size? |
| Required Text Fields | Name, Title, ID Number, Expiry Date, etc. | |
| Security Features | Barcode, QR code, magnetic stripe data? |
Having these assets collected and organized in a project folder makes the entire process incredibly efficient.
Nail Down Your Design and Photo Standards
Finally, let's talk about aesthetics. With your data organized, you can make key design choices that align with your company's brand. Have those logo files and official hex codes ready. You'll also want to decide on the information hierarchy—what’s the most important detail a person should see at a glance?
Photos are, of course, a massive part of a professional ID. For the best results, especially with AI tools, it's vital to follow specific photo requirements for AI-generated ID images. Consistency in lighting, resolution, and background is non-negotiable.
If your employee photos are all different sizes, don't panic. Using a tool to standardize them is a smart move. A good bulk image resizer can get all your photos into a uniform format in just a few clicks.
By getting all these elements locked in upfront, you create a clear blueprint that makes the actual design and generation phases a breeze.
Designing Your Master ID Card Template
This is where your vision really starts to take shape. Creating a master template isn't just a design step; it's the most critical part of the whole process, especially when you're making IDs for an entire team or organization.
Think of it as the blueprint. A good template tells the AI exactly how to generate every single card, ensuring they all look perfectly consistent. This saves a massive amount of time down the road. You're not just designing one card—you're building a smart, automated system.
The main idea here is to separate the static elements from the dynamic ones.
- Static elements are the parts that stay the same on every card—your company logo, the background color, maybe a security hologram graphic.
- Dynamic elements are the placeholders that change for each person, like their name, photo, and ID number.
Setting Up Your Canvas and Static Elements
First things first, you'll need a blank canvas in an AI-powered design tool. The standard ID card size is CR80, which is 3.375 x 2.125 inches. Getting this right from the beginning is crucial for printing, so don't skip it.
Once your canvas is ready, add your company logo. This is your primary static element and the anchor for your brand's identity on the card.
I recommend uploading a high-resolution version of your logo, preferably a PNG with a transparent background. Position it somewhere thoughtful, like one of the top corners. This keeps it visible but out of the way of the important, person-specific info that needs to be front and center.
Adding Dynamic Text and Photo Placeholders
With your logo set, it's time to add the dynamic text layers. These aren't the actual names and job titles yet—they're just placeholders that you’ll link to a data spreadsheet later on.
You'll want to create separate text boxes for fields like:
- Full Name
- Job Title / Department
- Employee ID Number
- Expiry Date
For instance, you might type something like {{Full Name}} into a text box. This simple tag tells the AI, "When you generate the cards, look for the 'Full Name' column in my spreadsheet and stick the data right here."
Next up is the photo. Create a placeholder for the employee's picture, which is usually a simple shape like a rectangle or a circle. Position it where you want the headshot to go. The AI will then automatically crop and insert each person's photo into this spot, keeping everything looking tidy and uniform across all the cards.
Pro Tip: When you're picking out fonts, legibility is everything. A clean, sans-serif font like Helvetica, Arial, or Open Sans is almost always a better call than something fancy. The goal is instant recognition, not artistic flair.
Balancing the Layout for a Professional Look
A cluttered ID card is an ineffective one. A professional layout comes down to a clear visual hierarchy. What's the most important information? Usually, it’s the person's photo and name, so they should be the most prominent.
You can guide the viewer's eye using different font sizes, weights (like bold vs. regular), and colors.
This image of an ID card printer shows a finished product where the layout is clean and organized, which is exactly what makes professional printing possible in the first place.
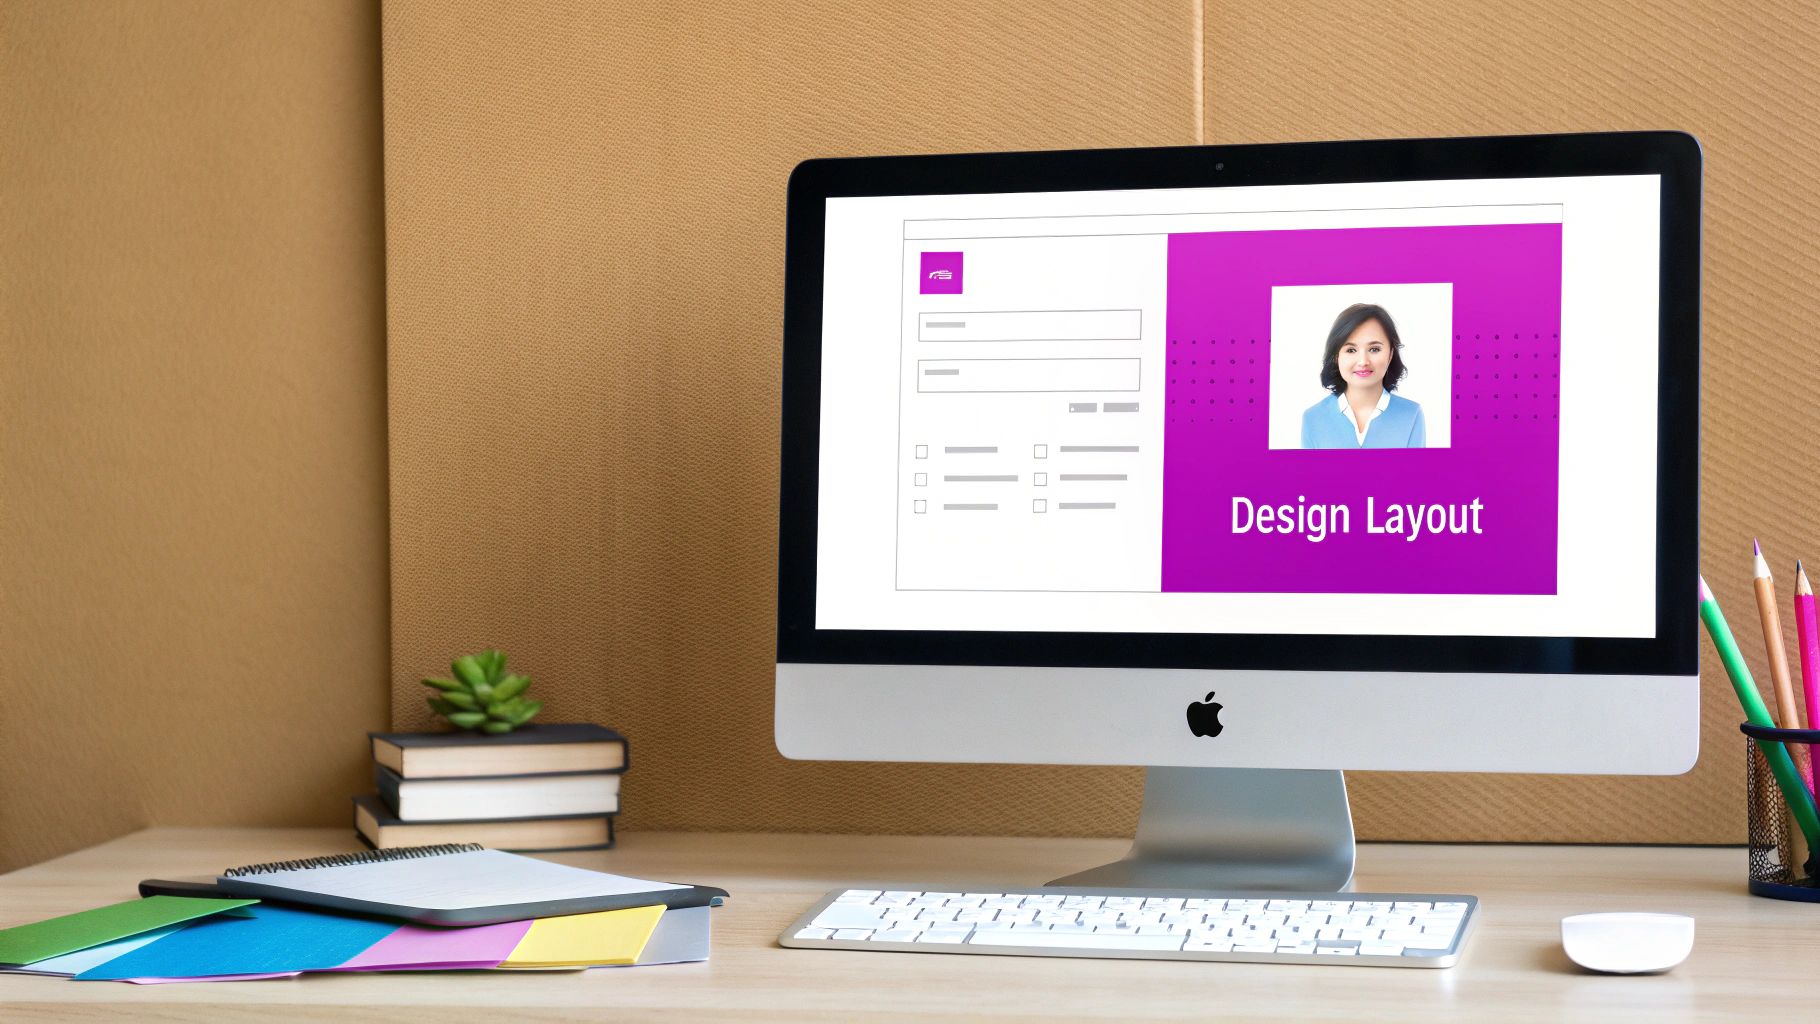
The clear separation between the photo, name, and company branding is what makes this card work so well—and that's a direct result of a well-planned template.
This level of professional output used to be something only large corporations with deep pockets could achieve. Today, it’s more accessible than ever. The global market for devices used in personalizing ID cards is expected to hit $2.5 billion by 2025, and it's growing at a steady 7% annually through 2033.
This growth shows just how much demand there is for secure, high-quality ID solutions—the kind that AI generators now make simple. If you want to get some ideas or start designing your own, check out our powerful AI image generator.
How to Generate Hundreds of IDs in Minutes
Alright, you've perfected your master template. Now for the really satisfying part: generating every single ID card you need, all at once.
This is where the automation kicks in, turning what would have been days of tedious, soul-crushing manual work into a task that takes just a few minutes. The secret is connecting your smart template to a simple data source.
Most of the time, this data source is just a CSV file or a Google Sheet—the same one you prepared earlier with columns for names, titles, and photo filenames. The platform reads this file, row by row, and uses that info to populate the dynamic fields in your design. This is the magic of creating ID cards at scale; you build the blueprint once and let the technology handle all the repetitive labor.
The Data-Mapping Process Demystified
The core of this step is something called data mapping. It sounds technical, but I promise it's straightforward. You're just telling the software which spreadsheet column should go into which placeholder in your template.
It’s as simple as this:
- Link the
{{FullName}}placeholder to the 'Full Name' column in your sheet. - Connect the
{{Photo}}placeholder to the 'PhotoURL' or 'FileName' column. - Map the
{{EmployeeID}}placeholder to your 'ID Number' column.
This mapping creates a direct line of communication between your raw data and your finished design. Once that connection is made, the AI system can instantly pull the correct information for every single person and place it perfectly on the card. If you're working on more complex designs with unique visual elements, a free AI image prompt generator can be a great way to brainstorm creative ideas for integrating data visually.
Data mapping is the bridge between your spreadsheet and your finished product. Getting this right is critical. It ensures every card is not only visually consistent but also perfectly accurate, wiping out the risk of human error that always plagues manual creation.
From Spreadsheet to Finished Cards: A Real-World Scenario
Let's imagine a mid-sized company onboarding 50 new hires for a big expansion. In the old days, the HR manager would have blocked out an entire week to manually create each ID card in some clunky design program. It would have been a painful cycle of copy, paste, resize, and save, over and over again.
With an AI generation platform, the workflow is totally different. The manager connects their meticulously prepared Google Sheet of new hires to the master ID template they designed. After a quick data-mapping check to make sure everything lines up, they hit a single "Generate" button.
In about a minute, the platform spits out 50 unique, high-resolution ID card images. Each one is perfectly populated with the correct name, photo, and department. The entire batch is ready for printing. This incredible efficiency is exactly why so many businesses are turning to automation. To take it even further, exploring dedicated AI automation services can help streamline this process across an entire organization.
This infographic breaks down a simplified workflow for what happens next, moving from your digital files to the final physical cards.
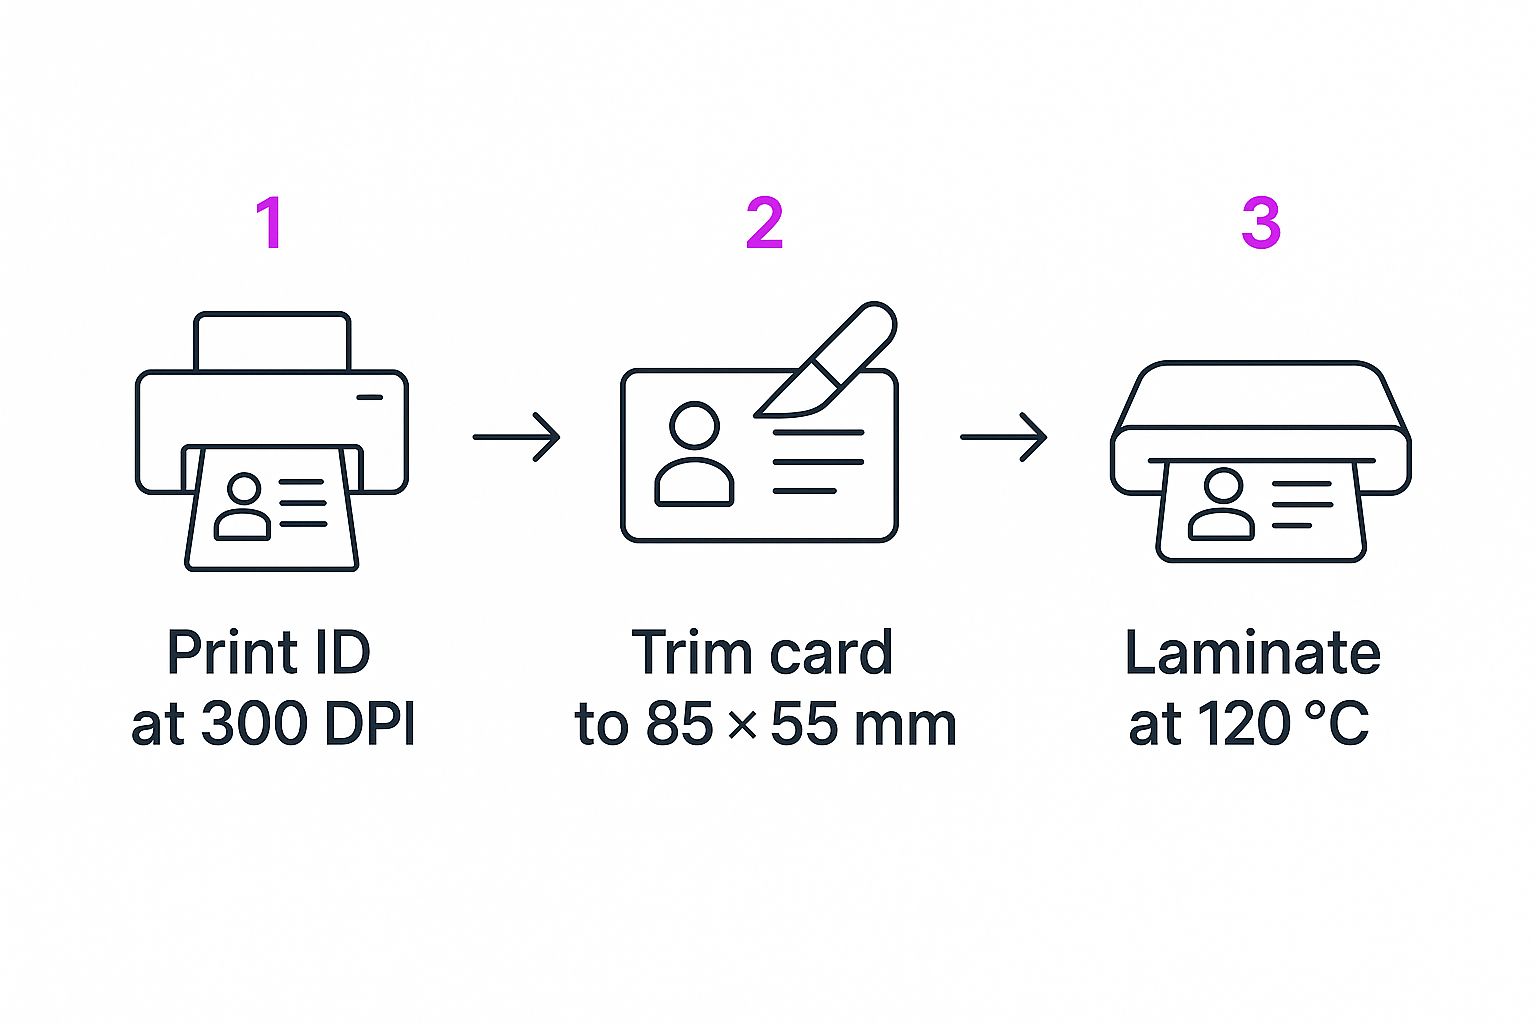
As you can see, precision matters at each physical step—from high-resolution printing to exact trimming and proper lamination. This ensures the final card actually matches the professional quality of your digital design.
But the real power here is the scalability. The effort it takes to generate 50 cards is virtually the same as it is for 500. That’s a game-changer.
Taking Your ID Cards to the Next Level with Advanced Features
A basic ID card gets the job done, but a modern one can be so much more. Once you’ve nailed the essentials like the name and photo, you can start exploring some powerful ways to crank up both security and day-to-day usefulness. It’s all about turning that simple piece of plastic into a smart, secure asset for your whole organization.
This doesn't mean you need to overcomplicate things. In fact, some of the most effective upgrades are subtle design choices that make a world of difference in making your ID cards harder to fake and more useful for your team.
Integrate Dynamic QR Codes for Interactive Use
One of the smartest moves you can make is adding a dynamic QR code. This isn’t just a static black-and-white square; it's a direct link to live, up-to-date information. All you have to do is set up your spreadsheet so each QR code points to a unique URL.
Think about the possibilities here:
- Digital Business Cards: A quick scan of a QR code could pull up an employee's vCard, letting a new client instantly save their contact details. No more fumbling with business cards.
- Instant On-the-Spot Verification: The code could link to a secure internal page that displays the cardholder's photo and current credentials. It’s a simple, fast way to add an extra layer of verification for security personnel.
This one feature bridges the gap between the physical card and your digital systems, making your IDs incredibly versatile. With identity verification becoming more crucial every year—global digital ID checks are expected to hit 86 billion in 2025, a 15% annual jump—this is a serious upgrade. You can read more about this trend toward stronger security measures on juniperresearch.com.
Weave in Subtle Security Features
Beyond QR codes, you can bake visual security elements right into your design template. These are the kinds of details that make unauthorized copies stick out like a sore thumb.
For instance, try adding a line of microtext. It's just tiny text, almost invisible to the naked eye, but easily verifiable with a magnifying glass. Another great, low-effort addition is a custom, semi-transparent watermark layered behind the employee's photo or other key information. These touches are dead simple to add in your design tool but are a huge headache for anyone trying to forge a card.
Here’s a pro tip I use all the time: Use conditional formatting to visually distinguish between roles. You can set up your template to automatically add a specific color band based on a value in your spreadsheet—maybe red for 'Contractor' or blue for 'Staff.' It provides instant visual classification for access control and makes everyone's life easier.
Common Questions About Creating ID Cards

As you start designing your ID cards, you’re bound to run into a few common questions. I see them pop up all the time. Getting these sorted out early will help you avoid some classic pitfalls and keep your project running without a hitch. Let's tackle some of the most frequent ones.
What Is the Best Format for Employee Photos
For the best results, especially when generating cards in bulk, you absolutely want to start with high-resolution JPG or PNG files. Trust me, the quality of your source photos makes all the difference. Aim for a consistent aspect ratio and a simple, neutral background to give all your cards a clean, professional look.
While most AI tools are smart enough to crop and resize images automatically, they can only work with what you give them. Great source photos will always lead to a great final product.
It's also a simple but powerful trick to name your photo files logically so they match up with your data spreadsheet. Think john.doe.jpg or EMP-123.png. This one small step can make the data mapping process virtually error-free.
Can I Add Unique Barcodes or QR Codes
Yes, you can, and this is where modern AI design platforms really shine. It's incredibly straightforward. You just create a placeholder layer for a QR code or barcode right inside your main template.
Then, in your spreadsheet, you'll have a column filled with the unique data for each code—maybe it's an employee ID number, a vCard link, or a URL for a private portal. When the platform gets to work, it will generate a unique, scannable code for every single person on your list.
The ability to generate unique, data-driven QR codes is one of the most powerful features of modern ID creation. It transforms a static card into an interactive tool for verification, contact sharing, or access control.
What Are the Most Common Design Mistakes
I've seen so many well-intentioned designs get derailed by a few common, avoidable mistakes. Here are the biggest culprits:
- Too Many Fonts: Stick to two fonts at the most. Any more and the card starts to look cluttered and amateurish.
- Poor Color Contrast: This one seems obvious, but it happens all the time. Low-contrast text is hard to read, which defeats the entire purpose of the card. Go with dark text on a light background or vice versa.
- Tiny Photos: The employee photo needs to be large enough for someone to recognize the person at a glance. Don't make people squint.
- Missing Information: It's easy to forget key details like an expiry date or a "if found, please contact..." notice, but these things are crucial for the card's utility.
At the end of the day, always choose clarity and function over a flashy, complicated design. The goal is instant, clear communication.
Ready to stop wrestling with design software and start generating stunning IDs in minutes? Bulk Image Generation uses powerful AI to turn your simple data into hundreds of professional, ready-to-print ID cards instantly. Try it now and see how easy it can be at https://bulkimagegeneration.com.