
Mastering ai character creation for scalable, on-brand characters

Aarav Mehta • January 8, 2026
Explore a practical, scalable workflow for ai character creation and learn to generate hundreds of unique, on-brand characters for marketing and education.
Gone are the days of spending hours, or even days, painstakingly designing a single digital character. AI character creation isn't just about making one design; it's about generating hundreds of unique, on-brand characters in a matter of minutes. This completely changes the game for how we produce creative content.
The New Reality of Character Creation
Welcome to the new era of digital creativity. Forget the old, manual grind of character design. Now, you can describe a character's personality, style, and vibe in plain text and get a flood of high-quality visuals back almost instantly. This shift makes scalable content creation a reality for everyone, from marketers needing a fresh face for a campaign to educators building a cast of historical figures.
This leap forward is thanks to some serious breakthroughs in AI, specifically with transformer architecture and Generative Pre-trained Transformer models. These advancements gave AI a much deeper understanding of context. Then, models like DALL·E and Stable Diffusion took it a step further, translating that understanding from text to images.
From Single Images to Scalable Assets
The real magic here is the shift from one-off creations to a full-blown, scalable workflow. Imagine needing 50 different versions of your brand mascot for a social media blitz, or a diverse lineup of avatars for a new app. With the right tools, you can now produce these assets at a scale that was pure fantasy just a few years ago.
You're no longer just making a picture; you're building an entire library of visual assets.
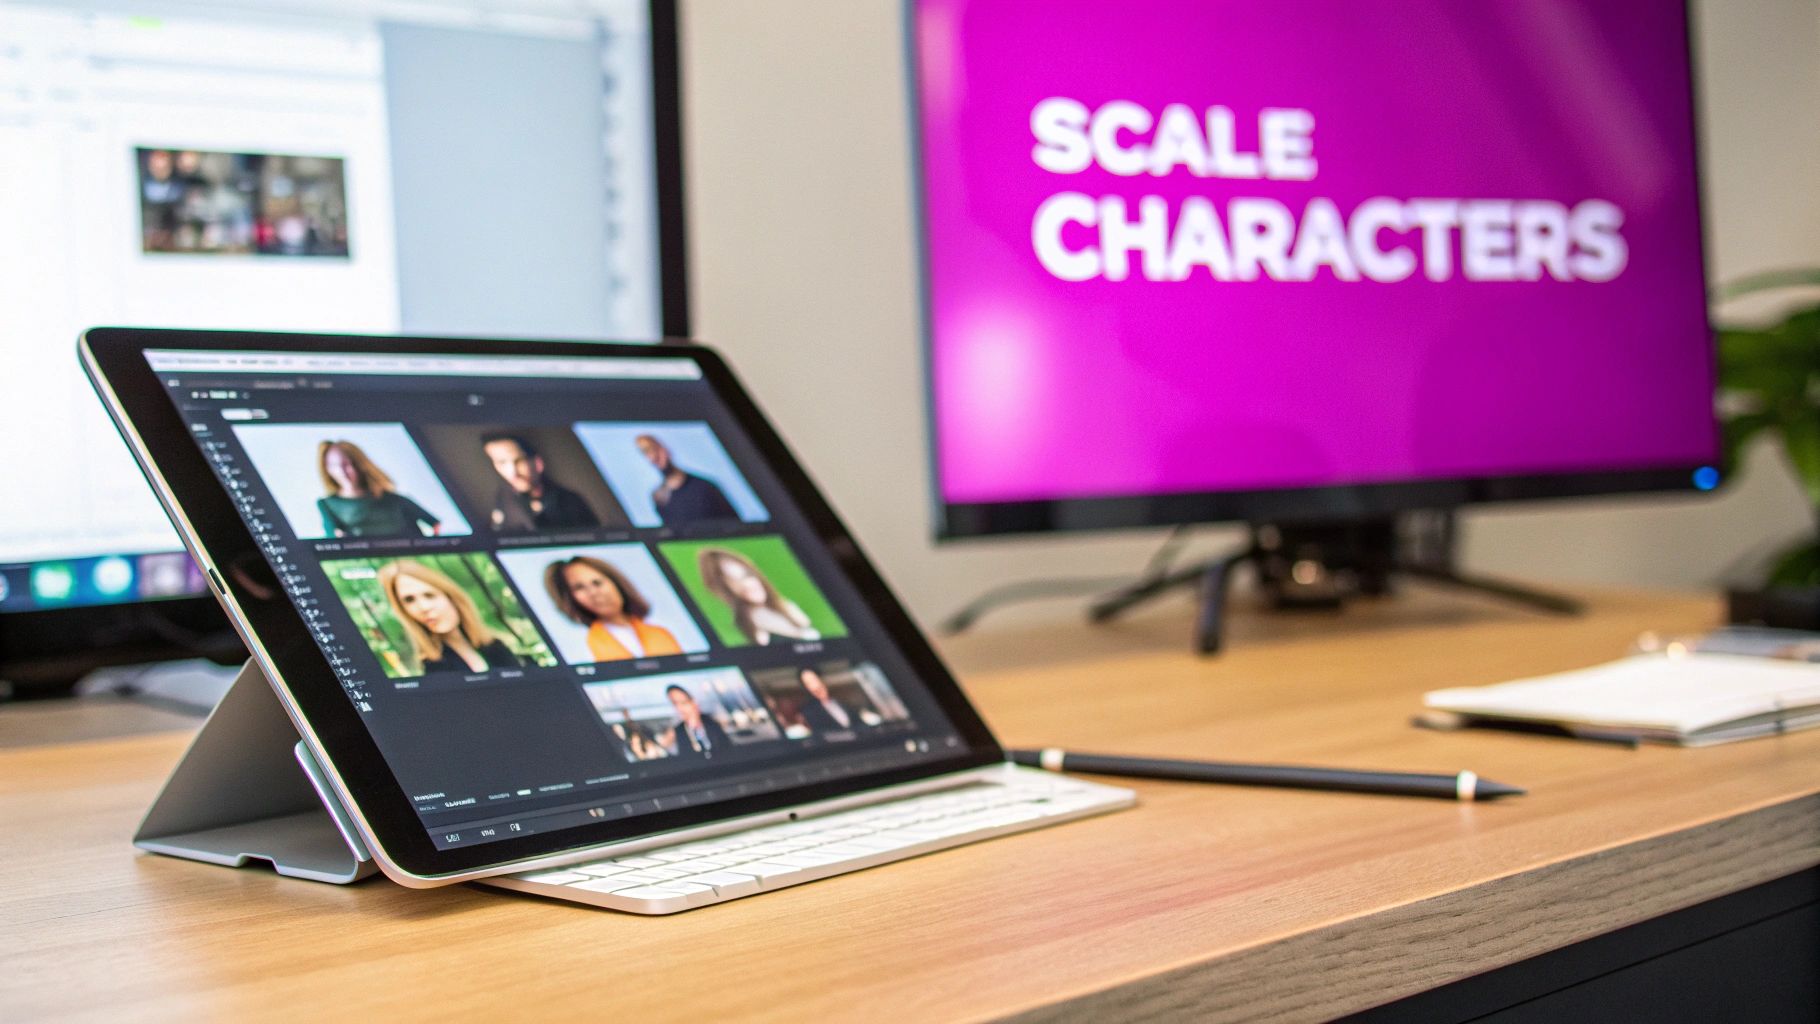
This is what it looks like in practice. A single, well-crafted prompt can spit out dozens of visuals that are consistent in style yet unique in their details, all ready for post-production. It transforms a complex artistic endeavor into a manageable and incredibly efficient production line.
In this guide, I'll walk you through the practical steps to make this technology work for you. We'll turn your creative ideas into a massive library of visual content, faster than you ever thought possible. And as you get started, it pays to keep an eye on emerging AI image generation trends for 2025 to keep your work ahead of the curve.
Defining Your Character and Campaign Goals
Before you even think about writing a prompt, let's talk strategy. The biggest mistake people make with AI characters is jumping straight into generation without a clear vision. It’s like trying to build a house without a blueprint—you’ll get something, but it probably won’t be what you wanted.
Think of it like casting for a movie. You wouldn't just grab a random person off the street. You need an actor who fits the role, with a personality, a backstory, and a clear purpose in the story. This initial groundwork is what separates a folder of pretty-but-useless images from a set of powerful assets that actually connect with your audience.
Establish a Clear Persona
A memorable character is more than just a cool design; they have depth. Take a few minutes to brainstorm their core traits. Is this character mischievous and a bit cheeky, or are they a wise, authoritative guide? A small business creating a mascot for their newsletter probably needs someone warm and relatable. A history teacher designing a virtual assistant for an educational module, on the other hand, needs a figure that looks historically accurate and trustworthy.
Jot down a few key descriptors that get to the heart of who they are.
- Personality: Friendly, energetic, mysterious, calm, funny.
- Backstory: Where did they come from? What drives them? (Even a one-sentence backstory helps!)
- Visual Style: Modern vector art, vintage storybook illustration, photorealistic.
This simple creative brief becomes your North Star. It guides every prompt you write and keeps the character consistent across dozens or even hundreds of images. A well-defined persona translates directly into more precise and effective AI outputs.
A lot of people get hung up on just the visual traits. But the real magic is in the personality. Describing their mood or attitude in your prompt—like 'a cheerful, optimistic robot' versus just 'a robot'—yields far more engaging results. It’s a small tweak that makes a huge difference.
Align Characters with Project Objectives
Your character has a job to do. Their design needs to serve a specific goal. Are you trying to boost social media engagement? Build brand trust on your website? Create fun educational materials? The objective should dictate the character's entire look and feel.
For example, a character designed for a children's coloring book series needs to have simple lines and a friendly, approachable demeanor. In contrast, a brand avatar for a tech company’s chatbot should look professional and capable. When your visuals are in lockstep with your campaign goals, their impact multiplies.
A solid strategy also means making sure your visuals feel like they belong to your brand. You can manage this by creating a brand kit for AI image generation, which keeps colors, styles, and other elements consistent.
Once you’ve used AI to nail down your character's design, you might even think about taking them beyond the screen. There are fantastic guides on bringing character designs from concept to a tangible product. This kind of strategic planning is what turns a random image generation session into a powerhouse production of creative assets that truly work for you.
Crafting Prompts for Consistent Character Batches
Alright, this is where the magic happens—where your strategy meets the AI's creative power. Let me be blunt: the success of your entire bulk character run hangs on the quality of your prompt.
If you toss in a lazy, one-line request, you're going to get a batch of generic, disconnected, and probably useless images. But a well-thought-out, detailed prompt? That's your ticket to creating a whole cast of characters that look and feel like they belong in the same world.
Think of your prompt as the ultimate creative brief for your AI assistant. It needs to lay down the law on the non-negotiable elements that define your character's soul, but also leave just enough wiggle room for the AI to introduce those subtle, natural variations. Nailing this balance is the secret sauce for getting diversity without wrecking your consistency.
Building Your Master Prompt
Your master prompt shouldn't just be a list of adjectives. It needs layers, with each one adding more and more specific detail. A vague idea like "a friendly robot" is a dead end.
Instead, you need to flesh it out. Try something like this: "A charming, retro-style robot character with a friendly digital smile, illustrated in a clean vector art style, perfect for a children's educational app."
See the difference? This prompt works because it establishes clear pillars for the AI to build on:
- Persona: "charming," "friendly digital smile"
- Aesthetic: "retro-style," "clean vector art"
- Context: "children's educational app"
These pillars act like guardrails, keeping every single generated image true to the core concept. If you're just getting started, I'd highly recommend using a structured tool to help you think through these layers. Our own free AI image prompt generator is built for exactly this—to make sure you don't miss any of the crucial details.
The Anatomy of a Powerful Character Prompt
A truly killer prompt for AI character creation does more than just describe what the character looks like. It defines the entire scene, the artistic direction, and the mood.
You need to break it down into controllable components. Here are the things I always include:
- Core Identity: These are the unchangeable traits. Think: "A young female adventurer with bright blue eyes, messy blonde hair in a ponytail, and a signature leather jacket."
- Artistic Style: This is absolutely non-negotiable for consistency. For instance: "Flat 2D illustration, clean lines, vibrant color palette, minimalist background."
- Composition and Pose: Tell the AI exactly what you want to see. "Full-body shot, dynamic pose, running towards the camera," or "Close-up portrait, looking directly at the viewer with a confident expression."
- Emotional Nuance: Adjectives are your best friend here. Words like "joyful," "pensive," "determined," or "curious" can completely change the vibe of the output.
- Setting or Background: Even a simple instruction makes a huge difference. "Isolated on a white background" is clean and effective, while "in a lush, fantasy forest setting" adds context.
And when you're going for hyper-specific aesthetics, especially realistic faces, you can lean on more specialized AI Headshot Generator tools to really lock in that consistency across a large batch.
The secret to great bulk generation isn't just a long prompt—it's a structured one. I always start with the character's core features, then the art style, and finally the pose and emotion. This hierarchy tells the AI what's most important and prevents it from getting confused.
The table below breaks down these core components, showing how each piece of the prompt directly shapes the final image.
Key Prompt Components for AI Character Creation
This table breaks down the essential elements of a successful character prompt and shows how each one influences the final image.
| Prompt Component | Description | Example (Flux 1.1) | Impact on Output |
|---|---|---|---|
| Core Identity | The character's unchangeable physical and personality traits. | "A grizzled space pirate with a cybernetic eye and a long, grey beard." | Defines the who of the character, ensuring the same individual appears in each image. |
| Artistic Style | The overall visual aesthetic, from medium to color palette. | "Digital painting, gritty and realistic textures, cinematic lighting." | Guarantees visual cohesion across the entire batch, making the images look like a set. |
| Composition & Pose | Camera angle, shot type, and the character's action. | "Medium shot, leaning against a spaceship bulkhead, arms crossed." | Controls the framing and action, allowing for varied but controlled character presentation. |
| Emotional Nuance | Adjectives that define the character's mood or expression. | "A weary but determined expression, slight smirk." | Breathes life and personality into the character, guiding the AI on subtle facial cues. |
| Setting/Background | The environment surrounding the character. | "Inside the dimly lit cockpit of a starship, isolated on black background." | Establishes context and can be used to ensure a clean, consistent backdrop for easy editing. |
As you can see, each component plays a specific role. By controlling them systematically, you move from random generation to predictable, scalable character production.
Putting Your Bulk Generation Workflow into Action
Alright, you've nailed down your master prompt. Now it’s time to move from planning to production. This is where all that careful prep work starts to pay off, letting you pump out a whole batch of unique character variations without breaking a sweat.
The goal here isn't just to make a ton of images. It's to create a whole set that feels cohesive while still having those subtle, engaging differences.
Think of it like this: you’re a social media manager who needs 50 different profile pictures for your brand’s mascot. Each one has to be the same character, but you want to show a range of emotions—happy, thoughtful, excited, curious. Bulk generation is perfect for this. You feed it your master prompt, tweak a few settings, and let it create the entire batch in one go.
Dialing in Your Generation Settings
Before you hit that big "generate" button, you need to get your settings just right. Think of these as the control knobs for the whole operation. They're critical for getting the results you’re after.
- Number of Images: This one's pretty simple. For our mascot example, you'd just set this to 50.
- Aspect Ratio: This just defines the shape of your images. A 1:1 ratio is perfect for profile pictures, but you'd want something like 16:9 for a YouTube thumbnail.
- Style Intensity: This setting tells the AI how strictly it should follow your style keywords. A higher intensity means more consistency, which is exactly what you want when creating a unified set of characters.
This simple prompt engineering flow gives you a good visual for how to approach the process from idea to generation.
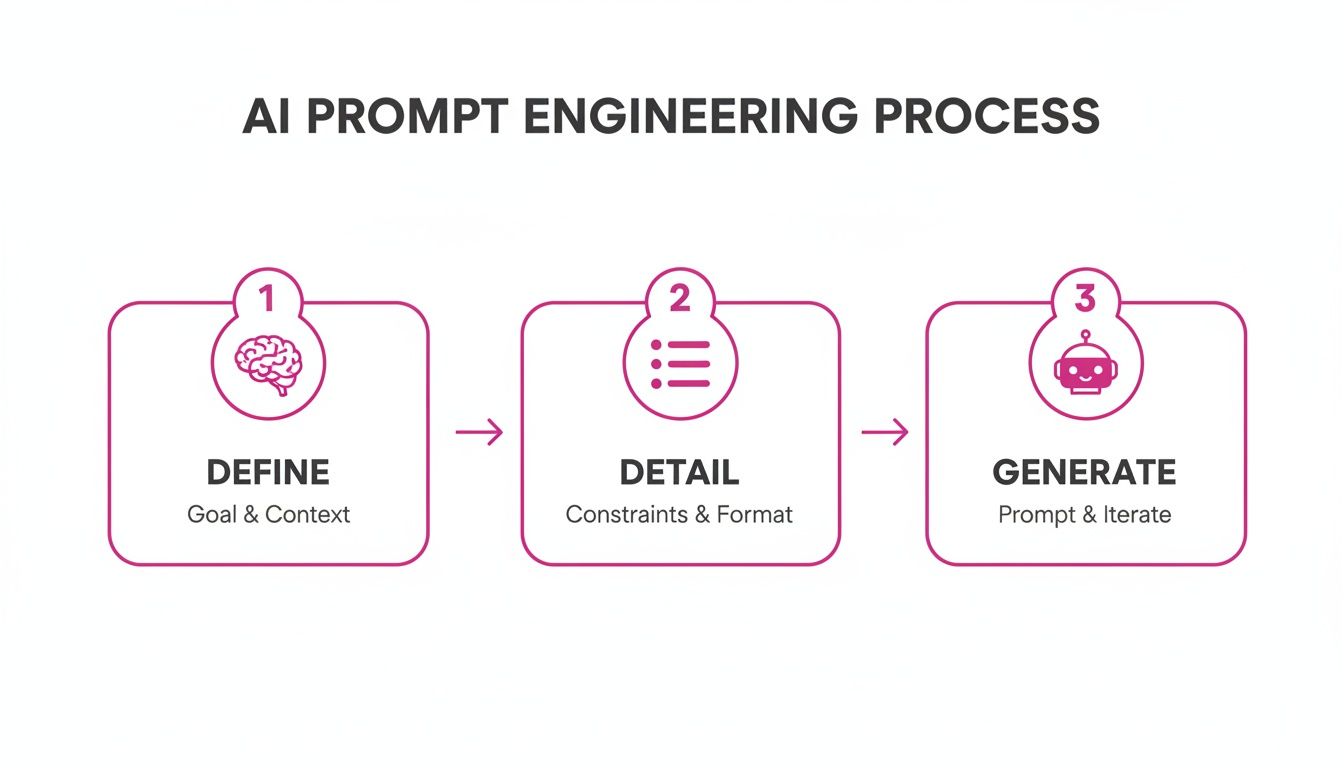
The main takeaway? Generation is the final step in a structured process, not the first.
This whole method completely flips the script on content production. On platforms that support bulk generation, a single marketer can go from one idea to 50–100 on-brand character images in less than a minute. That kind of speed makes rapid A/B testing and micro-segmented campaigns the new standard. If you want to dive deeper into how we got here, you can learn about the history of AI and its impact on creative fields.
Here's a little tip from my own experience: always generate a few more images than you think you'll need. If you need 50, generate 60. This gives you some wiggle room and ensures you have plenty of top-notch options left after you toss out the ones that didn't quite land.
Streamlining Post-Production and Batch Editing
Generating your first set of images is a huge milestone, but it's not the finish line. The next big step in creating AI characters at scale is getting those raw assets ready for the real world. This is where an efficient post-production workflow becomes a massive time-saver, turning a folder of 100 character variations into content you can use on any platform.
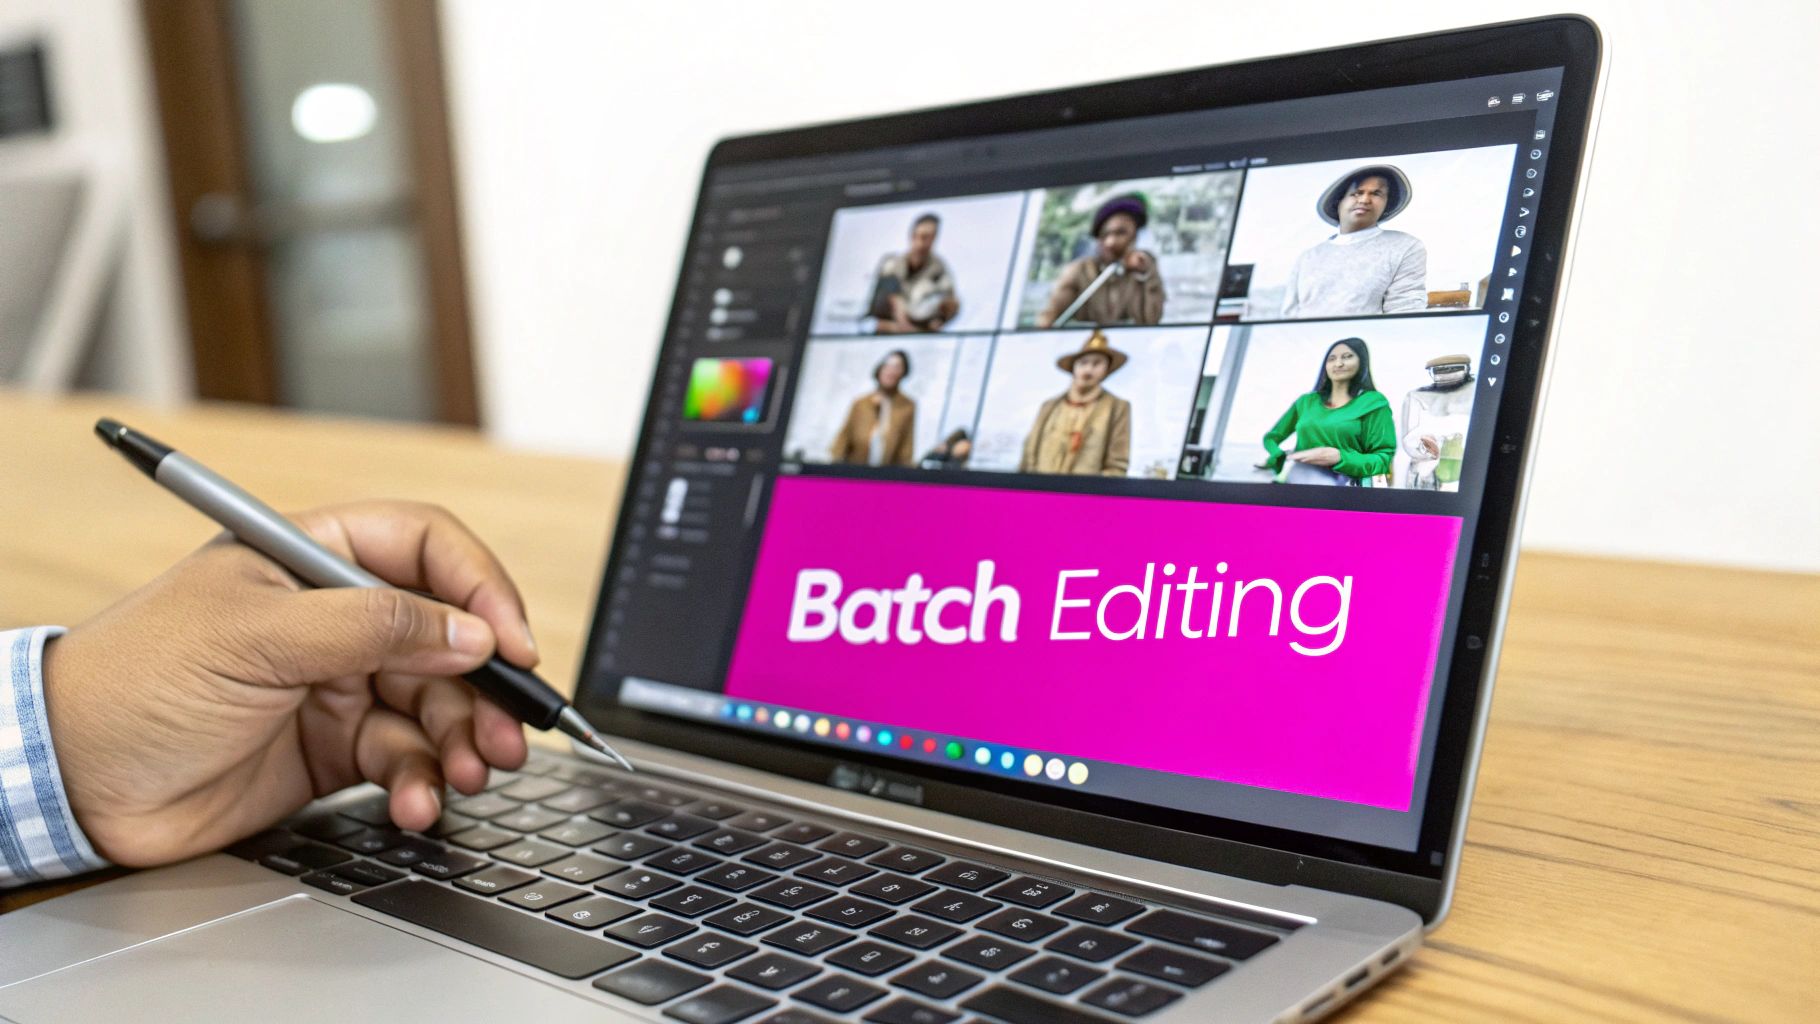
Without the right tools, you’d be stuck opening each file one by one—a mind-numbing task that completely defeats the purpose of bulk generation. Modern platforms, however, build post-production right into the workflow, letting you apply edits across your entire image set at once. This is the secret to achieving true scale.
Essential Batch Editing Techniques
Imagine you've just generated a batch of 100 mascot images for a social media campaign. Every single one needs a transparent background so it can be dropped onto different colored posts. Doing this manually would take hours. With batch editing, you can strip the background from all 100 images with a single click.
It’s the same story for other crucial tweaks:
- Bulk Resizing: Instantly resize your entire character set for different placements. In just a few minutes, you can create a batch for Instagram posts (1080x1080), another for website banners (1920x1080), and a third for email headers (600x200).
- Consistent Enhancements: Apply a uniform color grade, boost sharpness, or adjust brightness across every image at the same time. This is key to making sure your character always looks the same, reinforcing your brand identity.
- Automated Face Swaps: Sometimes the AI nails the perfect pose but gets a facial detail slightly off. Advanced tools let you pick a "master" face from your best generation and swap it onto other images in the batch, guaranteeing absolute consistency.
These integrated features can easily cut your total editing time in half. That frees you up to focus on creative strategy instead of repetitive technical work.
The biggest win here isn't just speed; it's about maintaining creative momentum. When you can go from generation to final asset without getting bogged down in tedious, one-by-one edits, your whole process feels more fluid and less like a chore.
A Practical Post-Production Workflow
Let’s walk through a real-world scenario. Say an educator creates 50 unique historical figures for a series of printable worksheets. The raw images look great, but they all have cluttered, AI-generated backgrounds.
Their post-production process becomes incredibly simple:
- Select All: Choose the entire batch of 50 images inside the platform's editor.
- Remove Backgrounds: Use the one-click background removal tool on the whole selection.
- Enhance & Unify: Apply a subtle "vintage paper" filter to the entire set to give them a cohesive, historical feel.
- Export Formats: Export the entire batch as high-resolution PNGs with transparent backgrounds, ready to be dropped into any worksheet template.
What would have been a full day of meticulous Photoshop work is now done in under five minutes. This kind of efficiency is what makes AI character creation a practical tool for any project, no matter the team size or budget. It’s not just about making images; it’s about building a production pipeline.
Using Templates for Repeatable Success
When you're creating AI characters, one-off wonders are fun, but the real magic is in repeatability. Consistency is what separates a random creative project from a scalable brand asset. This is where you move from just making cool images to building a reliable production workflow.
Instead of reinventing the wheel every single time, you can build a library of master prompts and pre-set templates. Think of them as your one-click starting points for different needs. You might have one template fine-tuned for your social media mascot, another for your game characters, and a third for your marketing visuals. This approach doesn't just save a ton of time; it locks in your visual style across everything you create.
Refining and Iterating Your Characters
Let's be real: your first batch of images is almost never the final product. It's just version 1.0. The next crucial step is to look through what you got, pick out the absolute best ones, and use them to guide the next generation of your character.
Grab a successful image and break down what makes it so good. Is it the way the light hits? That specific smirk on its face? The overall composition? Find those winning elements and fold them back into your master prompt.
For example, you might notice that adding the phrase "soft, morning light" consistently gives your character a warmer, more approachable vibe. So, you add that to your prompt and save it. Just like that, you've leveled up your character's DNA.
This loop is how you manage your AI creations as long-term, evolving assets.
- Review: Go through a new batch and cherry-pick the standouts.
- Refine: Tweak your master prompt with the keywords and phrases that worked best.
- Repeat: Kick off a new generation using the improved prompt.
Treat your master prompt like a living document. It should grow and change as you get a better feel for what makes your character tick. Saving different versions of your prompts is a great way to track this evolution and build an internal playbook for your creative team.
This cycle of continuous improvement turns your process from simple image generation into a smart asset management system. With every iteration, your character gets stronger, more consistent, and more dialed-in to your brand’s vision.
Questions That Always Come Up
When you first dive into creating AI characters, a few questions pop up almost immediately. Getting these sorted out from the start will save you a ton of headaches and make the whole process feel less like guesswork.
How Do I Stop My Character From Looking Different in Every Image?
This is the big one. Consistency is everything, and it all starts with a rock-solid core prompt. You have to be almost painfully specific about the details that matter—hairstyle, eye color, that specific leather jacket they always wear, their overall vibe.
Another trick I use all the time is locking in the seed number for a batch of images. This tells the AI to use the same starting point for every generation, so when you make small tweaks to the prompt, like changing an expression or a pose, the core character stays the same.
And finally, don't sleep on post-production. Running your whole batch through a quick editing workflow for color correction or enhancements is the final step to really lock in a uniform look. It’s what makes your character instantly recognizable across dozens of images.
What’s the Best Way to Prompt for Different Art Styles?
You have to guide the AI with the right keywords. Start by clearly defining the style you're after. Think in terms of phrases like “clean vector art,” “photorealistic portrait,” or “vintage cartoon style.”
If you have a specific artist or movement in mind, mention it! The AI has been trained on a massive amount of visual data and often understands these references. Many platforms even have style templates to get you started, which can be a great way to find the right language for the look you want.
Can I actually use these AI-generated images for my business? Generally, yes. Most generative AI platforms are fine with you using the images for commercial projects. But—and this is a big but—it is always crucial to review the terms of service for the specific tool you're using.
That quick check will tell you everything you need to know about licensing and usage rights, ensuring you're good to go for your marketing campaigns or products.
Ready to create hundreds of on-brand characters in minutes? With Bulk Image Generation, you can skip the manual prompting and editing. Describe your character, and our AI will generate a massive, consistent batch for you, complete with one-click post-production tools. Start generating your characters at scale today at bulkimagegeneration.com.