
Mastering Realistic AI Images A Practical Guide

Aarav Mehta • July 15, 2025
Learn how to generate stunningly realistic AI images. Our guide covers advanced prompting, model selection, and post-production for professional results.
Creating AI images that look real isn't some niche tech trick anymore.It's become a core skill for anyone making content today. The process has evolved far beyond just typing a few words into a box. Now, it’s about a mix of detailed instructions, knowing your way around AI models, and a bit of editing magic to get visuals that are almost impossible to tell apart from actual photos.
The New Frontier of Visual Content
We've definitely entered a new era of digital creation. The ability to cook up photorealistic images from text is a game-changer, letting brands and artists pump out top-tier visuals like never before. This isn't just a minor update; it's completely shaking up industries from advertising to entertainment.
The growth here is just explosive. The entire AI industry is sitting around $279 billion in 2024, but the projections for the global market are staggering—a potential $1.811 trillion by 2030. This isn't just investor hype; it's driven by real-world use. A recent survey showed that 58% of people are already using AI for photo editing, mostly because it saves them a massive amount of time.
Why This Matters for Creators
This is about more than just making pretty pictures. For a business, it means you can create unique, on-brand images without the hassle and cost of photoshoots or digging through stock photo libraries. For a solo creator, it kicks open doors to visual storytelling that used to be blocked by a lack of technical skills or expensive software. It's a whole new frontier, with platforms like the makerbox platform helping push the boundaries of what's possible.
The real power move? Generating images in bulk. Instead of making one image at a time, you can spit out hundreds of variations. Think about A/B testing ad creative, mocking up a diverse product line, or filling an entire e-commerce site with unique visuals. Tools that serve as an AI stock image generator are at the heart of this, offering a way to scale up content creation that traditional methods just can't match.
Just look at the projected market growth in the chart below. It really drives home how quickly this tech is being adopted.
This trend line shows this is no longer a novelty. It's becoming a fundamental tool for businesses looking to boost both creativity and efficiency.
The real opportunity isn't just about creating a single perfect image. It’s about building a scalable system for visual content production. If you can master that process, you’ll have a serious leg up in any creative field.
Ultimately, learning how to churn out realistic AI images isn't just a tech skill—it's about unlocking creative potential and making your workflow smarter and faster.
Ever wonder what’s actually happening when you type a prompt and a fully-formed image appears a few seconds later? You don't need a degree in computer science to get it, but peeking behind the curtain can seriously level up your image generation game.
At its core, an AI image generator is like an art student who has spent years studying millions upon millions of images and the text that describes them. When you ask for a "golden retriever playing in a sunny field," it doesn't just search for a matching photo. Instead, it draws on its vast knowledge of what "golden retriever," "playing," "sunny," and "field" all look like, and then synthesizes a brand-new image from scratch.
The Two Titans of Image Creation
Right now, the world of AI image generation is dominated by two powerhouse technologies: Generative Adversarial Networks (GANs) and Diffusion Models. They both strive for incredible realism, but their methods are completely different.
-
Generative Adversarial Networks (GANs): Think of this as a creative competition between two AIs. One AI, the Generator, creates images. The other, the Discriminator, is a tough art critic whose only job is to tell if the image is real or fake. This back-and-forth forces the Generator to get progressively better until its creations are so good they can fool the critic. It’s a battle of wits that results in hyper-realistic images.
-
Diffusion Models: This newer approach is more like a sculptor revealing a statue from a block of marble. The process starts with a screen full of random digital "noise"—like TV static. Then, guided by your prompt, the model carefully refines this noise, step by step, chipping away the chaos until a clear, coherent image emerges.
While GANs were the original pioneers for creating realistic faces and objects, Diffusion Models have become the new champions, often producing more detailed and contextually rich scenes. If you want to dive deeper, you can find a ton of great info from experts tracking the latest in AI methods.
Why This Actually Matters for Your Prompts
So, why the tech lesson? Because understanding these models helps you troubleshoot your results and write better prompts from the get-go.
If your image looks a bit "pasted together" or too perfect, it might be a characteristic of an older GAN. On the other hand, if the details feel slightly soft or dream-like, you're likely seeing the signature of a diffusion model at work.
The model you're using directly shapes the look and feel of your final image. Diffusion models are brilliant for complex scenes with rich textures and lighting—think breathtaking landscapes or detailed interiors. GANs, thanks to their adversarial training, often nail crisp, clean portraits where getting the anatomy just right is crucial.
This isn't just trivia; it's a practical advantage. Knowing this helps you choose the right tool for the job. For a diffusion model, you might use more atmospheric, descriptive language to guide its creative process. For a GAN, you might focus on sharp, precise details to get that clean look. This bit of knowledge moves you from just generating images to artfully directing the AI.
Crafting Prompts for Photorealistic Results
Your prompt is the single most important lever you can pull to generate truly realistic AI images. Think of it as your direct line of communication with the AI model. A vague, one-line request will almost always spit out a generic, flat-looking image. A detailed, thoughtfully constructed prompt, however, is your recipe for a masterpiece.
Going beyond a simple description like "a person smiling" is where the magic really begins. The goal is to paint a complete picture with your words, leaving as little to the AI's imagination as possible. You need to feed it specific, concrete details to work with.
This is the core workflow: you gather your creative data (the prompt), configure the model's settings, and then refine the final output.
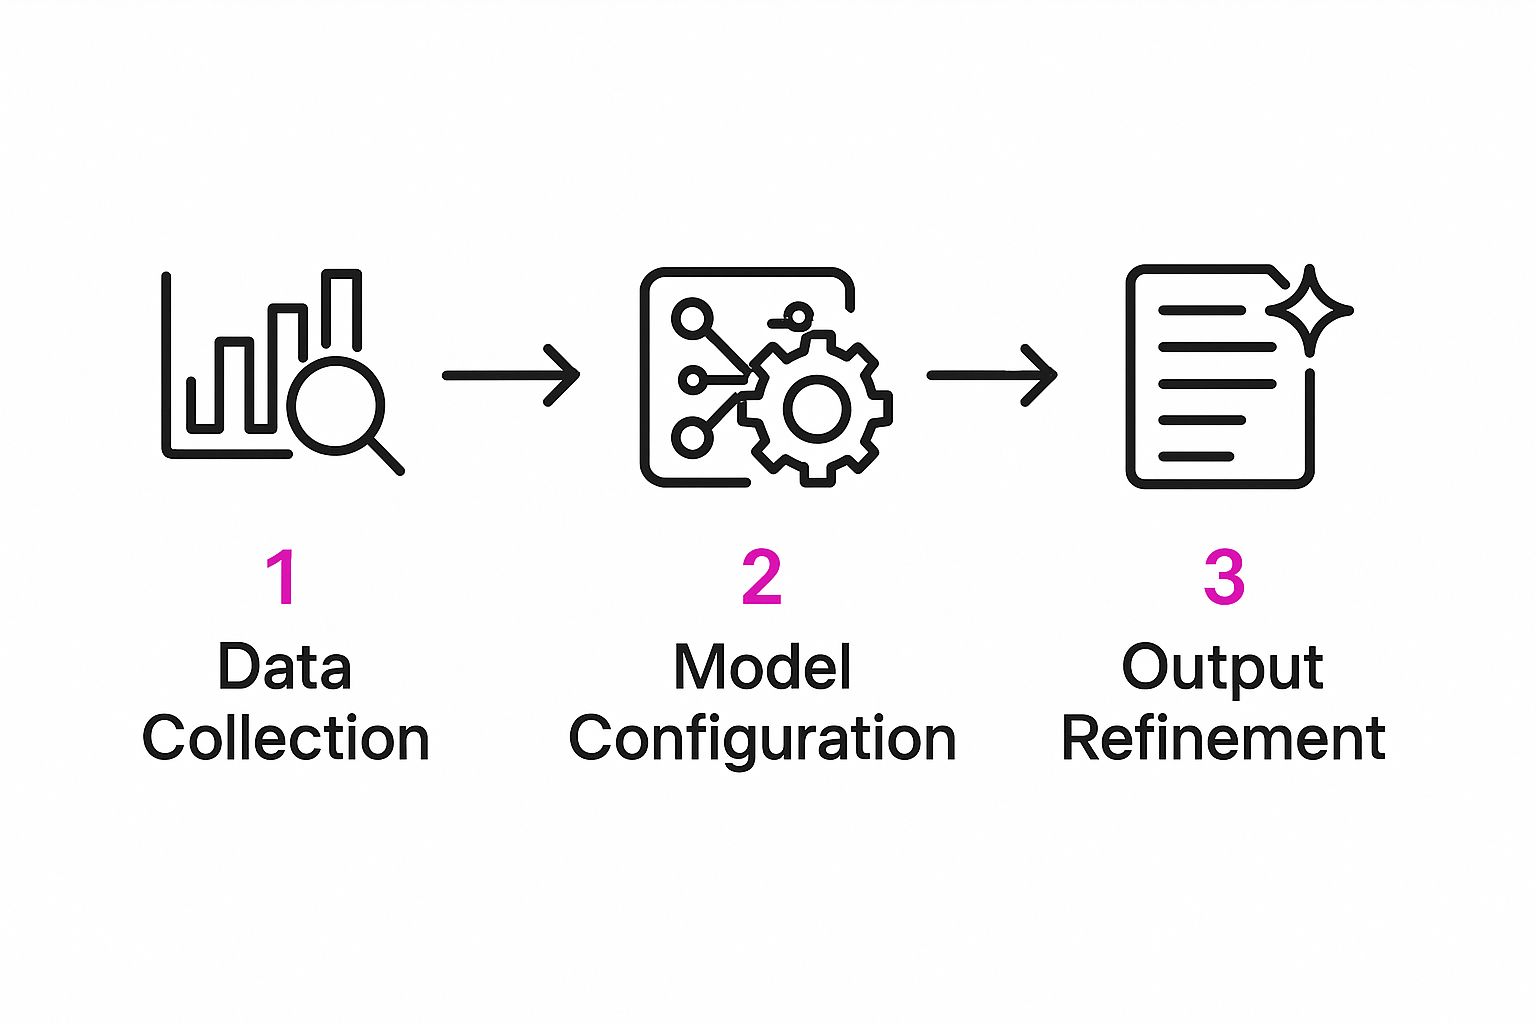
As the visual shows, your prompt is the foundation. It's the first step that influences everything that follows.
Think Like a Photographer
To get photorealistic results, you have to start describing the scene as if you were a photographer setting up a real shot. Instead of just describing the subject, specify the gear and conditions. This gives the AI a rich technical vocabulary that it directly associates with high-quality, professional photography.
Here are a few things I always consider adding:
- Camera and Lens: Specify a camera model or lens type. For instance, adding "shot on a Sony A7III with an 85mm f/1.4 lens" immediately tells the AI to create a portrait with that classic shallow depth of field and beautiful background blur (bokeh).
- Aperture and Shutter Speed: Mentioning "low aperture" or "f/1.8" helps achieve that creamy, out-of-focus background. On the other hand, "fast shutter speed" is perfect for freezing motion and getting a crisp action shot.
- Film Stock: You can instantly influence the image's color palette, grain, and overall mood by invoking classic film types like "Kodak Portra 400" or "Fujifilm Velvia".
The table below breaks down how these small additions can completely change your image from "obviously AI" to "wow, what camera did you use?"
Prompt Element Impact on Realism
| Element to Add | Example Keyword/Phrase | Effect on Image |
|---|---|---|
| Camera/Lens | Sony A7IV, 85mm f/1.4 lens | Creates shallow depth of field, professional bokeh, and high-resolution detail. |
| Lighting | Golden hour, soft rim light | Produces warm, directional light that adds depth and a professional, flattering look. |
| Film Stock | Kodak Portra 400 grain | Introduces a specific color palette, realistic grain, and a nostalgic, analog feel. |
| Atmosphere | Misty morning, volumetric lighting | Adds environmental depth, creating visible light rays and a more immersive scene. |
Adding these details gives the AI a much richer blueprint to work from, resulting in a far more believable and technically sound image.
Master the Light and Atmosphere
Lighting is, without a doubt, the most critical element for realism. Poor or generic lighting is an instant giveaway that an image is AI-generated. You have to become a director of light, using specific terms to guide the AI.
Move beyond "sunny day" and try these more evocative descriptors:
- Golden Hour: A classic term that produces warm, soft, and directional light that's universally flattering.
- Cinematic Lighting: This prompt encourages dramatic, high-contrast lighting with deep shadows, like what you'd see in a film.
- Soft Window Light: Perfect for indoor portraits, this creates a gentle, diffused light that minimizes harsh shadows.
- Rim Lighting: This creates a bright outline around the subject, separating them from the background and adding a professional, studio-like touch.
Key Insight: The more specific your lighting and atmospheric prompts are, the more believable your final realistic AI images will become. Words like "hazy," "misty," or "dramatic volumetric lighting" can completely transform a scene from mundane to magnificent.
The Power of Negative Prompts
Telling the AI what you want is only half the battle. Telling it what you don't want is just as important. This is where negative prompts come in. Think of them as guardrails, steering the model away from common AI pitfalls and weird artifacts.
Without negative prompts, you’re far more likely to get distorted hands, uncanny-looking faces, or strange digital noise. A solid negative prompt is essential for getting consistently clean results.
A standard set of negative prompts I often use includes:
unrealistic, cartoon, painting, illustrationblurry, low quality, jpeg artifactsdeformed, disfigured, extra limbs, extra fingersbad anatomy, malformed hands, ugly
Building a detailed prompt from scratch every single time can be a drag. For those moments when you need a head start, using a dedicated tool can be incredibly helpful. You can find inspiration and get a well-structured starting point with a quality free AI image prompt generator to get much better results, much faster.
Scaling Up Your Image Creation Workflow
Making one great, realistic AI image is a solid start. But the real power for your business comes when you can churn out hundreds of them, all while keeping things consistent and efficient. This is the leap from just creating to running a full-blown production line—and it's easier than you'd think. It all boils down to building a workflow that can scale.
This push toward mass production isn't just a whim; it's what the market demands. The AI image generator market was valued at around $418.5 million in 2024 and is expected to rocket to $2.633 billion by 2035. That explosive growth is all about the nonstop need for visual content in ads, e-commerce, and entertainment. You can discover more about these AI market projections to see where things are headed.
Embrace Batch Processing with Variables
The fastest way to scale up is with batch processing, which is just a fancy way of saying you generate tons of images from one command. The magic ingredient here? Variables.
Let's say you're mocking up designs for a new line of coffee mugs. Instead of writing out a separate prompt for every single design, you can automate the whole thing with a simple spreadsheet, like a CSV file.
Your spreadsheet columns become your variables:
- Column A (Product): "white ceramic coffee mug"
- Column B (Design): "minimalist mountain logo", "cute cartoon cat", "abstract floral pattern"
- Column C (Setting): "on a rustic wooden table", "in a modern kitchen", "held by a person with manicured hands"
When you upload this file to a platform that handles batch creation, the AI gets to work, mixing and matching all those variables. With one simple setup, you can crank out dozens, or even hundreds, of unique realistic AI images for your website or ad campaigns.
Key Takeaway: Using a CSV or spreadsheet with variables is the simplest yet most powerful strategy for scaling image production. It turns a manual, one-by-one task into an automated, high-volume workflow.
Maintain Consistency Across Large Batches
When you’re making a huge set of images, a consistent style is non-negotiable for your brand. A mishmash of visuals just looks amateur. The trick is to lock in the specific parameters that define your aesthetic.
Before you kick off a big batch run, create a "style" section for your prompt that never changes.
Example Constant Style Prompt:
"professional product photography, soft studio lighting, shot on Sony A7IV with 90mm macro lens, clean background, hyper-detailed, 4K"
This string becomes the unshakeable foundation for every single image. The only things that change are the variables you pull from your spreadsheet—the mug design, the setting, and so on.
Another pro tip: if your platform supports it, use a fixed seed number. The seed is the starting point for the generation process. Reusing the same seed with the same prompt helps you get a very similar composition every time, which is a lifesaver for consistency.
Organize Your Output for Efficient Review
Okay, so you’ve generated hundreds of images. That's only half the battle. Now you need a smart way to review them and pick the winners. A messy folder filled with image-1.png, image-2.png is a recipe for a headache.
Here’s how to stay sane:
- Use Descriptive Filenames: Have your batch process name files based on the variables used (e.g.,
mug_mountain-logo_rustic-table.png). This makes it ridiculously easy to find exactly what you're looking for later. - Create a Rating System: As you go through the images, create a "Finalists" folder for the keepers and an "Archive" folder for the duds. This quick triage system will save you a massive amount of time.
- Leverage AI for Text: To really round out your content, you'll need great text descriptions and ideas to feed into your image prompts. It's worth exploring the best AI content generators to see how they can complement your visual workflow.
Putting this kind of organization in place ensures your scalable process is efficient from the moment you hit "generate" to the final selection.
Refining Your AI Images With Post-Production
Let's be real. Even with the most carefully crafted prompts, the first image the AI spits out is rarely the final version. It's just the starting point. The magic that turns a good AI-generated image into something truly photorealistic happens in post-production. A little human touch goes a long way.
This isn't about completely changing the image. Think of it as the final polish—fixing the small, tell-tale AI glitches and adding a layer of authenticity that the machine often misses. It's how you bridge the gap between "almost real" and "you can't tell it's not a photo."
Fixing Common AI Flaws
One of the most powerful tools for this is AI inpainting. You've probably seen it in modern image editors. It lets you paint over a problem area—like those notoriously weird AI hands or eyes that are just a little off—and have the AI regenerate only that tiny piece.
So, instead of throwing away a great composition because of one flaw, you can do some quick surgery. Imagine you have a perfect portrait, but the subject has six fingers. Just paint over the hand and tell the tool to generate "a realistic human hand holding a coffee cup." It’s incredibly efficient and saves you from starting over.
Resolution is another common hurdle. AI models often create images at screen-friendly sizes, which won't cut it for high-quality printing. That’s where AI upscalers come in. They can intelligently blow up your image by 2x, 4x, or even more, adding believable detail instead of the blurry pixelation you get from old-school resizing. This simple step makes your AI art print-ready.
The most convincing AI images are almost always a hybrid creation. They start with a strong AI-generated base and are then perfected with human-guided editing. This blend of machine scale and human intuition is what separates the good from the great.
Batch Editing for a Cohesive Look
When you're generating a whole set of images for a campaign or a website, you need them to look like they belong together. Consistency is everything. This is where batch editing becomes a lifesaver. Tools like Adobe Lightroom or Capture One let you apply the same tweaks to an entire folder of AI visuals at once.
Here are a few batch adjustments that make a huge difference:
- Consistent Color Grading: Create a specific color profile or use a preset to give all your images the same vibe. This is absolutely critical for maintaining brand identity.
- Subtle Film Grain: A light, uniform layer of film grain can break up that overly smooth, digital look of AI images. It adds a touch of analog texture that just feels more authentic to the human eye.
- Lighting and Contrast Adjustments: Tweak the highlights, shadows, and overall contrast to perfect the lighting. This makes it feel like every image in the series was shot under the exact same conditions.
This process is a game-changer for product visuals. If you want to see this workflow in action, we break it down step-by-step in our comprehensive guide on AI product photography. By applying these simple post-production techniques, you can transform a random series of images into a polished, professional collection.
Your Questions on Realistic AI Images Answered
Once you start going down the rabbit hole of AI image creation, you're going to have questions. It's only natural. This space moves incredibly fast, and what was a hard limit yesterday might be standard practice today.
To help you out, I’ve pulled together some of the most common questions I hear and broken down the answers in a way that actually makes sense.
What Makes an AI Image Look Realistic?
Achieving true photorealism is less about one big trick and more about nailing a bunch of small, essential details. It's not just about what the subject is, but whether the world it exists in feels real. The most convincing AI images always get these things right:
- Accurate Lighting: This is non-negotiable. Shadows and highlights need to look like they belong. A person in a sunny field can't have the soft, diffused light of an indoor photo studio.
- Natural Textures: Surfaces need to feel right. Skin, wood, fabric, and metal should have authentic-looking textures, not that tell-tale smooth, plastic-like finish that screams "AI."
- Correct Anatomy: This is a big one, especially with people. Hands, faces, and body proportions have to be anatomically sound. Get this wrong, and you immediately fall into the uncanny valley.
- Subtle Imperfections: Real photos are never perfect. A little bit of subtle film grain, a minor lens flare, or a soft focus can be the secret ingredient that makes an AI image feel genuinely authentic.
The end goal is simple: create something that feels like it was captured through a camera lens, not spit out by an algorithm.
Which AI Models Are Best for Photorealism?
When you’re chasing that top-tier, can't-tell-it's-not-a-photo look, a few models consistently lead the pack.
Midjourney, especially its recent versions, is famous for its ability to create images that are both artistically stunning and stylistically realistic right out of the box. It’s a fantastic choice if you want incredible results without a ton of manual fine-tuning.
Then there’s Stable Diffusion. If you're someone who craves maximum control, this is your playground. Because it’s open-source, you can use custom-trained models—like the incredibly popular Realistic Vision checkpoint—to get hyper-specific and jaw-droppingly detailed photos. Ultimately, the "best" model really hinges on what you need to create and how deep you're willing to go.
Key Insight: Whether you can use your images for commercial projects depends entirely on the terms of service of the platform you're using. Most paid plans on major platforms give you commercial rights, but keep in mind that copyright law is still playing catch-up. Always, always double-check the platform's policies before you go to market.
How Do I Avoid the Uncanny Valley?
Ah, the "uncanny valley." It's that creepy, unsettling feeling you get when something looks almost human, but not quite. Dodging it is the key to creating portraits and scenes that people actually connect with.
It all starts with your prompt. Be ridiculously specific about the look you want. But just as important is using negative prompts to tell the AI what you don't want. Adding terms like "plastic skin," "disfigured," "malformed hands," or "cartoon" can effectively steer the model away from its worst habits.
Finally, don't underestimate the power of a little post-production. A few subtle tweaks to skin tones in an editor, using inpainting to fix a weird finger, or adding a touch of natural grain can be all it takes to pull an almost-real image into the realm of the completely believable.
Ready to stop wrestling with individual prompts and start creating at scale? Bulk Image Generation lets you produce up to 100 unique, high-quality images in under 20 seconds from a single description. Automate your creative workflow and get back to what matters. Start generating for free today!