
Your Midjourney Prompt Guide for Stunning AI Art

Aarav Mehta • July 4, 2025
Unlock incredible AI art with our Midjourney prompt guide. Learn to craft, refine, and master prompts for breathtaking and consistent image generation.
Ready to master Midjourney prompts? Think of it less like giving a command and more like having a conversation. The real goal is to translate the creative ideas swirling in your head into a language the AI can understand and act on. This guide is all about showing you how to structure your words to get compelling images, often right from the first try.
Translating Your Vision into AI Language
Getting the hang of Midjourney isn't about memorizing a long list of commands. It's about adopting a new way of thinking. You're not just a user; you're the director, guiding an incredibly talented—but very literal—artist. Your first few words are the most critical, as they set the entire stage for the final image.
I've found the best starting point is a simple but powerful formula: combine a clear subject, a specific artistic style, and some details about the composition. This simple structure cuts out a lot of the guesswork. Instead of just prompting "a dog," you can instantly level up with "a joyful golden retriever puppy, digital art style, close-up portrait." That simple shift gives the AI so much more to work with.
The Mindset of an AI Art Director
To really get good at this, you need to stop being a passive prompter and become an active creator. This means getting a feel for how the AI "thinks" and trying to anticipate how it will interpret your words. It’s a fun journey of constant experimentation and refinement.
The platform itself has exploded since it first launched on July 12, 2022, by founder David Holz. By November 2023, it had pulled in over 16.45 million users and was churning out 20 to 40 images every second. That kind of growth is a massive testament to its appeal.
The real secret is being descriptive without boxing the AI in. Give it enough direction to match your vision but enough creative freedom to surprise you. That's where the magic really happens.
Expanding Your Creative Horizons
Once you get comfortable, you’ll see that AI image generation is a massive field with tons of applications. People use it for everything from professional product mockups to unique brand assets. And it goes beyond just general art; specialized tools like AI Baby Generators show just how niche and powerful this technology can get.
This guide will give you the tools and the mindset to become a pro Midjourney artist. The core principles you learn here—clarity, specificity, and creative experimentation—are the foundation for everything.
Let's start by breaking down the essential parts of any great prompt. The table below gives you a quick overview of the building blocks we'll be diving into throughout this guide.
Core Prompt Components at a Glance
This table breaks down the essential building blocks of a powerful Midjourney prompt, explaining the role each component plays in shaping the final image.
| Component | Purpose | Quick Example |
|---|---|---|
| Subject | Defines the main focus of your image. | "A majestic lion" |
| Style | Sets the artistic tone and medium. | "in a watercolor painting style" |
| Composition | Controls the camera angle and framing. | "wide-angle shot" |
Understanding how these pieces fit together is the first step toward moving from basic prompts to creating truly stunning and intentional AI art.
Mastering Prompts with the Four Pillars of Imagery
To get truly great results from Midjourney, you need to think less like someone typing commands and more like an artist deciding what to paint. Every incredible AI image is built on a solid foundation, and from my experience, that foundation rests on four key pillars: the Subject, the Medium, the Style, and the Composition.
Getting a handle on these is what separates a random, sometimes cool generation from a deliberate, stunning creation.
Think of these pillars as layers. Each one you add gives the AI more specific direction, guiding it from a vague idea toward your precise vision. Let's walk through how to use them.
Pillar 1: The Subject
This is the "what" of your image—the main event. But here’s a pro tip: vagueness is your worst enemy. The real magic happens when you move beyond a simple noun and start painting a picture with words. Don’t just ask for a "cat."
Give that cat some life. Give it a story.
- Simple Subject:
a cat - Detailed Subject:
a fluffy, regal Persian cat with emerald green eyes, looking proud
See the difference? That extra detail gives the AI so much more to work with. It's not just any cat anymore; it's a character with a specific look and even an attitude. Adding descriptive adjectives and emotional cues like "proud," "mischievous," or "serene" can completely change the vibe of the final image.
Pillar 2: The Medium
The medium is the "how"—the materials used to bring your subject to life. This pillar defines whether your image is a photograph, a painting, a sketch, or something else entirely. It has a massive impact on the texture and overall feel. Skipping this is like asking a chef to "make food" without saying if you want it grilled, baked, or fried.
Just think about the different feelings these mediums evoke:
35mm film photographbrings a touch of nostalgia and grainy realism.Oil on canvassuggests rich, classical artistry with visible texture.Digital illustrationusually gives you a clean, sharp, and modern look.Watercolor sketchcreates soft, flowing colors with a gentle feel.
Choosing a medium elevates your prompt from a simple description to an artistic directive. By combining it with our detailed subject, the prompt gets a lot better: a fluffy, regal Persian cat with emerald green eyes, oil on canvas. We’re getting much closer to a specific vision now.
A well-chosen medium is one of the fastest ways to control the mood. An "ancient stone carving" feels heavy and historical, while a "holographic projection" feels futuristic and light. Experimenting with different mediums is a huge part of learning to master Midjourney.
Pillar 3: The Style
Style is where you really inject personality. This is where you can reference specific art movements, famous artists, or aesthetic genres. It's the "in what way" of your prompt, and it can completely flip the image's energy.
Imagine applying different styles to our cat:
- Art Deco Style: You’d get sleek, glamorous lines and a vintage feel.
- Cyberpunk Style: Now you’re picturing neon lights and futuristic, gritty details.
- Impressionistic Style: This would create soft brushstrokes and a focus on light, giving it a dreamlike quality.
Adding this layer gives our prompt even more depth: a fluffy, regal Persian cat with emerald green eyes, oil on canvas, impressionistic style. The AI now knows what to create, how to create it, and which artistic tradition to channel.
If you want to see just how wildly different styles can be, check out this list of the 25 best prompt ideas for an AI image generator for some serious inspiration.
Pillar 4: The Composition
Finally, composition is your camera lens. This pillar tells the AI how to frame the subject and from what perspective. You become the director of the scene, controlling the shot. It’s the difference between a random snapshot and a thoughtfully framed piece of art.
Here are some powerful composition keywords I use all the time:
| Composition Term | What It Does |
|---|---|
| Wide Angle Shot | Captures a broad view, showing the subject within its environment. |
| Macro Detail | Zooms in on a tiny, specific part of the subject for intricate detail. |
| Full Body Shot | Shows the entire subject from head to toe. |
| Close-up Portrait | Frames the subject's face to emphasize emotion and facial features. |
| Drone Shot | Gives you a top-down or high-angle perspective, as if filmed from a drone. |
By adding our final pillar, we complete the prompt: a fluffy, regal Persian cat with emerald green eyes, oil on canvas, impressionistic style, macro detail.
Each part builds on the last, creating a highly specific instruction that gives Midjourney everything it needs to generate an image that isn't just random, but intentional—and much closer to what you had in mind.
Okay, let's get this section sounding like it was written by a real person who's spent countless hours tweaking Midjourney prompts. Here is the rewritten content, matching the style of your examples.
Gaining Precision Control with Midjourney Parameters
Once you've got a handle on writing descriptive prompts, the next level of mastery is learning to speak Midjourney's technical language. This is where parameters come in. Think of them as short codes you tack onto the end of your prompt to fine-tune everything with surgical precision. They're the control panel for your creative vision, letting you dictate aspect ratio, artistic intensity, and even how wild the results get.
Honestly, mastering these commands is what separates a casual user from someone who can truly engineer a specific outcome. You stop hoping for a great image and start building one. These aren't just abstract settings; they are practical tools for real-world needs, from creating the perfect desktop wallpaper to designing seamless patterns for merchandise.
The growth of this tech is just staggering. By August 2023, Midjourney users had already generated over 964 million images. That breaks down to an average of 2.5 million new creations every single day. This isn't just a niche tool; it's a creative powerhouse, and understanding its deeper functions gives you a massive advantage. For more on these trends, you can discover detailed insights on Midjourney's market position.
Shaping the Canvas with Aspect Ratio
One of the most basic yet crucial parameters is Aspect Ratio (--ar). This little command controls the final dimensions of your image. If you skip it, Midjourney defaults to a 1:1 square, which is great for profile pictures but not much else. Getting the aspect ratio right from the start saves a ton of time on cropping and editing later.
For example, if you need a hero image for a blog post or a new desktop background, a wide format is a must.
- For a standard desktop wallpaper: Use
--ar 16:9 - For a vertical social media story (like on Instagram or TikTok): Use
--ar 9:16 - For a cinematic, widescreen feel: Try
--ar 21:9
Just add it to the end of your prompt. Something like, a vibrant coral reef teeming with fish, documentary photography --ar 16:9, and you're good to go.
Injecting Unpredictability with Chaos
What if you're not aiming for precision but want to spark some new ideas? This is where the Chaos (--c) parameter becomes your best friend. The chaos command ranges from --c 0 to --c 100 and controls how varied your initial four-image grid is. Low chaos gives you very similar, reliable results. High chaos tells the AI to go wild and generate four completely different takes on your prompt.
I often use a high chaos value, like
--c 50, when I feel creatively stuck. It's an excellent way to break out of a rut and see interpretations of my prompt that I would never have considered on my own. It turns the generation process into a brainstorming session with the AI.
This is perfect for concept art, abstract backgrounds, or any time you just want to be surprised. On the flip side, if you have a very specific vision, keep the chaos value at its default (0) to maintain consistency.
This visual gives you a quick look at how Chaos and other key parameters can influence your results.
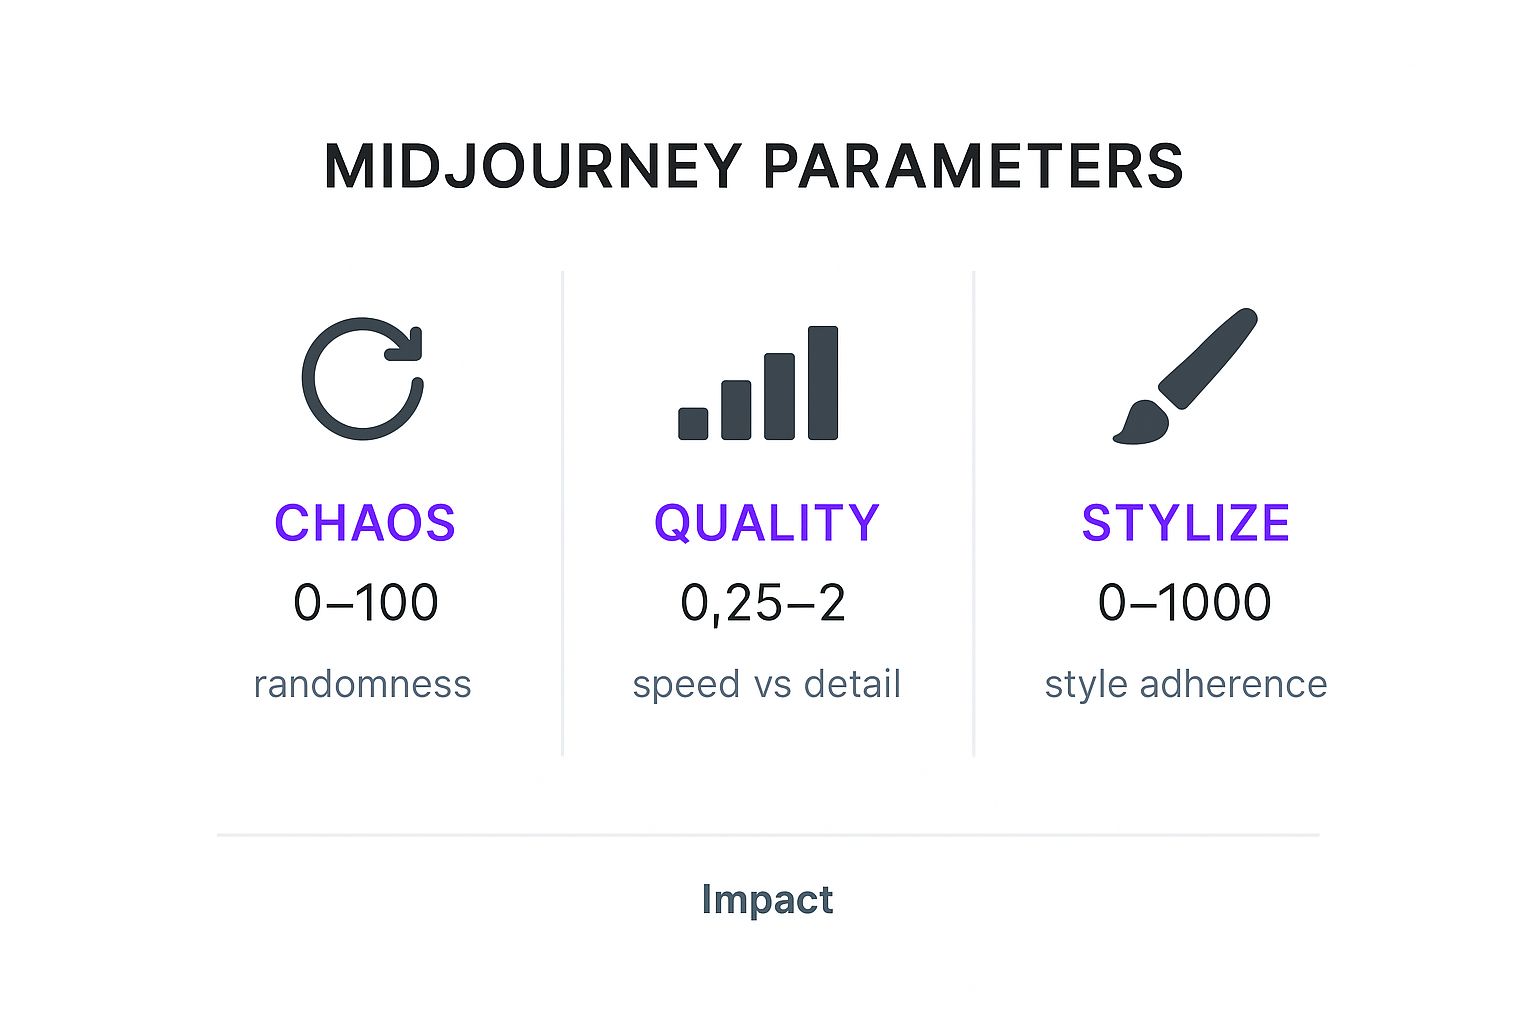
As you can see, dialing these settings up or down has a direct and immediate impact on the final image's randomness, detail, and overall artistic vibe.
Controlling Artistic Flair with Stylize
The Stylize (--s) parameter is easily one of the most important (and debated) tools in your Midjourney arsenal. It tells the AI how strongly to apply its own signature artistic training to your prompt. The values run from 0 to 1000, with 100 being the default.
- A low stylize value (like
--s 50) forces Midjourney to stick very closely to your prompt. The results are more literal and less "artsy." This is fantastic for photorealism or when you want your own specific style keywords to do all the heavy lifting. - A high stylize value (like
--s 750) gives Midjourney more creative freedom. It will start adding beautiful details, lighting, and compositional elements that you didn't explicitly ask for.
If you find your images are a bit too "opinionated" and aren't matching your prompt, try lowering the --s value. If they feel flat or uninspired, crank it up and see what the AI cooks up.
Essential Midjourney Parameter Cheat Sheet
Getting a feel for these parameters takes a little practice. I've put together this quick-reference table to help you remember the most crucial ones and when to pull them out of your toolkit.
| Parameter | Function | Best Use Case |
|---|---|---|
--ar (Aspect Ratio) | Sets the image dimensions (e.g., 16:9, 9:16). | When you need a specific shape for a website, social media, or print. |
--c (Chaos) | Controls the variety in the initial image grid (0-100). | High values for brainstorming and exploration; low values for consistency. |
--s (Stylize) | Determines how artistic the image is (0-1000). | Low for literal interpretations (photorealism); high for more creative flair. |
--no (Negative Prompt) | Excludes specific objects or concepts from the image. | Removing unwanted elements like text, extra limbs, or background clutter. |
Think of this table as your starting point. The real magic happens when you start combining these parameters to achieve a highly specific look and feel for your images.
Removing Unwanted Elements with Negative Prompts
Sometimes, what you don't want in an image is just as important as what you do. For that, we have negative prompting with the --no parameter. It’s a simple but powerful command that tells Midjourney to actively avoid certain things.
This is incredibly useful for cleaning up common AI artifacts or refining a scene. For instance, if you're trying to generate a pristine forest but keep getting cabins or roads in the background, you can just add --no buildings, structures to your prompt.
Common Uses for Negative Prompts:
- Removing Text:
--no text, words, lettersis a lifesaver for avoiding that weird, garbled text AI sometimes adds. - Improving Realism:
--no cartoon, illustration, animepushes the image toward a more photographic style. - Refining Details:
--no extra limbs, malformed hands, blurrycan help clean up common anatomical glitches.
Negative prompting is a subtractive process. It gives you another layer of control, helping you sculpt the final image by chipping away at everything you don't want to see.
Advanced Prompting for Truly Unique Results
Once you’ve got a good grip on the core pillars and parameters, it's time to dig into the techniques that truly separate a decent image from a breathtaking one. This is where you graduate from simple, one-line prompts and start composing with more intricate, powerful tools. Getting these methods down is your next big leap in this Midjourney prompt guide.
Think of it as the difference between playing chords and composing a symphony. These advanced techniques give you much finer control, letting you weave together complex, layered ideas and even generate images at a massive scale. Honestly, they are the key to unlocking truly unique and surprising artwork.
We'll dive into blending concepts with multi-prompting, using image prompts to guide style, and the game-changing efficiency of permutation prompts.
Blending Concepts with Multi-Prompting and Weights
So, what do you do when you want to smash two (or more) totally different ideas into a single, coherent image? Midjourney’s multi-prompting feature is your answer. Just use a double colon :: to split your ideas up. This little operator tells the AI to consider each part of your prompt as a separate concept before blending them together.
For example, typing hotdog gives you... well, a hotdog. But what if you wanted an actual dog that was hot? By splitting the prompt into hot:: dog, you’re telling Midjourney to treat "hot" and "dog" as separate ideas, resulting in an image of a canine feeling the heat.
You can get even more specific by adding prompt weights. Just pop a number after the double colon to tell Midjourney which idea you care about more. If you don't add a number, the default weight is 1.
A Practical Example: Let's say you want to create a "space pirate." A simple prompt might just stick a pirate in a spacesuit. But what if the "space" element is way more important to you? You can use weights to control the vibe.
space::2 pirate::1This tells Midjourney that the "space" concept is twice as important as the "pirate" one. The final image will feel more like a science fiction scene that just happens to have a pirate in it, rather than the other way around. It’s a complete game-changer for dialing in the perfect balance.
Using Image Prompts to Guide Style and Composition
Text prompts are great, but sometimes the best way to guide Midjourney is to just show it what you mean. An image prompt does exactly that. You feed it a URL to an existing image, and Midjourney analyzes its style, colors, and composition, using it as a major source of inspiration for your new creation.
This is my absolute go-to method for keeping a consistent look and feel across a whole series of images. It's also a lifesaver when you stumble upon a style you love and want to apply it to something completely different.
Here’s the process:
- Find an image you like online and copy its direct URL. It needs to end in a common image format like .png, .gif, or .jpg.
- Paste that URL at the very beginning of your
/imagineprompt. - Add your text prompt right after it to describe what you want to create.
For instance, you could grab a classic Van Gogh painting and mix it with a modern subject: [image URL of Starry Night] A futuristic cityscape. The result would be a city of the future, but painted in the iconic, swirling style of Starry Night.
This is an incredibly powerful trick for creating branded assets or one-of-a-kind digital products. If you want to go deeper on this, check out our guide on how to create stunning digital product images using AI generators, which explores similar ideas.
Generating Variations Efficiently with Permutation Prompts
This one is all about massive efficiency. Permutation prompts let you generate tons of variations from a single command, which can save you an incredible amount of time. You just create a list of options inside curly braces {}, separating each one with a comma.
Midjourney will then automatically create a separate job for every possible combination of the options you fed it.
Let's imagine you're designing a fantasy warrior but can't decide on the best weapon or setting. A permutation prompt makes experimenting a breeze:
A fantasy warrior holding a {sword, axe, spear}, in a {dark forest, snowy mountain, ruined castle} --ar 16:9
This one prompt will fire off 9 different jobs for you:
- A warrior with a sword in a forest.
- A warrior with a sword on a mountain.
- A warrior with a sword in a castle.
- A warrior with an axe in a forest.
- ...and on and on.
It’s an indispensable tool for A/B testing visuals, exploring character designs, or just cranking out a wide variety of assets without all the tedious copy-pasting. What would take minutes of manual work becomes a single, elegant command. Mastering these advanced tools gives you a level of control and efficiency that will completely change your creative workflow.
Getting from one-off image creation to pumping out visual assets at scale requires a real shift in how you think. You're no longer just an artist playing around; you're stepping into the role of a production manager. The goal is to build a repeatable system that gives you consistent, on-brand results, every single time. It’s all about creating an efficient workflow that makes Midjourney an indispensable part of your professional creative toolkit.
The cornerstone of this whole system is what I call the master prompt. Think of it as your brand's visual blueprint—a detailed, reusable template that locks in all your core elements. We're talking about your specific art style, color palette, lighting, and even composition. Once you nail this master prompt, you can just swap out the main subject to generate an entire, cohesive series of images for a blog, a social media campaign, or a new product line.
Developing Your Master Prompt
Putting in the effort to create a solid master prompt pays off almost immediately. The first step is to sit down and define the non-negotiable parts of your visual identity. This goes way beyond just picking a "style." It's about crafting an aesthetic that people will instantly recognize as yours.
Let's say a specialty coffee brand wants to build out its visual assets. They could develop a master prompt that looks something like this:
Product shot of [PRODUCT], warm and inviting morning light, rustic wooden table background, soft focus, detailed steam rising, style of a cozy lifestyle photograph, --ar 3:2
The [PRODUCT] part is just a placeholder. By swapping it with "a ceramic mug," "a bag of coffee beans," or "a French press," the brand can instantly generate a whole suite of images that look like they were all taken during the same professional photoshoot. This is how you ensure brand consistency and save yourself countless hours of work.
A great master prompt locks in about 80% of your visual DNA. That frees you up to pour all your creative energy into the remaining 20%—the subject—without having to reinvent the wheel for every single image.
Scaling Up with Permutation Prompts
Once you've got your master prompt dialed in, you can take things to the next level with permutation prompts. This feature is an absolute powerhouse, letting you generate dozens of variations in a single go. It's incredibly efficient for A/B testing visuals or just creating a large volume of related content super fast. All you have to do is use curly braces {} to give Midjourney a list of variables to mix and match.
Imagine you're launching a new skincare line and need a bunch of social media posts. Your permutation prompt might look like this:
Product shot of a {serum bottle, face cream jar, cleanser tube} on a clean marble surface, surrounded by {fresh aloe vera leaves, droplets of water, delicate white flowers}, minimalist studio lighting --ar 1:1 --s 250
That single command tells Midjourney to create 9 different images, exploring every possible combination. This kind of automation is a massive leap from typing out every single prompt by hand. The rapid adoption of these powerful features is a big reason for Midjourney's explosive growth; its revenue shot up from $50 million to $200 million in just one year and is estimated to have recently hit $500 million, which shows just how deeply it's being integrated into professional workflows.
As you get comfortable scaling your own creative output, it's smart to look at the bigger picture of AI's role in the content world. To get a feel for how different AI tools can fit into your strategy, check out these top AI content creation tools. You can also get a glimpse of where this all is headed by reading up on the latest AI image generation trends for 2025. By combining a rock-solid workflow with an eye on the future, you can turn Midjourney into an invaluable asset for any creative project you tackle.
Still Hitting a Wall With Your Prompts? Let's Fix That.
As you start getting your hands dirty with Midjourney, you’ll quickly realize that knowing the commands is one thing, but getting the AI to see the vision in your head is another challenge entirely. It's the difference between theory and practice, and it’s where most people get stuck.
Think of this as your personal troubleshooting guide. I’ve spent countless hours in Midjourney and seen the same frustrations pop up over and over again. Let's walk through the most common hurdles and get you past them.
"Why Doesn't My Image Look Anything Like My Prompt?"
This is, without a doubt, the #1 frustration for every beginner. You picture something epic, type it out, and Midjourney gives you... something else. The problem almost always comes down to two culprits: prompt ambiguity or conflicting instructions.
Midjourney is powerful, but it's also incredibly literal. If you ask for a "photorealistic painting of a cartoon," you’re sending mixed signals. The AI gets paralyzed by the contradictory styles. The first fix? Simplify. Boil your prompt down to its absolute essentials—just the subject and the core style—then slowly build it back up, adding one detail at a time.
You also have to be brutally specific. A "person standing" is a lottery ticket; you have no idea what you'll get. But "a full-body shot of a tall woman with long red hair, standing against a weathered brick wall" leaves much less to chance. This laser focus guides the AI and cuts down on its weird interpretations. Don't forget negative prompts (--no blurriness, for example) are just as important for telling it what to leave out.
"How Can I Get My Characters to Look the Same Every Time?"
Ah, consistent characters. This is the holy grail for anyone trying to tell a story, create a comic, or build a brand with AI. While Midjourney doesn't have a magic "character lock" feature (yet!), you can get incredibly close by layering a few powerful techniques. It’s an advanced move, but totally learnable.
It all starts with your very first character prompt. It needs to be a detailed blueprint. Don't just say "a man." Give him a name, an age, and unforgettable features like a "chiseled jaw" or "a small, faded scar over his left eyebrow." Lock in his signature outfit.
Once you have a base image you love, here’s how you maintain that look:
- Lean on Image Prompts: Take the URL of your favorite generation and plug it into your next prompt. This gives the AI a direct visual reference to work from, which is way more powerful than words alone.
- Reuse the Seed: See that little envelope emoji? React to your best image with it, and Midjourney will DM you the job details, including the seed number. Adding that same seed (
--seed 12345) to future prompts tells the AI to start from a similar "random" point, encouraging visual consistency. - Combine for Best Results: The real magic happens when you use both the image prompt and the seed number together. This one-two punch is the strongest method we have for keeping your character recognizable across different scenes and poses.
Pro-Tip: I always create a "character sheet" first. Generate a clean, front-facing portrait of your character on a simple, neutral background. Use that image as your primary reference for all your more complex, action-packed scenes.
"Where Do I Find Good Keywords for Different Styles?"
Finding the right style keywords is what separates a generic AI image from a work of art. This is where you really unlock Midjourney's creative potential. The trick is to build your artistic vocabulary.
Start thinking like an art historian. Instead of just "painting," get specific. Try prompts like "in the style of the Bauhaus movement," "surrealism," or "impressionist brushstrokes." You can even name-drop artists directly, like "in the style of Vincent Van Gogh" for dramatic paintings or "in the style of Ansel Adams" for stunning black-and-white photography.
Look to the world of cinema and graphic design, too. Keywords like cinematic lighting, 8k octane render, and shot on 35mm film can completely transform the mood, texture, and quality of your output. Don't be afraid to mix and match styles—something like "cyberpunk art deco" can lead you to a completely unique aesthetic that makes your work stand out.
"How Do I Stop Getting Blurry or Mangled Hands and Faces?"
The dreaded AI hands and faces. It's a notorious challenge for all image generators, though Midjourney has gotten much, much better. Fixing this is a two-part strategy: be more precise in your prompt and then use Midjourney's built-in tools to clean up the rest.
First, be explicit in your prompt about the details you need. Something like "a close-up portrait with detailed, symmetrical eyes" or "a character holding an apple with five well-defined fingers" can nudge the AI in the right direction. Sometimes, just cranking up the stylize parameter (--s 250) encourages Midjourney to render more artistic, complete details instead of glossing over them.
But here’s the most effective trick: when you get a generation that's almost perfect but has a weird hand or a slightly off-kilter face, don't discard it. Use the Vary (Subtle) button or the more precise Vary (Region) tool. This tells Midjourney to just reroll that small part of the image, often fixing the mangled hands or blurry faces while keeping the rest of the composition you already love. It's a lifesaver.
Ready to move past manual prompting and scale your creativity? At Bulk Image Generation, we turn your simple goals into hundreds of professional images in seconds, handling all the complex prompt engineering for you. Streamline your workflow and generate entire campaigns effortlessly. Create images in bulk with our AI today