How to Make White Background Transparent Easily

Aarav Mehta • October 1, 2025
Learn exactly how to make white background transparent with quick AI tools and Photoshop tips. Achieve professional results for logos, products, and designs.
Knowing how to make a white background transparent is one of those fundamental skills that can instantly level up your design game. It’s what turns a basic image into a versatile, professional-looking asset.
With this one simple edit, you can place logos, product photos, or graphics onto any backdrop—websites, presentations, social media—without that clumsy white box trailing behind. It’s the secret to getting a clean, seamless look every time.
Why Transparent Backgrounds Are a Game-Changer
Removing a white background isn't just a technical trick; it's a strategic move that makes your brand look more polished and your message clearer. A transparent image feels like it belongs, blending perfectly with its surroundings instead of clashing with them. This flexibility is essential for keeping your brand identity consistent across all your marketing materials.
Making Everything Look Seamless
Picture your company logo sitting perfectly on a colored website header. Or a product photo that blends right into a vibrant social media post. Without transparency, you're stuck with distracting white boxes that just break the visual flow and make the whole design feel cheap.
Transparent backgrounds make your design elements feel like a natural part of the composition. This is a big deal for:
- Website Design: Placing icons and logos without messing up your page's color scheme.
- Presentations: Layering graphics over text and other elements to create more dynamic, engaging slides.
- Social Media: Creating posts that pop, where your products or branding are the star of the show.
This is especially critical for getting professional results, which is a huge part of understanding product photography. For anyone in e-commerce, it means product shots can be dropped into all kinds of promotional materials without needing to be re-edited over and over. Our guide on AI product photography actually dives deep into how you can create these clean, ready-to-use shots in a fraction of the time.
You can actually measure the impact of this. Industry surveys have shown that transparent images can boost viewer engagement by around 35% just because they look so much better in different layouts. This is especially true in e-commerce, where over 85% of product images need clean, neutral backgrounds to drive more clicks.
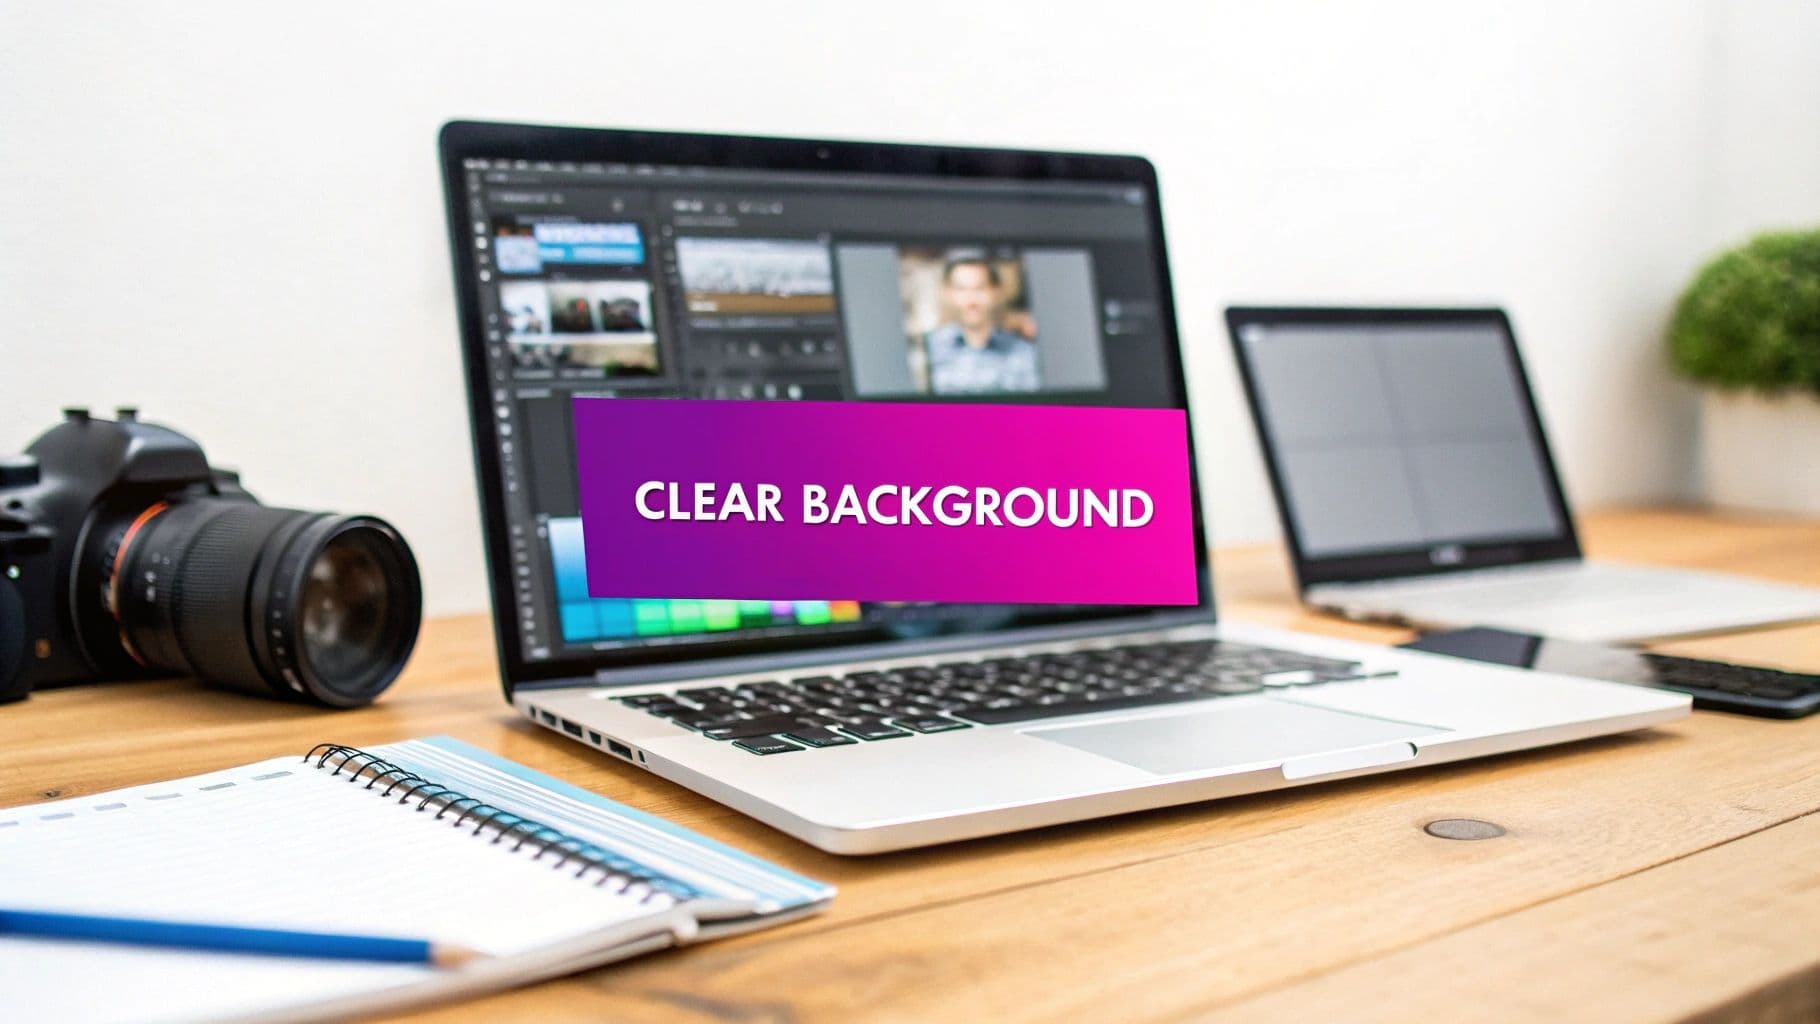
The Fastest Way: Let an AI Background Remover Do the Heavy Lifting
Look, if you need a white background gone now and don't want to mess around with complex software, AI tools are your best bet. Seriously. They handle all the tricky edge detection and separate your subject from the background, often giving you a perfect cutout with a single click.
This is a huge time-saver, especially if you're not a graphic designer. I've seen e-commerce store owners, marketers whipping up social media graphics, and even people just prepping a presentation get exactly what they need in seconds.
How Does AI Make It So Simple?
Doing this manually used to mean painstakingly tracing around an object. Forget about hair, fur, or anything semi-transparent—that was a nightmare. AI algorithms, on the other hand, have been trained on millions of images. They don't just see pixels; they understand context. This lets them identify the subject with incredible accuracy, preserving those fine details that are so easy to lose.
What used to take me several minutes of careful work now happens almost instantly. The AI creates a precise "mask" around your object, cleanly lifting it from the white background.
Here’s a peek at the Bulk Image Generation platform's interface. You can see how clean and straightforward it is.
The layout is designed to be intuitive. You can upload an image and apply edits like background removal in a batch, which is a lifesaver when you're working with dozens or even hundreds of photos.
Getting a Flawless Transparent Image
Getting a professional result with an AI tool is incredibly efficient. The whole point is to end up with a high-quality PNG file where the background is truly transparent, not just swapped for another solid color.
It’s usually a simple three-step dance:
- First, upload your image. Just select the photo with the white background you need to zap.
- Next, let the AI work its magic. The tool will automatically detect and isolate the main subject.
- Finally, review and download. Give the preview a quick once-over to make sure the edges are crisp, then download your shiny new PNG.
The real power here is consistency and speed. When you're staring down a task like updating an entire product catalog, AI background removal isn't just a nice-to-have; it's essential for getting the job done without losing your mind.
But it doesn't have to stop at just removing the background. Many platforms let you take that transparent image and drop it into entirely new scenes. You can explore a dedicated AI image generator to place your subject into completely new, creative contexts. This is perfect for generating fresh marketing materials or A/B testing different visual styles without booking a single photoshoot.
Taking the Wheel with Manual Editing Tools
AI tools are incredible time-savers, but there are moments when you just need that pixel-perfect, human touch. For really intricate images or those times an automated tool keeps fumbling the details, jumping into manual editing software like Adobe Photoshop or the open-source hero, GIMP, is the only way to go.
This approach puts you firmly in the driver's seat. Where an AI guesses, you direct. You get to make the final call on how to handle tricky edges, subtle shadows, and those complex little details that an algorithm might completely misinterpret. It’s a hands-on method, but it guarantees the final result is exactly what you envisioned.
This level of control has deep roots in the history of digital imaging. The ability to knock out a white background and make it transparent became widely accessible thanks to file formats that could support "alpha channels." The Portable Network Graphics (PNG) format, which came on the scene back in 1996, was a huge deal. It was one of the first to build in an alpha channel, which is essentially an extra layer of information that stores transparency data. If you want to get nerdy, you can learn more about the fundamentals of alpha channels on Adobe's help page.
Mastering Your Selection Tools
Your first mission in any manual edit is to select the background you want to vaporize. Different tools are built for different jobs, and knowing which one to grab is half the battle.
- Magic Wand Tool: This is your go-to for images with simple, solid-color backgrounds. One click on a white area, and it smartly selects all the connected pixels of that same color. You can fine-tune the "tolerance" to make it more or less picky.
- Pen Tool: When you’re dealing with complex shapes and clean curves, nothing beats the Pen Tool. It lets you trace a super-precise vector path around your subject. Yes, it has a bit of a learning curve, but it delivers unmatched accuracy for those buttery-smooth edges.
The real secret to professional-level cutouts isn't just hitting the delete key—it's using layer masks. A layer mask is a non-destructive way to hide parts of an image. Instead of permanently erasing pixels, you simply "paint" on the mask to reveal or conceal parts of the layer. This gives you the incredible flexibility to tweak and refine your edges over and over without ever damaging the original photo.
Refining the Edges for a Perfect Finish
Once you've made your initial selection and applied it as a layer mask, the real craft begins. This is where you zoom way in and hunt for imperfections. You’ll probably spot a faint white "halo" effect around your subject or some slightly jagged edges.
Using a soft-edged brush on the layer mask, you can gently paint away these leftover bits of background. This technique is absolutely essential for things like wisps of hair or sheer fabric, where a hard-edged selection would just look fake and amateurish. It’s this final, careful touch-up that separates a quick-and-dirty cutout from a truly professional one.
Choosing the Right File Format (And Not Undoing All Your Hard Work)
You’ve done it. You’ve carefully removed that pesky white background, and your image looks perfect. But hold on—the final step of saving your file is where so many people accidentally mess it all up.
It’s a painful but common mistake: you choose the wrong format, and that pristine transparent background is instantly replaced with a solid white one. This isn't just a minor technical detail; picking the right file type is absolutely critical to getting the result you want.
So, what's the secret? It's all about the PNG (Portable Network Graphics) format. Think of PNG as your best friend for any graphic that needs a transparent background. It supports something called an "alpha channel," which is basically an extra layer of information that tells pixels they can be completely see-through. This allows the background of your website, presentation, or design to show right through.
On the other hand, saving your image as a JPEG will flatten it and kill the transparency, almost always defaulting back to a solid white background. JPEGs are fantastic for photos because of how they handle compression, but they simply don't have the ability to support transparent areas.
A Quick Guide to Image Formats
Let’s break down the most common options so you know exactly which one to use and when.
- PNG: This is the undisputed champion for web graphics needing transparency. Use it for logos, icons, and product photos for e-commerce sites. The best part? It uses lossless compression, so you won’t lose any image quality.
- GIF: GIFs also support transparency, but with a major catch—they're limited to just 256 colors. This makes them a poor choice for detailed photos but still useful for simple graphics or animations where transparency is needed.
- SVG: A completely different beast, SVGs are vector files. This means they are infinitely scalable without ever losing quality. They’re perfect for logos and icons on the web, but since they aren't pixel-based, they aren't suitable for photographic images.
The practice of using transparent backgrounds really took off when PNGs gained universal browser support back in the mid-2000s. Suddenly, designers had the freedom to create much more dynamic and layered web layouts.
Image Format Comparison for Transparency
To make things even clearer, here’s a quick-reference table that compares these popular formats side-by-side.
| Format | Supports Transparency? | Best For | Compression |
|---|---|---|---|
| PNG | Yes (Full Alpha) | Logos, icons, web graphics, product photos | Lossless |
| JPEG | No | Photographs, complex images with many colors | Lossy |
| GIF | Yes (Basic) | Simple animations, graphics with limited colors | Lossless |
| SVG | Yes | Logos, icons, illustrations (scalable vector art) | N/A |
This table should help you make the right call every time you save an image with a transparent background.
Of course, file format is just one piece of the puzzle. Once you've nailed that, mastering image compression techniques is key to keeping your website fast and responsive. And if you find yourself needing to adjust image dimensions after the fact, a bulk image resizer can be a massive time-saver.
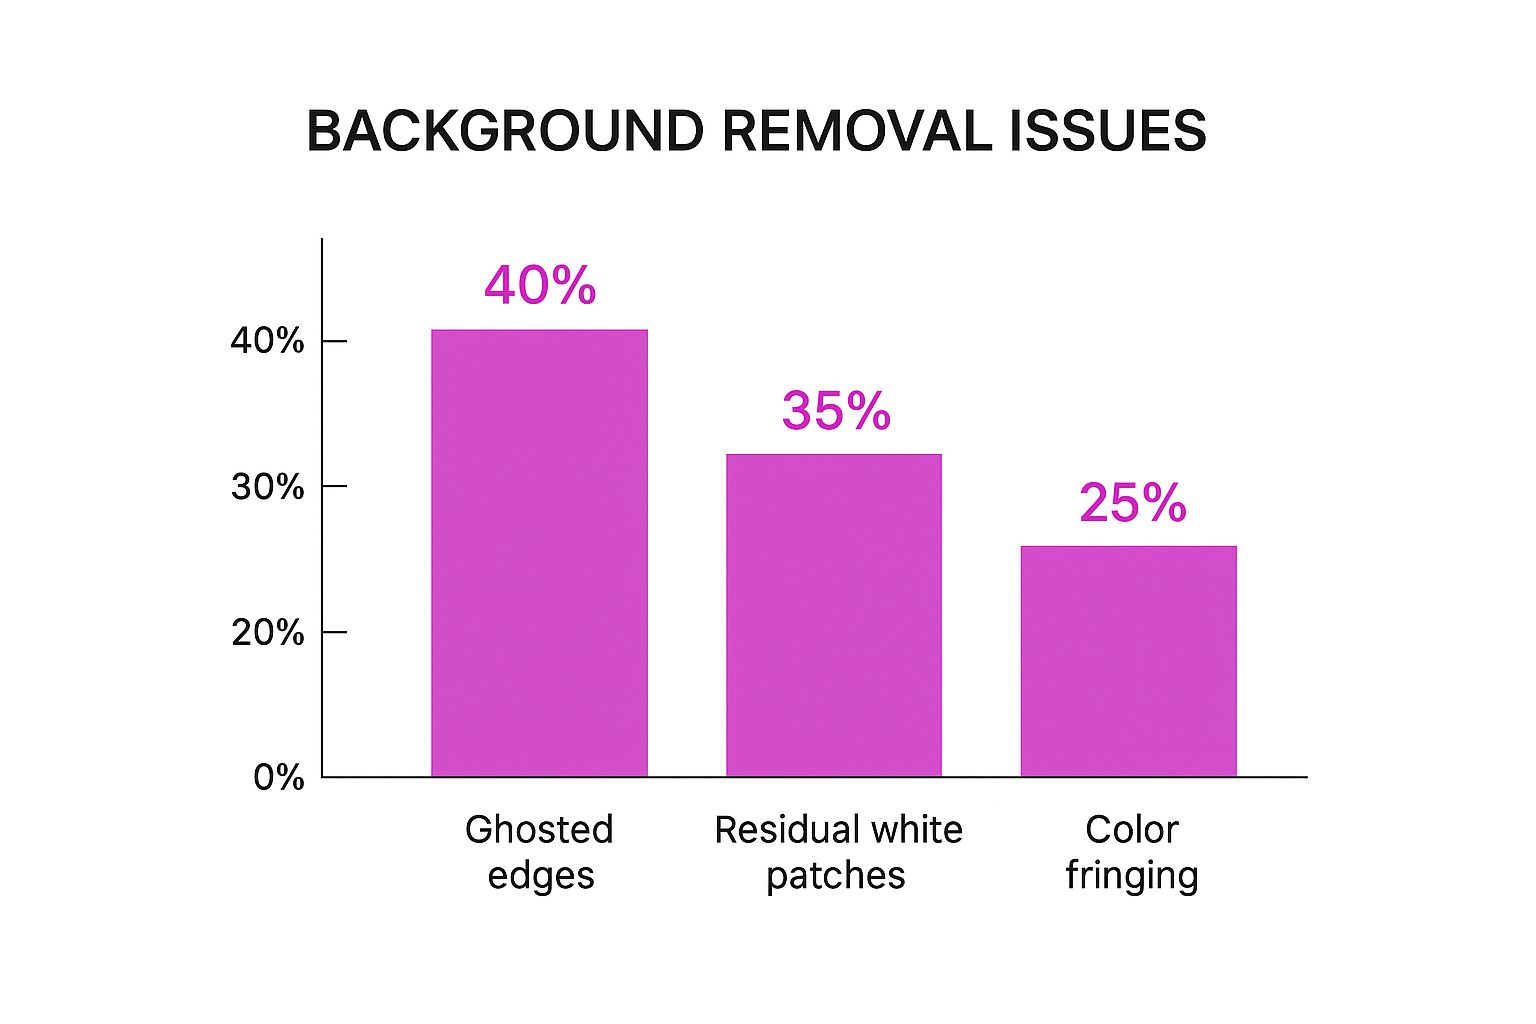
Don't Let These Common Mistakes Ruin Your Transparent Backgrounds
The difference between an amateur cutout and a professional one is all in the details. You can know the basic steps to make a white background transparent, but a few small errors can completely undo all your hard work.
One of the most common—and most frustrating—issues is the dreaded "white halo." It’s that faint, glowing outline of the old background that just won't let go of your subject.
This happens when your selection tool isn't quite tight enough against the object's edges. Instead of a crisp, clean separation, you're left with a fuzzy, unprofessional border. It looks especially bad when you place your new transparent image on a darker backdrop. Using an edge-refining tool or adding a slight feather to your selection can work wonders to blend this transition smoothly.

Get Up Close and Personal with Your Pixels
Another frequent mistake is leaving stray pixels behind. These are tiny, isolated specks of the original white background that often hide in complex areas or tight corners. They’re easy to miss, but they stick out like a sore thumb on the final design.
The solution is simple but absolutely critical: zoom in.
Seriously, get right up close with your image to inspect the edges. I make it a habit to scan the entire perimeter of my subject at 200-300% magnification before I even think about calling the job done. It's the only way to catch those sneaky leftover bits.
Before you save and close, always test your transparent image on both a light and a dark background. This simple quality check is a lifesaver. It instantly reveals imperfections like halos or rogue pixels that were completely invisible on a white canvas. For a flawless finish, this step is non-negotiable.
Common Questions About Transparent Backgrounds
When you're trying to make a white background transparent, a few common hiccups can pop up. I've seen them all over the years. Let's walk through the most frequent ones so you can get your images looking perfect without the headache.
Why Did My Transparent Image Turn Black?
So you removed the background, downloaded your image, and opened it… only to find a solid black background. Classic issue.
Don't panic! This almost always means the program you're using to view the file—like a basic photo viewer on your computer—doesn't support transparency. The transparent data is still there, your viewer just doesn't know how to show it.
To check, just drag and drop the file into a web browser like Chrome or pop it onto a slide in PowerPoint or Google Slides. These apps are built to handle transparency, and you should see your image exactly as you intended.
Can I Make a Background Transparent on My Phone?
Absolutely. You definitely don't need to be chained to a desktop for this anymore.
There are some seriously powerful mobile apps out there. Tools like PhotoRoom, Pixelcut, and Canva use AI to knock out backgrounds with just a couple of taps. They're built from the ground up for a mobile workflow, making it incredibly simple to get professional results while you're on the move.
What's the real difference between transparency and opacity? Think of it this way: transparency is an on/off switch—a pixel is either totally visible or totally invisible. Opacity is a dimmer switch, letting you control how see-through a pixel is on a scale from 0% to 100%.
Ready to create stunning, transparent images in seconds? Try Bulk Image Generation and let our AI handle the heavy lifting for you. Get started at bulkimagegeneration.com.