
AI Birthday T-Shirt Design at Scale

Aarav Mehta • December 5, 2025
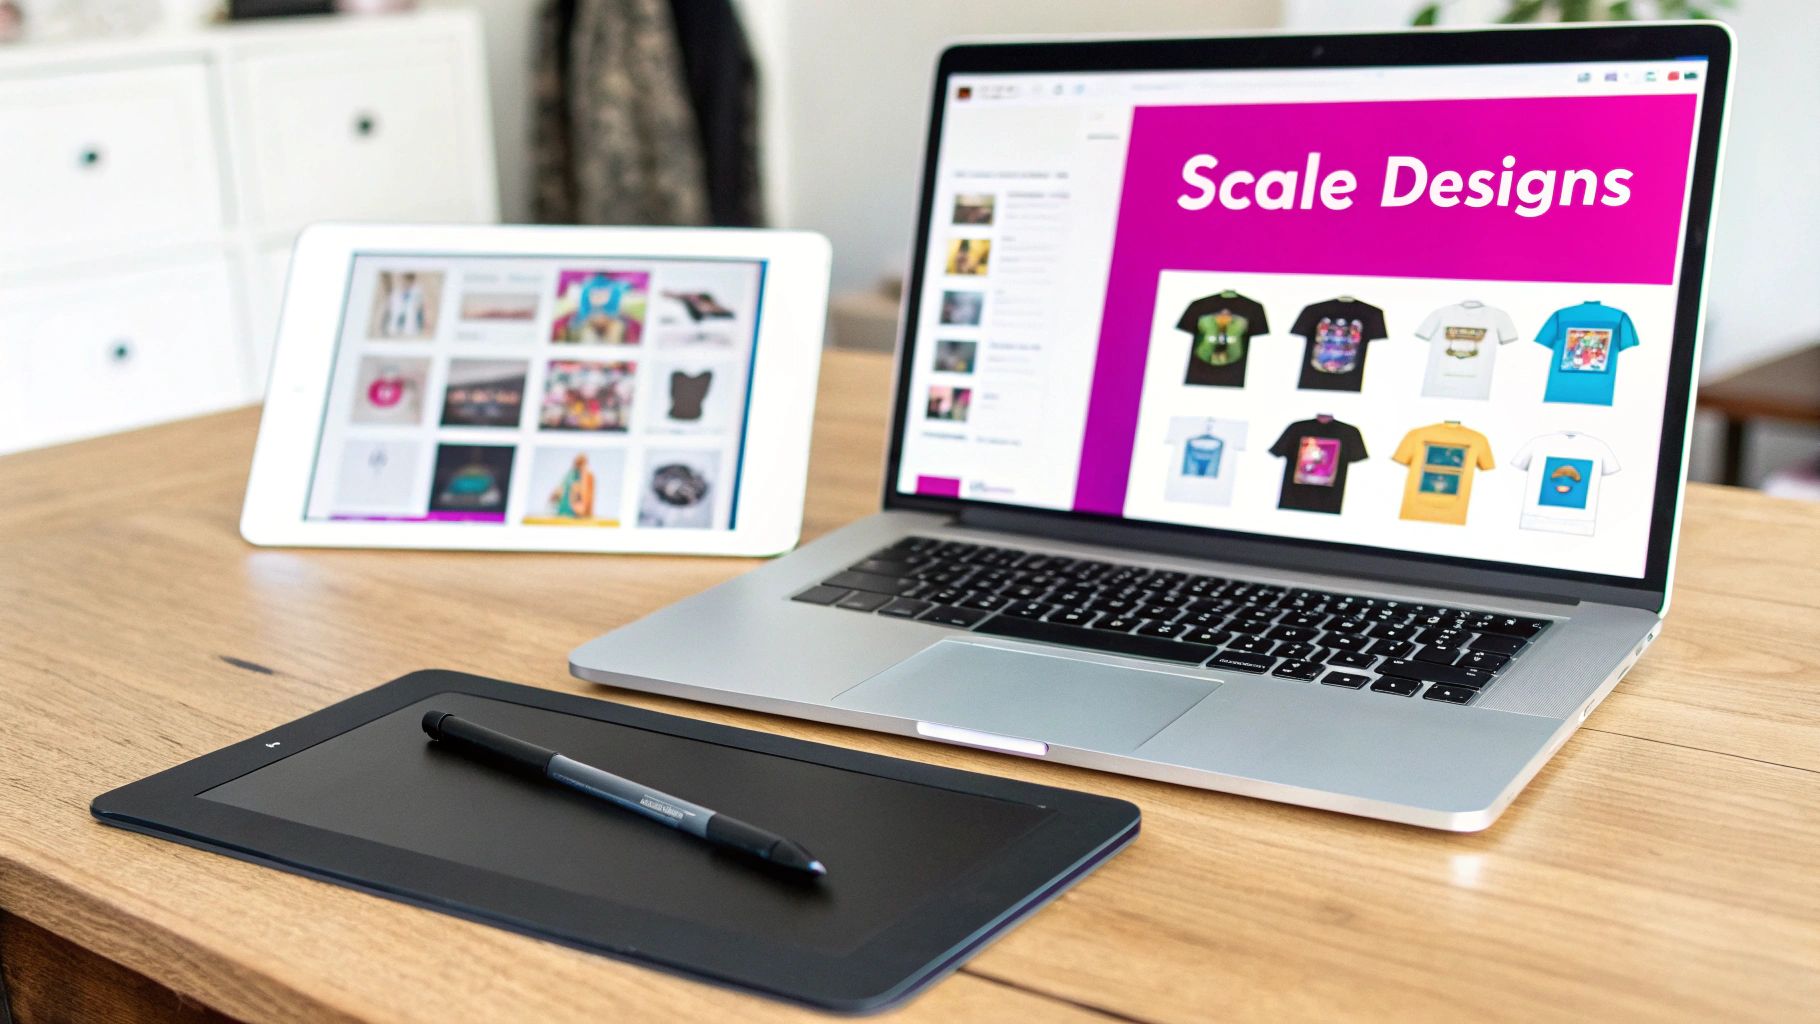
Learn a modern AI workflow for creating stunning birthday t-shirt design collections. Move from prompt ideas to print-ready files and mockups in minutes.
A great birthday t-shirt does more than just celebrate a day—it turns a piece of clothing into a keepsake. But who has the time to create hundreds of unique designs one by one? That's where a smarter workflow comes in, powered by AI bulk image generation. This approach lets you build a massive portfolio of custom designs without the soul-crushing manual labor, scaling your creative output for any birthday theme you can imagine.
A Smarter Workflow for Custom Apparel
Forget spending hours nudging pixels on a single design. We’re going to walk through a method that lets you generate hundreds of unique, high-quality visuals in the time it takes to brew a pot of coffee. This guide is for the print-on-demand sellers, graphic designers, and entrepreneurs out there who want to multiply their creative output, not their workload.
This is about more than just speed. It's about unlocking creative doors you didn't even know were there and building a scalable business around personalized birthday gear. The demand for customized products is absolutely booming, leaving a wide-open opportunity for creators who can deliver a diverse range of appealing designs quickly.
The Opportunity in Custom T-Shirts
The numbers don't lie. The global custom t-shirt printing market, a space where birthday designs are a huge player, was valued at around USD 5.89 billion in 2023. It’s not slowing down, either—it's projected to grow at a compound annual growth rate (CAGR) of 13% from 2024 to 2033. That's a massive market hungry for fresh, personalized apparel.
In this guide, we'll cover the whole process from start to finish:
- Brainstorming concepts that actually sell.
- Writing AI prompts that deliver a wide range of styles.
- Batch-editing your creations for that professional polish.
- Getting your files print-ready and creating killer mockups.
Even though we're focused on digital design, it's always helpful to understand how your creations make it onto a shirt. Getting familiar with the fundamental aspects of screen printing gives you valuable context, even if you’re using print-on-demand services.
Let's take a quick look at just how different the AI-powered process is from the old way of doing things. The contrast in time and effort is pretty stark.
Traditional vs AI Bulk Design Workflow
| Phase | Traditional Workflow | AI Bulk Generation Workflow |
|---|---|---|
| Ideation | Manual brainstorming for each concept (Hours to days) | Generate hundreds of ideas from a single prompt (Minutes) |
| Design | Create each design individually in software (1-3 hours per design) | Generate 100+ design variations simultaneously (5-10 minutes) |
| Revisions | Manually tweak colors, fonts, and layouts one by one (Hours) | Re-run a prompt with slight changes for instant revisions (Minutes) |
| File Prep | Export each file individually for print (30+ minutes for a small batch) | Batch process and export all files in print-ready formats (5 minutes) |
| Mockups | Apply each design to mockups manually (Hours) | Automate mockup creation for the entire batch (Minutes) |
The table really says it all. You're trading days of tedious, repetitive work for a few minutes of focused, creative direction.
By the time you're done with this tutorial, you'll have a repeatable system for building a huge portfolio of birthday t-shirt designs. You'll be able to go from a spark of an idea to a market-ready product with an efficiency that leaves traditional timelines in the dust. Let’s dive in and start creating.
Developing Ideas and Prompts That Sell
Let's be honest, the AI is just a tool. The real magic behind a killer bulk generation workflow isn't the software—it’s the quality of your ideas and the precision of your prompts. A generic concept will spit out generic, forgettable designs. But a well-researched niche paired with a powerful prompt? That's how you generate hundreds of potential bestsellers.
This is the foundational work. Get this right, and everything else flows smoothly.
Finding Your Profitable Niche
Before you even think about writing a prompt, you have to figure out what themes actually connect with buyers. Don't just settle for "happy birthday." The designs that truly sell are the ones that tap into specific, emotionally-charged sub-niches. You want the customer to feel like the shirt was made just for them.
A great place to start is with proven categories that consistently perform well. Think of these as your launchpad for endless creative twists.
- Milestone Ages: This one’s a classic for a reason. Designs for 18th, 21st, 30th, 40th, and 50th birthdays are always in demand. People are actively searching for these terms, which makes your designs easy to find.
- Birth Year & Retro Themes: Nostalgia sells, period. A "Vintage 1984" or "Legend Since 1974" design taps into a person's identity and shared history. These are an absolute goldmine for bulk creation—just change the year and you have a new product.
- Funny Quotes & Puns: Humor is an instant attention-grabber. A witty phrase like "I'm Not Getting Older, I'm Leveling Up" or a clever pun makes a design instantly shareable, especially on social media.
- Hobby-Specific Designs: This is where you can get really personal. Combine a birthday theme with a passion, like "Fishing Legend Since 1968" or "Bookworm & Fabulous at Forty." You're targeting a dedicated audience that loves to show off their interests.
The market for this is exploding. The custom t-shirt printing market is on track to nearly double between 2023 and 2032, rocketing from USD 9.23 billion to USD 17.27 billion. This whole boom is driven by people wanting unique stuff, making niche birthday tees a massive opportunity. You can read more about the custom t-shirt market growth on prnewswire.com.
The Anatomy of a Powerful AI Prompt
Okay, so you've got your niche. Now you have to translate that idea into a language the AI can actually understand. A great prompt is like a recipe—if you leave out key ingredients, you'll get a bland or unpredictable result.
A solid prompt for a birthday t-shirt design needs these four components:
- Subject: What’s the main focus? Be clear and concise. Think "a roaring T-Rex wearing a party hat" or "a vintage cassette tape."
- Style: What’s the vibe? This is absolutely critical for getting a consistent look. Use descriptive terms like 'minimalist line art,' 'retro cartoon style,' '8-bit pixel art,' or 'watercolor illustration.'
- Composition & Details: How should it all be arranged? Be specific. Phrases like 'vector graphic,' 'bold outlines,' 'flat design,' or 'isolated on a white background' ensure the AI gives you something you can actually print on a shirt.
- Negative Prompts: What do you not want? Use these to get rid of common AI mistakes like weird text, unwanted shading, complex backgrounds, or a cat with five legs.
Pro Tip: I always include "vector graphic" or "t-shirt graphic" in my prompts. This tells the AI to create a clean, printable design, not some photorealistic image that will look terrible when printed on fabric.
Building Your Prompt Spreadsheet for Bulk Generation
Once you get the anatomy down, you can build a system to create hundreds of variations without breaking a sweat. My go-to tool for this is a simple spreadsheet.
Set up columns for each part of your prompt. This lets you mix and match elements to generate a massive list of unique prompts almost instantly.
If you hit a creative wall or just want some fresh ideas for styles or subjects, a tool can be a great starting point. You can find new structures and inspiration with a free AI image prompt generator to help flesh out your spreadsheet columns.
Here’s what my spreadsheet structure usually looks like:
| Subject | Style | Composition | Negative Prompt |
|---|---|---|---|
| a cool cat wearing sunglasses | vintage cartoon | vector graphic, bold outlines | text, shading |
| a retro gaming controller | 8-bit pixel art | t-shirt graphic, isolated | gradients, shadows |
| a funny taco with a party hat | cute kawaii style | flat design, simple colors | realistic, background |
From here, it's just a matter of combining them. Take one subject like "a cool cat," pair it with ten different styles and ten different compositions, and you've instantly created 100 unique design prompts. This methodical approach is the secret to scaling your creative output without burning out.
Running Your Bulk Generation Workflow
Alright, you've done the hard part. Your prompt spreadsheet is organized and ready to go—that was the strategic thinking. Now comes the fun part: execution. This is where your birthday t-shirt ideas stop being lines in a spreadsheet and start becoming a library of real, tangible designs.
The whole point here is to work smarter, not harder. Instead of the soul-crushing process of feeding prompts into an AI one by one, we’re going to upload a single CSV or spreadsheet. This file is your master command, telling the AI exactly what to make, how many versions you need, and the specific styles to use for every single t-shirt design.
This process boils down to a simple, repeatable formula.
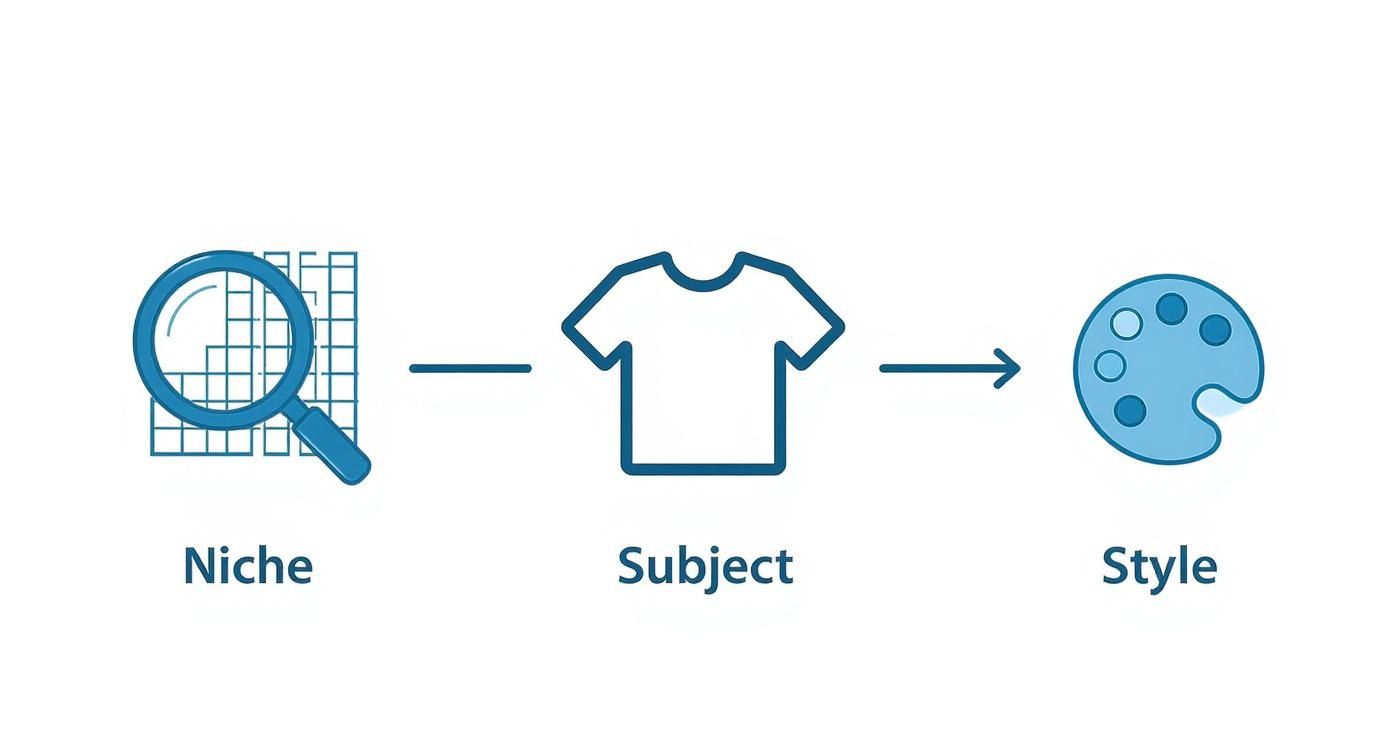
As the flowchart shows, you start broad with a niche, get specific with a subject, and then apply a distinct style. Nail this, and you can crank out unique designs all day long.
Dialing in Your Generation Settings
Before you hit that big "Generate" button, you need to lock in a few key settings for the entire batch. Getting this right now saves you from a world of headache during editing. The goal is consistency—making sure every image comes out ready for the next step.
Think of these as your quality control levers.
- Aspect Ratio: For t-shirts, you almost always want a portrait orientation. A 4:5 aspect ratio is a great starting point. It fills the printable area on the front of a shirt perfectly, avoiding that weird stretched or boxy look.
- Image Resolution: Don't even think about skimping here. Go for the highest resolution the tool offers. While 1024x1024 pixels is a workable minimum, bigger is always better to ensure your final print is sharp and professional, not a pixelated mess.
- Style Consistency: Some platforms have a feature to keep the style consistent across an entire batch. If you see that option, use it. This is how you make sure all your "vintage cartoon" designs actually feel like they belong in the same collection.
Crucial Tip: I can't stress this enough—always generate your images on a simple or white background. It makes batch background removal about a thousand times easier. Tossing phrases like
isolated on a white backgroundorsimple flat backgroundinto your prompts is a lifesaver.
Kicking Off the Generation
Actually running the job is usually the easiest part. Most bulk generation tools have a big, obvious "Upload CSV" button. Just select the spreadsheet you prepared, and the system will read each row as a separate job.
Once you start the process, the AI takes over. This can take anywhere from a few minutes to an hour, depending on how many images you’re creating. It’s the perfect time to step away and grab a coffee. The machine is now doing the heavy lifting that would have taken a designer days to complete manually.
This kind of workflow automation is a game-changer for scaling up creative projects. If you're curious how this applies elsewhere, checking out a bulk social media image generator shows how the same principles can power marketing campaigns.
Getting Your New Files in Order
When the AI is finished, you’ll get a huge batch of images, probably in a gallery or a single zip file. The last thing to do in this phase is to get organized. Trust me, a folder with hundreds of files named image_1, image_2, image_3 will become your worst nightmare when you start editing.
A smart naming convention is your best friend here.
Ideally, the tool will name the output files based on the prompts you used. If it doesn't, you'll have to do it manually, but it’s absolutely worth the effort.
Try a structure like this:
[Niche]_[Subject]_[Style]_[VariantNumber].png
For example:
Milestone50th_VintageCar_RetroCartoon_01.pngHobbyFishing_BassFish_LineArt_01.pngHobbyFishing_BassFish_LineArt_02.png
This system makes it easy to find specific designs, see which prompts worked best, and slide right into batch editing without any friction. With your raw visuals all sorted, you're ready to start polishing them into final products.
Getting Your Graphics Print-Ready with Batch Editing
Okay, so you’ve just generated a mountain of incredible birthday t-shirt ideas. That’s a huge first step, but let’s be real—those raw images are not ready for prime time. Think of them as unpolished gems. They’ve got potential, for sure, but they need to be cut, cleaned, and set before they can truly shine.
This is where batch editing comes in, and it's how we turn that creative explosion into professional, print-ready graphics that marketplaces and printers will actually accept.
The goal here isn't to sit there and painstakingly edit every single image one by one. That would completely defeat the purpose of our bulk workflow. Instead, we're going to use automated actions and smart processes to apply high-quality, consistent edits across the entire collection. This part is all about technical precision at scale, making sure every design meets the strict requirements for printing.
Automating Background Removal
The single most important edit for any t-shirt design is getting rid of the background. No one wants to buy a t-shirt with a big white box around the graphic. You’re selling the design itself, not the canvas it came on.
Manually removing the background from hundreds of images is a soul-crushing, mind-numbing task. This is where automation is a non-negotiable part of the process.
Thankfully, modern editing software is ridiculously good at this. Tools like Adobe Photoshop have powerful "Select Subject" and "Remove Background" features that can be recorded into an Action. An Action is just a recorded sequence of steps you can play back on any image. You literally record yourself removing the background once, then you can unleash that action on an entire folder of designs.
It usually looks something like this:
- Open one representative image from your generated batch.
- Start recording a new Action in Photoshop (or a similar tool like Photopea).
- Use the software's AI selection tool to isolate the main subject of your design.
- Invert the selection and delete the background, leaving you with a nice, clean transparent canvas.
- Stop the recording. Boom. You now have a reusable command for instant background removal.
By running this Action through a batch processing feature, you can tell the software to open every image in a folder, apply those background removal steps, and save it as a new transparent PNG file. This can chew through hundreds of designs in the time it takes you to make a cup of coffee.
Standardizing Image Dimensions and Resolution
Every single print-on-demand platform and marketplace, from Etsy to Amazon Merch on Demand, has very specific file requirements. If you stray from their rules, your design will either get rejected outright or, even worse, get printed poorly.
The most common standard for a high-quality t-shirt print is 4500 pixels wide by 5400 pixels tall at 300 DPI (dots per inch).
This specific size ensures your birthday t-shirt design looks crisp and vibrant, without any pixelation, even when it's printed on a big XXL shirt. Just like with the background removal, you can batch-process this step.
Set up an automated workflow that does the following for each image:
- Resizes the canvas to 4500x5400 pixels.
- Centers your graphic within that new canvas.
- Ensures the resolution is locked in at 300 DPI.
This consistency is absolutely crucial. It means every product you upload has the same professional formatting, which makes your listing process way easier and guarantees a quality end product for your customers. A design that looks great on your screen but is too small for the printer will turn into a blurry, unprofessional mess—and probably a bad review.
Applying Universal Enhancements
Once your images are correctly sized and have transparent backgrounds, you can apply a few subtle, universal enhancements to really make them pop. These are small tweaks that improve the overall quality and consistency of your entire design library. And yes, these can be added right into your recorded Action for a fully automated process.
Two key enhancements work well for most birthday t-shirt graphics:
1. Sharpening AI-generated images can sometimes have a slightly soft feel to them. Applying a gentle sharpening filter, like an "Unsharp Mask," can make the edges crisper and the details more defined. Just don't overdo it. The goal is subtle definition, not a crunchy, over-sharpened mess.
2. Color and Contrast Adjustments You can also use automated level or curve adjustments to make sure your colors are vibrant and your blacks are deep. A simple "Auto Contrast" or "Auto Tone" function often works wonders here, making the design more dynamic and visually punchy when it's printed on fabric.
By baking these steps into your batch-processing Action, you’re making sure every single design is not just technically correct, but also visually optimized. This kind of attention to detail is what separates the amateur sellers from the professional brands.
Organizing for the Final Output
Your editing process should end with a perfectly organized file system. Have your batch process save the final, print-ready files into a new folder, keeping them separate from the raw, unedited AI generations. Trust me, this saves a lot of headaches later.
It’s also best practice to stick with the naming convention you established earlier. Your final output folder should look clean and be filled with files like:
Milestone50th_VintageCar_RetroCartoon_01_PRINT-READY.pngHobbyFishing_BassFish_LineArt_01_PRINT-READY.png
This simple, clear labeling system prevents you from accidentally uploading the wrong version of a file. With your folder of perfectly edited, print-ready PNGs, you've officially created a valuable library of commercial assets. You’re now fully prepared for the next and final creative step: bringing your designs to life on product mockups.
Automating Product Mockups for Your Store
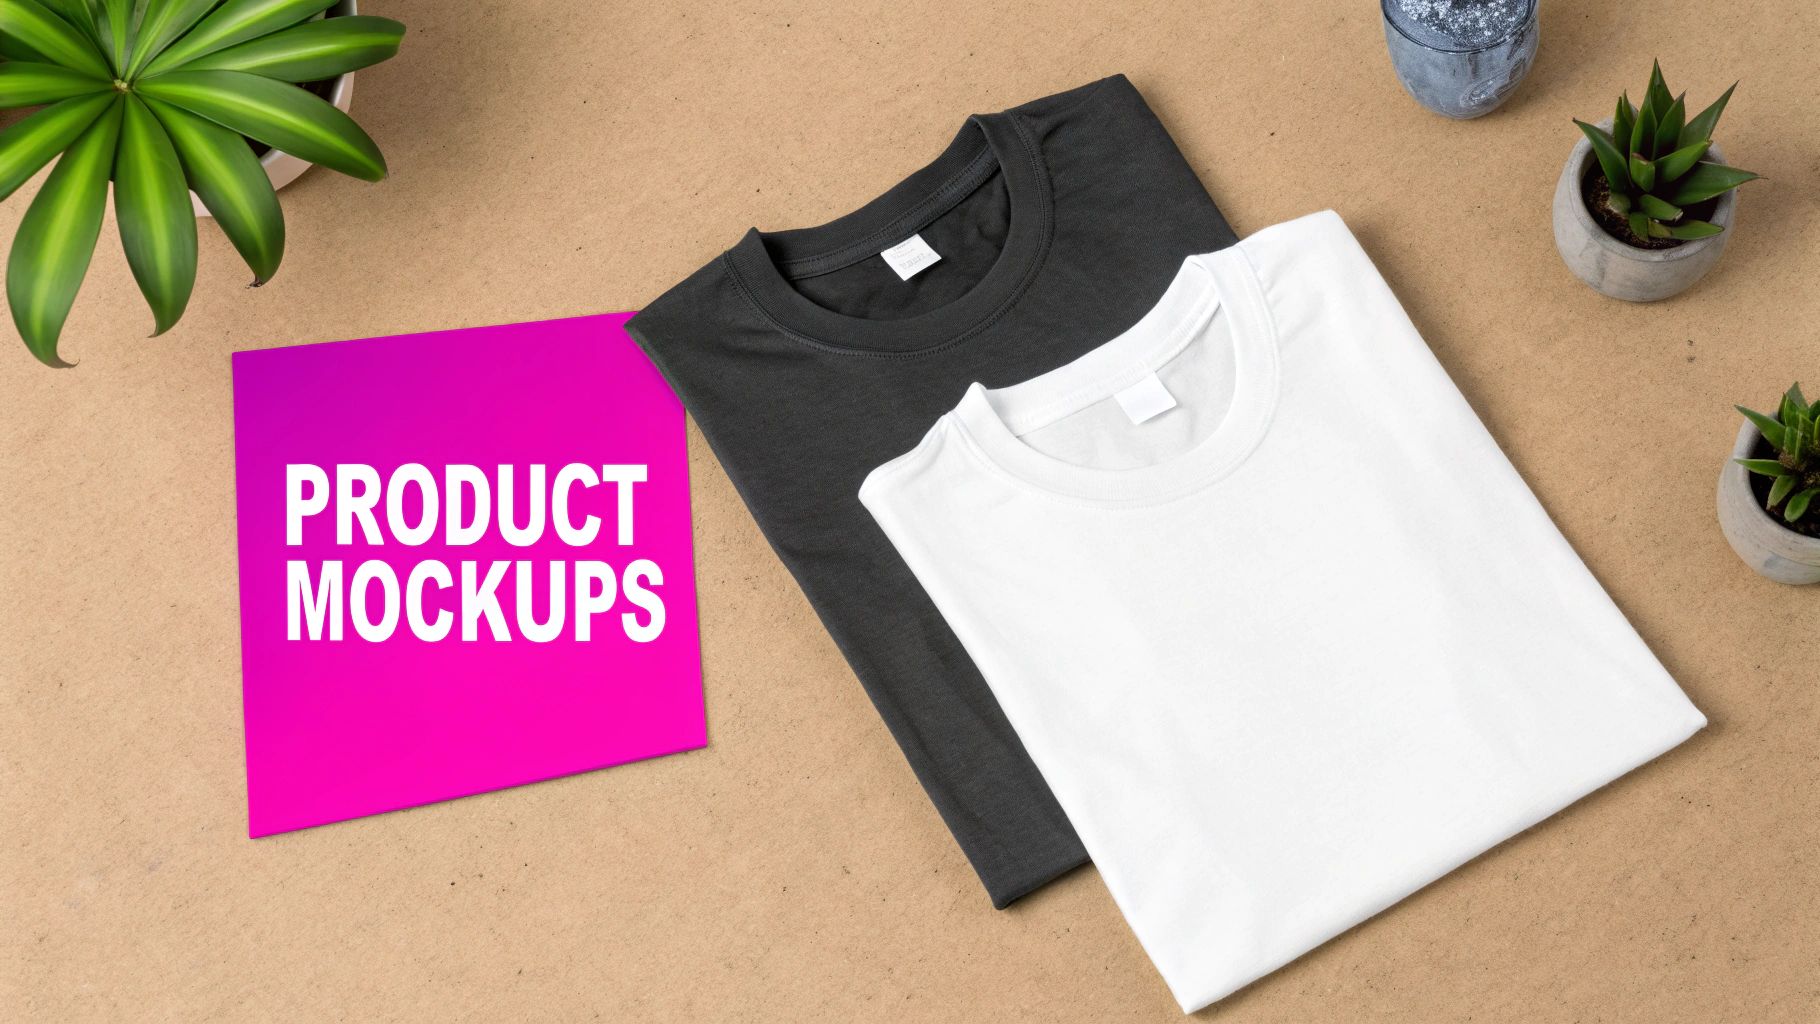
So, you've done the hard work. You've brainstormed, generated, and edited a folder full of amazing, print-ready birthday t-shirt designs. But here's the thing: a transparent PNG file isn't going to sell itself. Customers need to see what that design actually looks like on a real product. This is where a great mockup becomes your most powerful sales tool.
People don't just buy a design; they buy the vision of themselves wearing it. A compelling mockup closes that gap between a digital file and a physical shirt, helping someone picture it as part of their own life. The good news? You no longer need a photo studio and a team of models to create hundreds of them.
Choosing Your Mockup Generation Tools
The right tool really comes down to your specific workflow and where you sell. There are a few fantastic options out there, each with its own perks for cranking out mockups for your birthday shirt designs. The goal is to find something that can handle a ton of images without killing the quality.
- Integrated Print-on-Demand (POD) Tools: If you’re already using platforms like Printify or Printful, their built-in mockup generators are your most direct route. You upload your design, and they automatically place it on different t-shirts. It’s seamless.
- Standalone Mockup Software: Tools like Placeit or Smartmockups have absolutely massive libraries of professional photos and templates. You just drag and drop your design, and their software makes it look realistic on thousands of different models, flat lays, and scenes.
- Photoshop Actions and Templates: For total creative control, you can use pre-made Photoshop mockup templates. By setting up a batch-processing Action, you can tell Photoshop to automatically open every single one of your designs and pop it into the template. This is perfect for a highly customized, branded look.
A great mockup does more than just show off your design—it tells a story. It sets a mood, defines your brand, and speaks right to your ideal customer. Choosing mockups that match your brand's vibe is just as important as the design itself.
Establishing an Automated Workflow
The dream is to go from a folder of print-ready PNGs to a folder of market-ready product photos with as few clicks as possible. You want a process that’s simple, repeatable, and can scale up as you add more designs.
Let’s say you’re using a standalone tool. Your workflow might look something like this:
- Pick a handful of on-brand mockup templates (maybe three model shots and two flat lays).
- Upload your entire batch of edited birthday t-shirt files at once.
- Tell the software to apply each design to your chosen templates.
- Batch-export all the new images, which could be hundreds at a time.
This simple process turns what could take days of manual work into a task that takes just a few minutes. That efficiency is exactly what allows you to rapidly grow your online store's catalog. This is a core part of modern visual marketing. For a deeper look, our guide on https://bulkimagegeneration.com/blog/en/tutorials/ai-product-photography has some great insights on creating stunning visuals at scale.
Curating a Consistent Brand Aesthetic
Automation is awesome, but it needs your direction. Don't just slap your designs onto every random mockup you find. A scattered, inconsistent look can make your store feel unprofessional and thrown together. Instead, carefully pick a specific set of mockups that truly reflect your brand's personality.
Selling funny, loud party shirts? Use mockups with smiling models in bright, festive settings. Is your brand more about clean, retro birth-year designs? Go for stylish flat lays or models with a more modern, understated vibe. When your product listings are consistent, it builds trust and helps customers instantly recognize your brand.
To see where e-commerce is headed, check out how solutions like advanced virtual fitting rooms and AI technology are helping customers visualize products. But for now, a cohesive set of high-quality mockups is your best bet. By batch-exporting these curated images, you'll have hundreds of compelling, market-ready photos ready to upload straight to Etsy, Shopify, or wherever you sell.
Got Questions About AI T-Shirt Design? Let's Clear Things Up.
Jumping into AI design for the first time can feel like learning a new language. You can see the potential, but the practical side of things—from legal rights to print quality—can bring up a lot of questions. It's totally normal.
Let's tackle some of the most common uncertainties people have when they start creating birthday t-shirt designs with AI. Getting these basics down will give you the confidence to build your business on a solid foundation.
Can I Actually Sell T-Shirts with AI-Generated Images?
This is the big one, and rightly so. The short answer is yes, but the "how" is critical. It all comes down to the terms of service of the AI tool you're using. You absolutely have to do your homework here.
Most of the major players, like Midjourney and DALL-E 3, grant you full ownership and commercial rights for the images you create on their paid plans. This means you’re clear to print your birthday designs on t-shirts and sell them.
But there's a huge catch you can't ignore: you are still responsible for what you ask the AI to create.
- Don't generate famous characters. Asking for a design featuring a Disney princess or a Marvel superhero is a quick way to get a cease and desist letter.
- Stay away from brand logos. Trying to create a parody of the Nike swoosh or the Starbucks logo is just asking for legal trouble.
- Remember, you're the creator. The AI is your tool. The responsibility to make original, non-infringing work is 100% on you.
What's the Best Image Resolution for a T-Shirt?
When you’re making a physical product, technical quality isn't just a suggestion—it's everything. A blurry, pixelated design will kill your reputation and lead to bad reviews.
For any kind of t-shirt printing, your target resolution should always be 300 DPI (dots per inch). This is the industry standard for a reason; it ensures your designs look crisp and professional.
As for dimensions, the go-to size for most print-on-demand services is 4500 pixels wide by 5400 pixels tall. This size is big enough to cover the main printable area on a standard t-shirt without losing any quality.
My Two Cents: Always, and I mean always, save your final print files as a transparent PNG. This strips out any background color, so only your design gets printed on the shirt—not a big, awkward white box.
How Do I Keep My AI Designs from Looking Like Everyone Else's?
With so many people using the same AI tools, standing out is the name of the game. Uniqueness comes from two places: the creativity of your prompts and the personal touches you add afterward.
Don't settle for a generic prompt like "a birthday cake." You have to push the AI's creativity. Try something way more specific, like, "a vintage cartoon monster happily eating a giant slice of neon pink birthday cake, vector graphic, bold outlines, isolated on a white background."
The magic is in the details. Mix different styles, describe specific actions, and use vivid adjectives to guide the AI toward something truly unique. Then, in the editing phase, you can add your own signature. Throw in some custom text, combine AI elements with your own graphics, or apply a unique color grade to make that birthday t-shirt design unmistakably yours.
Ready to stop designing one image at a time and start scaling your creative output? Bulk Image Generation lets you turn a single idea into hundreds of unique, market-ready designs in minutes. Start building your t-shirt empire today at bulkimagegeneration.com