
How to Image Upload for Faster Bulk Generation

Aarav Mehta • November 2, 2025
Learn how to image upload for bulk generation. Our guide covers preparing files, mastering the uploader, and troubleshooting common issues for a fast workflow.
Before you even think about hitting that upload button, a few minutes of prep work can be the difference between a smooth, speedy process and a series of frustrating error messages. Getting your images dialed in first is the secret to a flawless bulk generation.
Preparing Your Images for a Flawless Upload
Think of it like organizing your ingredients before you start cooking—a little effort upfront makes the entire process faster, easier, and much more predictable. When the platform gets files it can easily understand, everything just works better.
First up, let's talk file formats. This is a simple but critical choice.
For anything photographic—product shots, lifestyle images, you name it—JPEG is almost always your best bet. It hits that sweet spot between great quality and a manageable file size. However, if your images have transparent backgrounds, like a logo or an icon you want to overlay, you absolutely need to use PNG. Sticking a JPEG with a white background where you need transparency is a classic rookie mistake that can derail your project.

To make it even clearer, here's a quick rundown on which format to pick.
Choosing the Right Image Format
A quick comparison of common image formats to help you choose the best one for your bulk upload needs.
| Format | Best For | Key Feature |
|---|---|---|
| JPEG | Photos, complex images, web graphics | Small file size with good quality |
| PNG | Logos, graphics, images needing transparency | Lossless quality and supports transparency |
| WebP | Modern web use where speed is critical | Excellent compression and quality |
| GIF | Simple animations and icons | Supports animation, limited color palette |
Ultimately, choosing between JPEG and PNG will cover most of your needs for bulk generation.
Optimizing File Size and Dimensions
Next, let’s get those image sizes under control. Uploading massive, print-quality files is one of the biggest reasons for slow uploads and processing errors. It's just overkill for digital use.
Take a moment to think about the final output. If you're creating 1080x1080 pixel images for Instagram, there’s zero benefit to uploading a 4000x4000 pixel source file. It just bogs everything down.
You can knock this out in seconds using our free bulk image resizer to get all your files consistent at once. It's also worth looking into custom image resizing options to strike that perfect balance between sharpness and file weight.
As a rule of thumb, I always try to keep individual image files under 2 MB. It's a simple guideline that prevents most timeout issues and makes for a much quicker upload, especially when you're working with hundreds of files.
Creating a Logical Folder Structure
Last but not least, get organized on your own computer before you start. This sounds basic, but trust me, it’s a lifesaver on bigger projects.
Create a main folder for your project, then use simple, descriptive subfolders like "Backgrounds," "Product-Shots-Q2," or "Logos-Transparent."
This little bit of housekeeping makes finding and selecting your assets inside the platform a breeze. No more guessing games or accidentally uploading the wrong version. It keeps your workflow clean and your mind clear.
A Guided Tour of the Bulk Upload Interface
Jumping into a new platform can sometimes feel like a chore, but we designed our upload interface to be as straightforward as possible. Think of this as your quick-start guide to get you up and running on your first project in minutes.
First things first, let's get your images into the system. You’ll see two main ways to do this, and which one you choose really just depends on how you like to work.
The most popular method is the drag-and-drop zone. I find this is the fastest way to get a whole project loaded. Just grab your prepared images or even entire folders from your computer and drop them right into the designated area on the screen. It’s that simple.
If you prefer a more traditional approach, you can always use the "Select Files" button. Clicking this pops open your computer’s file browser, letting you navigate to your project folder and pick out exactly what you need. This is perfect if you’re pulling specific files from a larger, more complex folder structure.
Here’s a look at what you’ll see on the screen.
As you can see, the layout keeps things clean and simple, giving you clear options without any clutter.
Tracking Your Upload Progress
Once you start an upload, you’re never left guessing what’s going on. A real-time progress bar appears for each file, giving you an immediate status update.
You’ll see a few different indicators:
- Uploading: Your file is on its way from your computer to our system.
- Processing: We’re analyzing the image and getting it prepped for the next step.
- Complete: The green checkmark means your image is good to go!
This instant feedback is a lifesaver, especially when you're working with a big batch of images. It lets you spot if a file is stuck or has failed without stopping your entire workflow. After everything is uploaded, you can head straight over to our AI image generator and start creating.
A personal tip from my own workflow: for big projects with multiple categories, I drag and drop entire, pre-organized folders. It's a huge time-saver because the platform keeps your folder structure intact. This simple trick makes managing complex projects so much easier.
Choosing the Right Upload Method for Your Project
Not all projects are created equal, and your image upload strategy shouldn't be either. The platform gives you a few different ways to get your files into the system, and picking the right one from the get-go can make a huge difference in your workflow. It's all about matching the tool to the task at hand.
For simple, straightforward jobs—say, you’re just generating a few variations of a single product—the drag-and-drop folder upload is your best friend. It’s quick, direct, and gets the job done without any fuss.
But what if your project is more complex? When you're dealing with multiple categories, like different product lines or various themes for a social media campaign, a structured ZIP file is the way to go. By organizing your images into subfolders inside that ZIP, the platform automatically keeps that structure for you. It’s a massive time-saver.
Advanced Workflows for Data-Driven Projects
For those bigger projects where you need to connect images to specific data, the CSV upload method is a total game-changer. Imagine you’re generating personalized marketing visuals where every single image needs a unique product ID, a person's name, or some custom promotional text. The CSV lets you map all that metadata directly to each image file, automating what would otherwise be a painfully tedious manual task.
This little decision tree breaks down how to pick the best method for your needs.
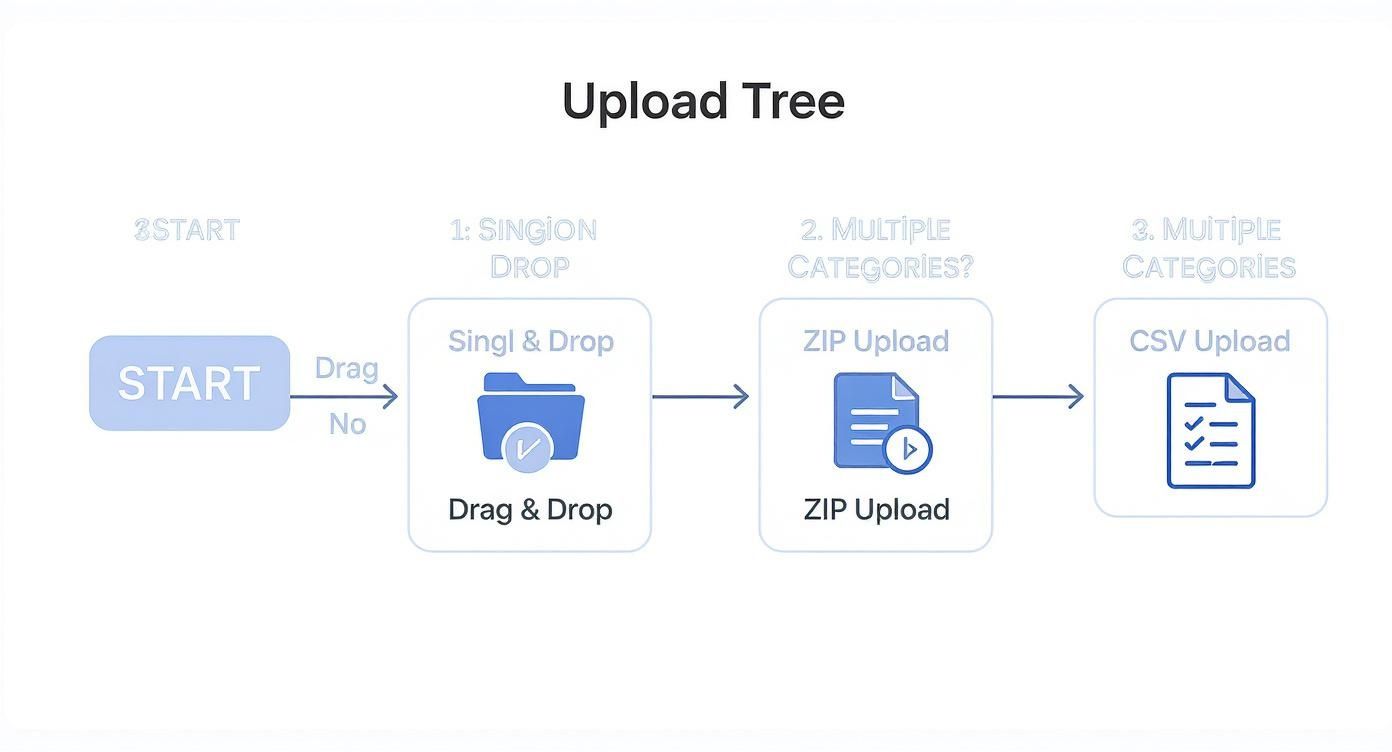
As the guide shows, the more complex your project, the more structure you'll want in your upload. It makes sense when you consider the sheer scale of image sharing today. With over 300 million photos uploaded to social platforms every single day, managing digital assets efficiently isn't just a nice-to-have; it's a necessity.
A personal pro-tip from my own experience: I always default to the ZIP method for any project with more than a couple of distinct categories. It might take a few extra seconds to prep the file, but it saves me a ton of organizational headaches on the back end, especially when I’m juggling hundreds of images.
As you figure out the best approach for your project, a deeper understanding cloud storage can also help inform where your images will ultimately live. This kind of knowledge is key for planning your long-term asset management beyond just the initial upload.
Insider Tips for a Faster Image Upload
Knowing how to upload images is one thing, but doing it efficiently is what saves you real time. This is especially true when you're wrestling with hundreds or even thousands of files at once. A few simple tweaks to your process can make a world of difference.
One of the biggest game-changers? Go old-school and plug in. A stable, wired internet connection will almost always beat Wi-Fi for large batch uploads. An Ethernet cable delivers a much more consistent data stream, which is your secret weapon against the dropped connections and frustrating failures that plague big wireless transfers.
Optimize Your Timing and Batch Sizes
Believe it or not, when you upload matters. Try running your big jobs during off-peak hours, like really early in the morning or late at night. The servers are quieter then, which often means you'll see faster response times and a much smoother process. It’s a simple trick that works wonders for massive projects.
Also, resist the urge to dump thousands of files in a single go. It’s far better to break your project into smaller, more manageable chunks.
- Small Batches: I recommend sticking to groups of a few hundred images at a time.
- Prevent Timeouts: This approach drastically cuts down the risk of a browser timeout or server error derailing your entire upload.
- Easier Troubleshooting: If something does go wrong, pinpointing the problem in a small batch is infinitely easier than digging through a folder of thousands.
The real takeaway here is that consistency beats raw speed. A slightly slower but stable wired connection will reliably get a huge batch uploaded far more successfully than a fast but flaky Wi-Fi signal.
And the need for this kind of efficiency is only growing. By 2025, it's estimated that a staggering 2.1 trillion photos will be taken globally. That's a mind-boggling amount of visual data being created and managed every single year.
Finally, a quick pro-tip: get your image dimensions right before you upload. Using a tool like an aspect ratio calculator helps you pre-format everything perfectly. A few minutes of prep here can save you a ton of rework later on.
Solving Common Upload Problems
Even when you've done everything right, a stubborn error message can pop up and throw a wrench in your creative flow. Don't worry, it happens to all of us. The key is knowing how to quickly spot the problem and get back on track. Think of this as your first-aid kit for the most common upload hiccups.
More often than not, the culprit is something simple related to the file itself. If you get an "invalid file type" error, that’s an easy fix. It just means the platform doesn't recognize the format—it’s probably not a JPG or PNG. Just open the image in any editor and re-save it as one of the supported types.
Another frequent one is "file size exceeds limit." This is just as straightforward. Your image is a bit too hefty, which can bog down the system. Pop it back into your compression tool, dial down the size to get it under 2 MB, and give the upload another go.
Decoding Other Upload Failures
Sometimes, the issue isn't the file's size or type but its name—a small detail that trips up more people than you'd think.
If your filenames are full of weird symbols or spaces, you're inviting trouble. The system can get confused and fail the upload. I've found it's best to stick to a clean, simple naming convention from the start.
- Avoid Special Characters: Ditch symbols like
!,#,&, or*in your filenames. They often cause conflicts. - Use Dashes or Underscores: Instead of spaces, use a hyphen (
-) or an underscore (_) to separate words. For example,blue-product-shot.jpgis much safer thanblue product shot!!.jpg.
This little bit of housekeeping ensures the system can read and process your files without a hitch.
A quick pro-tip: I make file renaming part of my prep workflow. Before I even think about uploading, I do a quick batch rename to get rid of any special characters and spaces. It completely eliminates a whole class of potential errors before they can even happen.
By understanding these common messages and cleaning up your filenames ahead of time, you can solve most upload problems in seconds. That means less time stuck on technical glitches and more time focusing on your actual creative work.
Got Questions? We’ve Got Answers.
When you're in the middle of a creative project, the last thing you want is to get tripped up by a technical glitch during the upload. Let's run through a few common questions that pop up, so you can get back to creating without missing a beat.
How Many Images Can I Upload at Once?
Our system is a powerhouse, but for the smoothest experience, it's best to upload images in batches of 500 or fewer. Why? It helps prevent browser timeouts and keeps the process snappy.
If you're working on a massive project with thousands of files, do yourself a favor and use the ZIP file method we talked about earlier. It’s a game-changer for big jobs.
Why Am I Seeing an "Invalid File Type" Error?
This is probably the most common hiccup we see, and thankfully, it’s an easy fix. This error just means you’ve tried to upload a file that isn't a JPG, PNG, or WEBP.
Just pop the file into your favorite image editor, save it as one of the supported formats, and try uploading it again. Problem solved.
Honestly, the secret to a flawless upload is doing a quick check before you start. Taking a minute to confirm your file types, sizes, and names will prevent 99% of the usual errors. A little prep goes a long way.
Can I Change or Delete Images After I’ve Uploaded Them?
Of course. Once your images land in the project gallery, you're in complete control. You can click on any image (or select a whole group of them) to edit their details or remove them entirely before kicking off the final generation.
It's amazing to see how much visual content management is growing. The global photo sharing market was valued at USD 5.06 billion in 2024 and is projected to hit USD 9.03 billion by 2035. This boom is powered by better cloud storage and AI, which you can read more about in these photo sharing market trends. It really shows why making the upload process seamless is so important.
Ready to stop fussing with the technical side of things and get back to creating? With Bulk Image Generation, you can get your assets uploaded and generate hundreds of incredible visuals in seconds. Give it a try and see just how fast your ideas can come to life!