
Batch Edit Pictures and Reclaim Your Time

Aarav Mehta • July 21, 2025
Learn how to batch edit pictures to transform your workflow. Our guide offers practical tips for ensuring consistency and saving hours of tedious work.
To batch edit pictures is to apply the same set of adjustments—like a specific filter, crop, or watermark—to a whole group of images at once.
If you’ve ever found yourself editing photos one by one, you know how quickly it turns into a mind-numbing, repetitive chore. Batching transforms hours of that tedious work into a task that takes just a few minutes. For photographers, marketers, and e-commerce store owners, it’s not just a nice-to-have skill; it's essential.
Why Batch Editing Is a Workflow Game-Changer
Imagine you're launching a new product line with 100 different photos. Editing each one individually—fiddling with the brightness, cropping to the right size, and slapping on a watermark—is a surefire recipe for burnout. Even worse, you’ll end up with inconsistencies.
Now, picture applying those exact same edits to all 100 images with a single click. That’s the magic of batch editing. It’s not just about saving time; it’s a strategic move that injects massive efficiency and consistency into your creative process.
When you stop dedicating hours to monotonous tasks, you free yourself up for high-impact activities, like refining your brand’s visual identity or dreaming up new creative campaigns. This is especially true if you’re a wedding photographer drowning in photos or a social media manager trying to stay ahead of the content calendar.
The Impact of Efficiency
This time-saving mindset isn't just for images. The same principles apply to other parts of your content strategy, like when you’re batching social media content to schedule posts for an entire week or month at a time.
Batch editing forces you to create a system. It turns a chaotic, one-off task into a repeatable, scalable process that delivers predictable and professional results every single time.
This push for a more systematic approach is reflected in the market for image editing software. It was valued at $3.5 billion and is on track to hit $6.2 billion by 2033. This growth is all about the increasing demand for tools that help us manage visual content without losing our minds.
The data below really brings the benefits home, showing just how much time you save and how many errors you avoid when handling an average batch of 50 images.
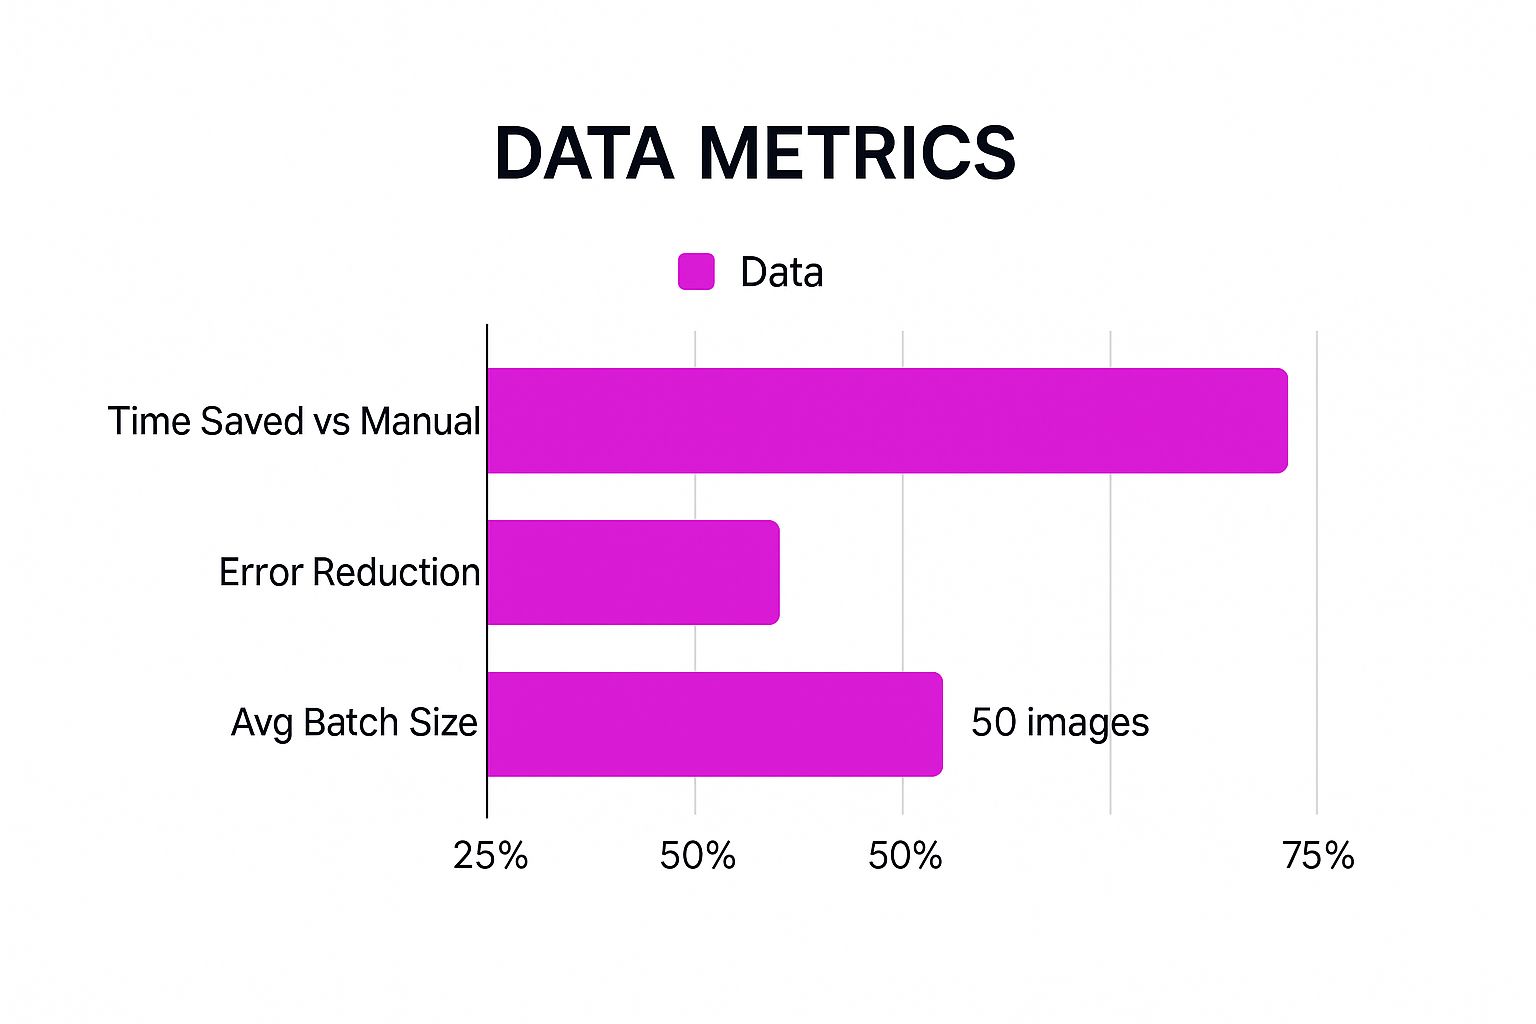
As you can see, the boost in productivity is huge. It frees up hours that you can pour back into the creative work that actually matters.
To put it in perspective, here’s a quick look at how the two workflows stack up side-by-side.
Manual vs. Batch Editing Workflow Comparison
| Task (50 Photos) | Manual Editing Time | Batch Editing Time | Consistency |
|---|---|---|---|
| Resizing | 25-30 minutes | < 1 minute | Low (risk of variation) |
| Color Correction | 45-60 minutes | 2-3 minutes | High (identical settings) |
| Applying Filter | 15-20 minutes | < 1 minute | High (identical filter) |
| Adding Watermark | 20-25 minutes | < 1 minute | High (uniform placement) |
| Total Time | ~2 hours | ~5 minutes | Excellent |
The difference is staggering. A two-hour job becomes a five-minute task, all while ensuring every single image looks perfectly uniform. This is how you scale your visual content without sacrificing quality.
Setting Your Photos Up for Success
 Let’s be honest, the real secret to a flawless batch edit has nothing to do with that final click. It’s all in the prep work. A little bit of organization before you even touch an editing slider can save you from massive headaches and ensure your final images look consistent and professional.
Your first move? Give your project a dedicated home. Round up every single image you plan to edit and drop them into one, clearly labeled folder. It’s a simple step, but it’s the best way to avoid missing a crucial shot or accidentally pulling in a straggler from a different project.
Next, take a look at your file formats. If you’re dealing with a mix, especially those finicky HEIC files from an iPhone, it’s a smart move to convert everything into a universal format like JPG. This guarantees compatibility with pretty much any editing tool and prevents frustrating errors from derailing your workflow.
A pro tip I live by: always work from copies, never the originals. Make a quick backup of your unedited photos before you start. This is your safety net, giving you the freedom to experiment without the fear of permanently messing up your source files.
Choosing Your North Star Image
Once your files are organized, it’s time for the most critical step of all: selecting your "hero" image.
This isn’t about picking your absolute favorite photo. Instead, you’re looking for the one that best represents the average conditions of the entire set. Find an image with typical lighting and color that mirrors what you see in the majority of your shots.
This one photo will be your guide. The edits you dial in for this image will become the template for every other photo in the batch. Nailing this choice is the key to being able to batch edit pictures with confidence, because it ensures the adjustments will translate beautifully across the entire gallery, creating that cohesive, polished look you’re after.
Your Practical Guide to Batch Editing
This is where the magic really happens. Let's move beyond theory and get our hands dirty with a real-world project that every photographer dreads: a massive wedding gallery. It’s the perfect stress test to show off just how powerful it is to batch edit pictures.
Once you have your organized folder of images, the first step is to get them into the Bulk Image Generation editor. Go ahead and upload the entire set. The platform is built to handle huge volumes without breaking a sweat. After the upload, your full gallery will be laid out, ready for you to select that "hero" image you carefully picked out earlier.
Nailing Your Core Adjustments
Now, pour all your creative focus into that one hero shot. This single image will define the look and feel for the entire gallery. I always start with the fundamentals:
- Exposure: Get the brightness just right for the scene.
- Contrast: Add that perfect amount of pop between your lights and darks.
- White Balance: Tweak it until the colors look natural and true-to-life.
These basic adjustments are the backbone of your final style. Since you chose an image that represents the average lighting conditions of the shoot, these settings should apply beautifully across most of the other photos. Think of it as creating your master preset on the fly.
Syncing Edits Across the Entire Gallery
Your hero image looks perfect. Now for the step that will save you hours of tedious work. Instead of manually applying those same edits to hundreds of other photos, you’re going to do it all at once.
Just select your freshly edited hero image, then select all the other photos in the gallery you want to apply the style to.
Find the "Apply to All" or "Sync Settings" button and give it a click. Instantly, the editor copies your adjustments—exposure, contrast, white balance, and more—to every single photo you selected. Just like that, the heaviest lifting is over.
The real game-changer here is scalability. It doesn't matter if you're working with 50 product shots or 600 wedding photos. The time it takes to apply that core style is exactly the same: a few seconds.
This kind of efficiency is exactly why the photo editing software market is projected to reach $1.58 billion by 2032. Professionals simply can't afford to waste time on repetitive tasks, and batch editing is the cornerstone of a modern, efficient workflow.
While our platform is fantastic for applying universal styles, some tasks like resizing have their own dedicated tools for the best results. For those specific jobs, you can use our purpose-built bulk image resizer.
And there you have it. Your whole gallery now has a consistent, professional look, and you've achieved it in a tiny fraction of the time it would have taken to edit each photo one by one.
Digging Deeper with Advanced Batch Editing
Once you've got the basics down, you can start using batch editing for more than just simple fixes. This is where it stops being a handy utility and becomes a central part of your brand strategy. We're talking about a level of consistency and automation that can completely reshape your entire workflow.
For instance, think about applying a consistent watermark or logo across an entire library of images. You can protect hundreds of product photos or client previews in a single go. It’s a simple action that adds a serious layer of professionalism and protects your work.
Creating and Applying Your Own Presets
One of the absolute best ways to batch edit pictures is by making your own custom presets. Let's say you've perfected a specific "Moody Winter" look for your blog photography. Instead of trying to recreate that magic every single time, you can save those exact adjustments as a preset you can use again and again.
This means you can instantly apply that signature style to future photoshoots. Here’s why that’s such a game-changer for your workflow:
- Rock-Solid Brand Consistency: Every single image you put out will have a cohesive, recognizable look.
- Huge Time Savings: Applying a complex, multi-step style takes seconds, not minutes.
- More Creative Freedom: It frees you up to concentrate on composition and nailing the shot in the moment, knowing the post-processing is already handled.
This kind of automation is a huge reason why the photo editing software market is expected to hit $3.29 billion by 2032. As AI tools become more integrated into our workflows, professionals are demanding tools that automate tedious tasks and let them collaborate more effectively.
The real magic of a custom preset is turning your unique creative vision into a scalable, one-click solution. It's your style, bottled and ready to go.
But it’s not just about stylistic flair. You can also create batch actions for resizing. Imagine taking a folder of horizontal product shots and instantly creating square versions for your Instagram grid and vertical ones for your Stories. It’s all about making your content work smarter, not harder. When you pair these advanced techniques with other tools, like a powerful AI image generator, you can really take your content creation to a whole new level.
Finalizing and Exporting Your Edited Images
You’ve applied all your edits across the entire batch, but don't hit export just yet. The final review and export process is what separates a decent batch edit from a truly professional one. This is where you ensure every single image looks its best, no matter where it ends up.
Before you do anything else, give your images one last scan in a gallery view. I always do this. It’s a quick spot-check that immediately highlights any outliers. You might find one photo that’s a touch too dark or another that needs a slightly different crop. Now's your chance to make those small, individual tweaks.
Choosing Your Export Settings
Once you’re completely happy with how everything looks, it's time to export. This final step is crucial for delivering high-quality, usable assets consistently.
The right settings depend entirely on where these images are going. Here’s a quick rundown of what I typically use:
- File Format: For almost anything web-based—social media, blogs, websites—JPG is your best bet. If you’re prepping for high-resolution print work, you'll want to go with a TIFF or a maximum-quality JPG instead.
- File Naming: Please, don't leave your files with generic names like
IMG_5432.jpg. A smart naming system, likeClientName-Event-001.jpg, keeps you organized and looks far more professional. - Compression: This is all about balancing quality with file size. For web use, a quality setting around 70-80% is usually the sweet spot, keeping files small without a noticeable drop in quality.
I can't stress this enough: mastering your export workflow is just as important as the editing itself. It’s what guarantees your images are optimized, organized, and ready for any platform, maintaining their quality long after they leave your editor.
This same principle of planning for the final output applies when creating images from scratch. To learn more, check out our guide on how to create stunning digital product images using AI generators.
Common Questions About Batch Photo Editing
When you first dive into batch edit pictures, a few questions always seem to pop up. It’s a pretty intuitive process, but knowing the little details can save you from common headaches and really unlock the power of this workflow. Let's get right into the questions we hear the most.
A big one is about control. People worry that batch editing means giving up the ability to make specific, one-off adjustments. The good news? You absolutely don't lose that control. In fact, a professional workflow blends both approaches. You start by applying your core edits across the entire batch to create a consistent look and feel.
Once that's done, you just do a quick scroll through the gallery. You'll immediately spot any photo that needs a little extra love—maybe one is a bit too bright or needs a different crop. This way, you get the insane speed of batch processing while keeping the pixel-perfect control you need for those final touches.
What Is the Best File Format to Use?
For the editing itself, RAW files (like .CR2, .NEF, or .DNG) are the gold standard. They hold the most data for color and exposure, giving you maximum flexibility. That said, high-quality JPEGs work just fine for most batch editing tools, including ours.
When you’re ready to export, it all comes down to where the images are going:
- For the Web & Social Media: Stick with JPEG to keep your file sizes small and load times fast.
- For Professional Printing: Export as a TIFF or a maximum-quality JPEG to make sure every last detail is preserved.
Does Batch Editing Lower Image Quality?
Nope. Applying edits to a bunch of photos at once doesn't degrade them any more than editing a single photo would. Quality loss usually sneaks in from other places, like saving the same JPEG over and over (which re-compresses it each time) or choosing low-quality export settings.
The real secret to keeping your quality high is to always work from your original, high-resolution files. Get all your edits done, and only export the final versions once, at the very end.
Ready to slash your editing time and get that polished, professional look across all your images? Give Bulk Image Generation a try and see just how easy it is to batch edit pictures. You can start creating gorgeous, consistent galleries in minutes at https://bulkimagegeneration.com.