
Design a Minecraft YouTube Banner That Actually Gets Clicks

Aarav Mehta • December 7, 2025
Learn to design a pro Minecraft YouTube banner that stands out. Our guide covers dimensions, AI asset creation, and design tips for a click-worthy channel.
Your Minecraft YouTube banner is the very first thing people see. It’s your channel's digital storefront, and in a split second, it tells visitors who you are and what you're all about. It's the one thing that can instantly separate a professional-looking channel from just another hobbyist.
This guide will show you a modern way to design something that truly stands out.
Your Banner Is More Than Just Channel Art

Think of your YouTube banner as a digital handshake. For a space as packed as Minecraft content, that first impression is everything. It's your best shot at showing off your channel's personality—whether you're all about hardcore survival, mind-bending redstone builds, or just chaotic minigames with friends.
A well-designed banner does more than just fill space. It sets expectations and starts building a brand identity that viewers will recognize and remember, which is absolutely key for turning a random viewer into a loyal fan.
Why a Custom Banner Matters
Let's be real: the competition on YouTube is fierce. The Minecraft world is especially massive, with over five million channels pushing out content and views soaring past one trillion. A generic banner just gets lost in that sea of noise.
A strong, custom banner builds trust. It signals that you're serious about your content and it should work hand-in-hand with your other channel elements. While you're focusing on the banner, remember that solid YouTube thumbnail best practices are just as important for boosting your channel's appeal and getting those clicks.
A great banner answers three questions instantly for a new visitor: Who are you? What kind of videos do you make? And why should they stick around?
This guide isn't about slapping text on a template. We're diving into a powerful workflow that mixes classic design ideas with modern AI tools. You don't need to be a pro artist to create a killer Minecraft YouTube banner that feels like you. We’ll walk through how to craft something that not only looks professional but actually helps grow your audience from the moment they land on your page.
Getting Your Dimensions and Safe Zones Right
Ever see a killer Minecraft banner that looks amazing on a desktop, but on a phone, the main character's head is completely chopped off? Yeah, that’s exactly what we’re going to avoid.
Before you even think about placing your first block or firing up your design software, you have to nail the technical specs. This isn’t the fun part, I know, but getting it right is the foundation for a banner that looks pro on every single screen.
The All-Important Safe Area
YouTube uses one massive image for your banner, but it shows different parts of it depending on the device. A banner that looks epic on a big-screen TV will get brutally cropped on a phone, which is where a huge chunk of your audience is watching.
This brings us to the single most important concept here: the "text and logo safe area."
Think of this as the tiny, guaranteed-to-be-visible rectangle right in the middle of your banner. Your channel name, your Minecraft skin, your social handles—anything a viewer absolutely must see—has to live inside this little box. It ensures your core branding is always front and center, no matter how someone is viewing your channel.
The full banner size you'll upload is 2560 x 1440 pixels, but the mobile-friendly safe area is a much smaller 1235 x 338 pixels. That tiny rectangle is your main stage.
Don't get me wrong, the space outside this zone is still useful! Treat it like bonus real estate. It's the perfect spot for sprawling Minecraft landscapes, background textures, or secondary characters that add flavor but aren't critical. The key is to keep the essential stuff locked in that central safe zone.
A Practical Dimensions Breakdown
To make this super clear, here’s a quick cheat sheet with the numbers you need to commit to memory. Getting these right from the start will save you a world of pain later.
Here's a simple table to keep on hand. I recommend bookmarking this page or taking a screenshot so you always have it ready.
YouTube Banner Dimensions Cheat Sheet
| Display Type | Full Banner Dimensions | Safe Area (Always Visible) |
|---|---|---|
| TV Display | 2560 x 1440 pixels | The entire image is visible. |
| Desktop Max | 2560 x 423 pixels | A wide but short slice from the middle. |
| Tablet Display | 1855 x 423 pixels | A slightly narrower slice than desktop. |
| Mobile & Desktop Min | 1546 x 423 pixels | The minimum desktop view. |
| Mobile Safe Area | 1235 x 338 pixels | CRITICAL: Your main content must fit here. |
Getting these proportions right is everything. Always start your design file at the full 2560 x 1440 pixels, but immediately draw a 1235 x 338 pixel box in the center to serve as your guide.
Juggling different aspect ratios can feel a bit confusing at first. If you're ever unsure about your canvas proportions, a tool like this handy aspect ratio calculator can be a lifesaver. For a broader look at what other platforms require, this social media image sizes guide is also a fantastic resource to have in your back pocket.
Generating Your Own Minecraft Assets with AI
Your banner needs to be yours. Not just another stock image of a Creeper or a generic render you found online. This is where AI image generation becomes a massive creative unlock. You don't need to be a 3D artist or a pro with a drawing tablet anymore. All it takes is a few well-worded text prompts to build a whole library of custom Minecraft assets.
This gives you all the creative control. You can generate anything from a sweeping Nether fortress landscape to an action shot of your specific Minecraft skin mid-battle. It all comes down to learning how to talk to the AI.
Writing AI Prompts That Actually Work
Think of a prompt as a recipe. The more specific your ingredients, the better the final dish. A lazy prompt like "Minecraft character" will spit out something bland and uninspired. You've got to give it more to work with.
I've found a simple formula is the best place to start: [Subject] + [Action/Pose] + [Location/Background] + [Art Style] + [Lighting/Mood]
Let's put this into practice. Say your channel is all about hardcore survival. You could try a prompt like this:
"My custom Minecraft skin with a diamond sword, fighting a Creeper on a mountaintop at sunrise, digital painting, dramatic cinematic lighting"
See the difference? Now the AI has a clear scene to build, resulting in an asset that’s unique to your channel.
The real magic of AI isn't just making one image; it's about cranking out dozens of variations in minutes. Just by tweaking your prompt—swapping "sunrise" for "stormy night" or "digital painting" for "anime style"—you get a completely new visual. This is how you build a consistent set of on-brand assets without starting from scratch every time.
Before you go too deep into designing, though, you absolutely have to nail the dimensions. This infographic breaks down the key sizes you need for a Minecraft YouTube banner so it looks crisp on every device.
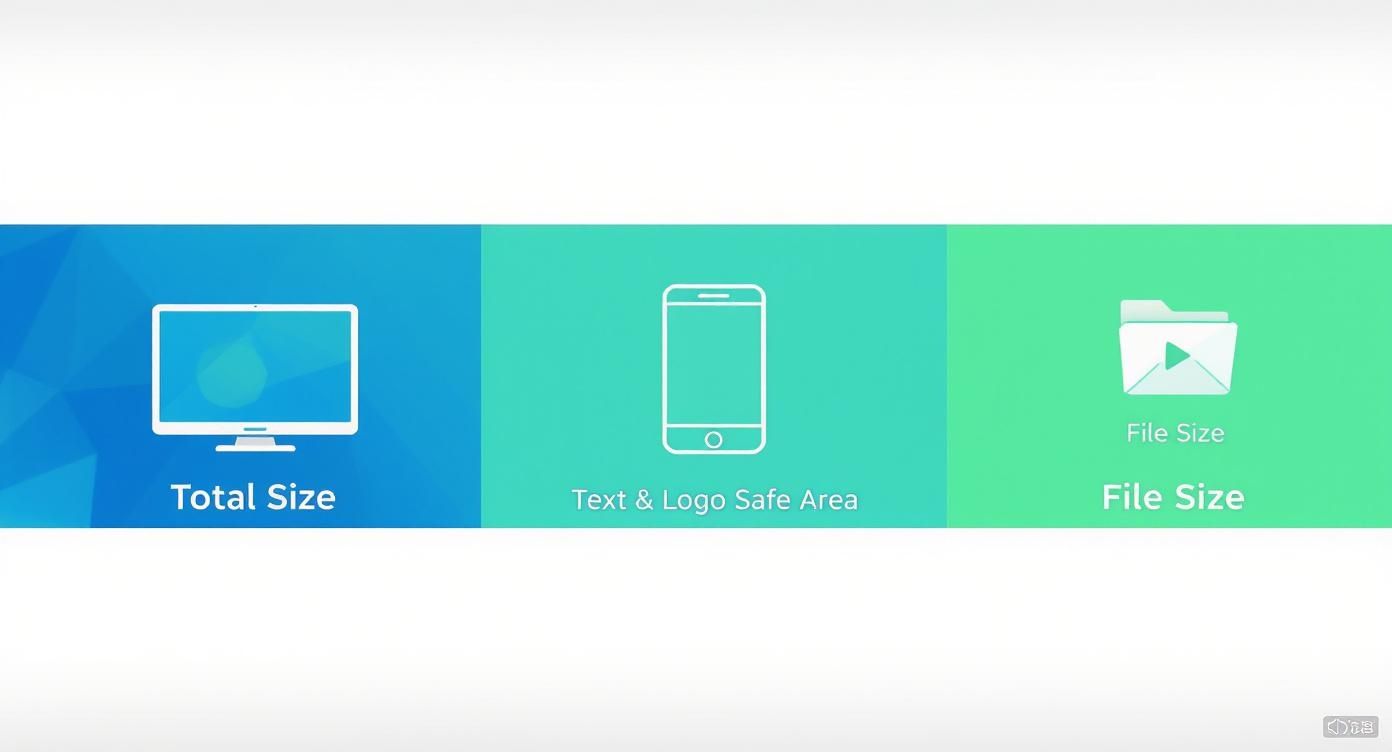
The key takeaway here is the difference between the full banner size (for TVs) and that tiny, critical "safe area" in the middle. Your most important stuff—like your channel name and character—has to live in that safe area to be seen on a phone.
Creating an Endless Supply of Variations
Once you have a solid prompt formula, the fun begins. Start generating assets in bulk. Experiment. See what works. Don't be afraid to get weird with different styles and compositions.
Here are a few more ideas to get you going:
- For a builder channel:
A majestic Minecraft castle on a floating island, surrounded by waterfalls, fantasy art style, soft morning light - For a minigame channel:
My Minecraft skin wearing colorful armor, jumping through an obstacle course, vibrant cartoon style, dynamic action shot - For a survival channel:
My Minecraft character standing at the entrance of a torchlit cave, looking out at a zombie horde, dark and gritty illustration, high contrast
Playing around with these prompts is how you find your channel's unique vibe. Using a dedicated Minecraft YouTube banner image generator can speed this process up massively, letting you pump out tons of options quickly. Instead of tedious manual work, you can focus on the creative side of things and build a library of high-quality, original art that makes your channel instantly recognizable.
Assembling Your Banner for a Pro Look
Alright, you've got a folder full of unique, AI-generated assets. Now for the fun part: bringing it all together. This is where those individual pieces stop being just images and start telling the story of your channel. We're moving beyond a simple collage to craft a truly professional Minecraft YouTube banner.
Think of this stage as all about composition and balance. You’ll be layering your character, backgrounds, and other cool elements, making sure they all play nicely together. The goal is to set a mood, guide the viewer's eye, and make your channel instantly recognizable.
Building Your Scene Layer by Layer
First up, the background. This could be one of those epic landscapes you generated, a simple blocky texture, or even just a gradient that matches your brand colors. Whatever you choose, drop it in as your bottom layer and make sure it fills the entire 2560 x 1440 pixel canvas.
Next, drag in your main character asset. Position them right in the middle of that 1235 x 338 pixel safe area. This is the star of the show, the absolute focal point, so it needs to be front and center. From there, you can start adding supporting elements—maybe a friendly mob, a pet, or part of a structure—around your character. Let them spill out into the wider desktop and TV areas to create a sense of depth and scale.
Quick tip: The areas outside the safe zone are for atmosphere, not for critical info. A Ghast floating in the far corner looks awesome on a TV but won't be missed on a phone. This trick makes your design feel expansive on big screens while keeping it tight and focused on small ones.
A polished banner often comes down to the little things. I like to add subtle lighting effects, like a soft glow from a torch or a lens flare peeking over a mountain, to help blend the character into the background. These small touches are what make the whole composition feel integrated and less like a cut-and-paste job.
Choosing Fonts and Adding Text That Pops
The text on your banner is just as crucial as the graphics. It’s got to be readable, on-brand, and placed where it matters most. Your channel name is the big one—it absolutely must be inside the safe area.
When picking a font, you're looking for a balance between theme and clarity. It’s tempting to grab the most pixelated, blocky font you can find, but be careful. They can get really hard to read, especially on a phone screen. A much better move is to use a clean, bold sans-serif font that gives a nod to the blocky aesthetic without sacrificing legibility.
Here are a few typography pointers I've picked up over the years:
- Create Contrast: Your text needs to jump off the background. A simple drop shadow, an outer glow, or even placing a solid-colored shape behind the text can make a world of difference for readability.
- Establish Hierarchy: Your channel name should be the biggest, boldest text on the banner. Any secondary info, like a tagline or social handles, should be noticeably smaller.
- Keep it Brief: A banner isn't the place for a novel. Stick to your channel name and maybe a short, punchy tagline like "Epic Builds & Survival."
You just can't overstate the power of professional channel art. Look at any of the top Minecraft YouTubers—their banners are a huge part of their brand identity. It's what grabs your attention and signals you're in the right place.
And remember, consistency is everything. You want viewers to instantly recognize your content, whether it's your banner, thumbnails, or in-video graphics. To keep everything looking cohesive, check out our guide on how to create a brand kit for consistent AI image generation. It's a game-changer.
Getting Your Banner Ready to Go Live
You’ve poured your creativity into designing the perfect banner, and now you're in the home stretch. This last part is all about the technical details, but getting it right is what makes all that design work actually pay off. A file that's too big won't even upload, and one that's too compressed will just look blurry and amateurish.
The trick is hitting that sweet spot between image quality and file size. YouTube is pretty strict here—you have to stay under their 6MB limit.
Choosing the Right File Format
When you hit "Save" or "Export," you'll usually see two main options: PNG and JPG. They might seem similar, but they handle image data in completely different ways.
- PNG (Portable Network Graphics): This is almost always your best bet for a banner with sharp text, logos, or character graphics. PNGs use what’s called lossless compression, which means they keep all the original detail, giving you a super crisp and clean final image.
- JPG (Joint Photographic Experts Group): If your banner is more like a complex, photo-realistic scene—say, a highly detailed landscape render—a JPG can get you a smaller file. The catch is that it uses lossy compression, which can sometimes introduce weird artifacts or a bit of blurriness around the edges of text and graphics.
For pretty much any Minecraft-style banner that mixes graphics, your character, and text, PNG is the way to go. It just looks better. Just keep an eye on that file size when you export.
The goal here is simple: get the file size as small as possible without seeing a noticeable drop in quality. Always export at the full 2560 x 1440 pixels first, then check the file size. If it's over 6MB, go back and export it again with slightly lower quality settings until you duck under that limit.
The Upload and Final Check
With your perfectly optimized banner file in hand, it's time for the final step.
Head over to YouTube Studio. On the left-hand menu, find the “Customization” tab, then click on “Branding.” This is where you'll see the “Banner image” section.
Click “CHANGE” and upload your new banner. Now, don't skip this next part. YouTube will show you an interactive preview, and this is your single most important final check. It shows you exactly how your banner will look on a TV, a desktop monitor, and, most importantly, a mobile phone.
Squint at that mobile view. Is your channel name cut off? Is your character’s face weirdly off-center? This preview is your last chance to catch any alignment mistakes before your entire audience sees it. If it all looks perfect, hit “DONE” and then smash that “PUBLISH” button to make it live.
A strong visual brand is a huge part of growing a channel. Just look at the official Minecraft channel—they've built a massive presence since 2010, pulling in over 14.2 million subscribers and 2.5 billion views. You can dig into more stats about Minecraft's impressive channel growth on speakrj.com if you want to see just how powerful consistent branding can be. Your new banner is a massive step in that direction.
Answering Your Top Minecraft Banner Questions
Jumping into banner design always brings up a few tricky questions, especially when you're aiming for that perfect, pixel-crisp look for your Minecraft channel. I've seen creators stumble over the same issues time and time again, so let's clear up some of the most common ones right now.
Getting the banner size and quality just right is probably the biggest headache, but it’s usually an easy fix once you know what to look for.
"Why Does My Banner Look Blurry After I Upload It?"
Ah, the classic blur issue. This one almost always boils down to two culprits: the quality of your original image or the file type you're saving it as. First off, you have to start with a big canvas. The official YouTube recommendation is 2560 x 1440 pixels, and you should treat that as law. If you design something smaller and try to stretch it to fit, it's going to look like a pixelated mess every single time.
Next, take a hard look at your export settings. JPGs might seem like a good idea because the file sizes are smaller, but they use what’s called "lossy" compression. That means the file throws away data to shrink itself, which kills the quality of sharp lines and text. For a Minecraft banner—full of crisp edges and bold text—you absolutely want to export as a PNG. PNGs use "lossless" compression, which means every single pixel stays exactly as you designed it.
Here's a simple rule I always follow: If your design has text, sharp lines, or flat colors (which is basically all Minecraft graphics), PNG is your best friend. The file might be a tad bigger, but the difference in quality is night and day.
"Can I Put My Own Minecraft Skin in My Banner?"
Not only can you, but you absolutely should. Using your own skin is one of the fastest ways to build a recognizable brand for your Minecraft YouTube banner. When viewers see that character, they'll immediately think of your channel.
You've got a few solid ways to get a great image of your skin:
- Good Ol' Screenshots: Just hop in-game, find a plain background (like a wall of a single block type) that's easy to cut out later, and snap a high-res screenshot.
- 3D Skin Renders: There are plenty of free tools online that let you create a custom 3D render of your skin. You can pose it however you want, which is a huge plus.
- AI Image Generation: Like we've been talking about, AI tools can create incredible, dynamic scenes featuring your exact skin. This gives you a ton of creative freedom to make something nobody else has.
No matter which path you choose, the goal is the same: get a high-resolution PNG file with a transparent background. This makes it a breeze to just drop your character onto your banner design without any of those ugly white boxes around it.
"How Often Should I Really Be Changing My Banner?"
There’s no secret formula here, but think of your banner as a core piece of your channel's identity. You definitely shouldn't be swapping it out every week. A consistent banner is like a welcome sign—it helps people recognize your channel in a split second.
That said, there are some great reasons to give it a refresh:
- A Major Rebrand: If you're overhauling your channel name, logo, or the type of content you make.
- Hyping Up a Big Event: It’s perfect for announcing a new let's play series, a huge collaboration, or hitting a subscriber milestone.
- Seasonal Fun: Adding some spooky blocks for Halloween or a Santa hat for Christmas is a simple way to keep your channel feeling current and fun.
My advice? Keep your banner consistent enough to be instantly recognizable, but don’t hesitate to update it when you've got something important to share. For most channels, giving it a fresh coat of paint every six to twelve months is a good rhythm. It keeps things from getting stale without confusing your audience.
Ready to stop wrestling with complicated software and start creating stunning, unique assets for your channel in minutes? With Bulk Image Generation, you can generate hundreds of custom Minecraft-style visuals with simple text prompts, making it easier than ever to design a banner that truly stands out. Check out our AI tools today and see the difference for yourself.