
How to Generate Images with AI A Practical Guide

Aarav Mehta • November 28, 2025
Learn how to generate images with AI using practical, real-world examples. This guide covers choosing tools, writing great prompts, and refining your art.
Getting started with AI image generation can feel like pure magic, but it’s really a skill grounded in a straightforward process anyone can pick up. Think of it as a conversation with an incredibly fast, highly skilled artist. You describe what you want, and the AI brings it to life. This isn't just a niche curiosity anymore; it's quickly becoming a fundamental tool for creators everywhere.
The sudden explosion in popularity is reshaping creative fields from marketing to game development. This isn't just anecdotal, either. In 2024, the AI image generator market was valued at around USD 418.5 million and is expected to rocket to USD 2.63 billion by 2035. That's a compound annual growth rate of about 18.2%, largely driven by demand in advertising and media.
The Four Pillars of AI Image Creation
At its core, the entire process of generating images with AI boils down to four key stages. Get these right, and you'll have the confidence to create just about anything you can dream up. Each step builds on the last, turning a simple idea into a polished, final image.
Let's break down the essential workflow that turns your text prompts into compelling visuals.
| Stage | Key Objective | What to Focus On |
|---|---|---|
| 1. Pick Your Tool | Select the right AI platform | Explore different models like DALL-E 3 or Midjourney to find a style and feature set that fits your project. |
| 2. Craft Your Prompt | Clearly communicate your vision | Write detailed, descriptive instructions. The more specific you are, the better the result. |
| 3. Refine the Output | Polish your initial image | Tweak your prompt, regenerate variations, or use editing tools to perfect details and fix imperfections. |
| 4. Export Your Final Image | Prepare the image for use | Save your creation in the right format and resolution for its intended purpose, like a website or social media. |
Mastering these four pillars will take you from a curious beginner to a proficient AI image creator.
For a fun and low-stakes way to start, you could try an AI avatar maker to get a feel for how prompts translate into unique digital portraits.
What the AI Actually Sees
When you type in a prompt, you're not just giving a simple command. You're feeding the model a series of data points it uses to construct a picture from scratch, pulling from its vast training on existing images and text.
Key Takeaway: The quality of your AI-generated image is a direct reflection of the quality and detail in your text prompt. The more specific you are about the subject, style, lighting, and composition, the closer the AI will get to what's in your head.
Here’s a great example from OpenAI showing how DALL-E 3 translates a rich, descriptive prompt into a highly detailed scene.
Notice how the AI nailed specific requests like "dramatic backlighting" and "cinematic style." This shows its ability to understand and execute complex artistic instructions. This is why learning to generate images with AI is really about learning how to communicate your ideas with absolute clarity.
Choosing the Right AI Image Generator for You
Diving into AI image generation feels like walking into a massive art gallery with a million different styles. The sheer number of tools can be overwhelming, but finding the right one really just comes down to what you need to create. Are you a marketer who needs a steady stream of on-brand assets, or are you an artist chasing a very specific aesthetic?
What works for one person will be a complete miss for another. A generator that creates stunning photorealistic portraits might totally flop when you ask it for a whimsical, cartoon-style illustration. The goal is to match the tool to your project, technical skill level, and budget.
As you explore, it helps to understand the various top AI image models that power these tools. Knowing a little about the "engine under the hood" helps you see past the flashy user interface and make a smarter choice.
No matter which platform you land on, the creative process is pretty much the same. It's a simple, repeatable loop.
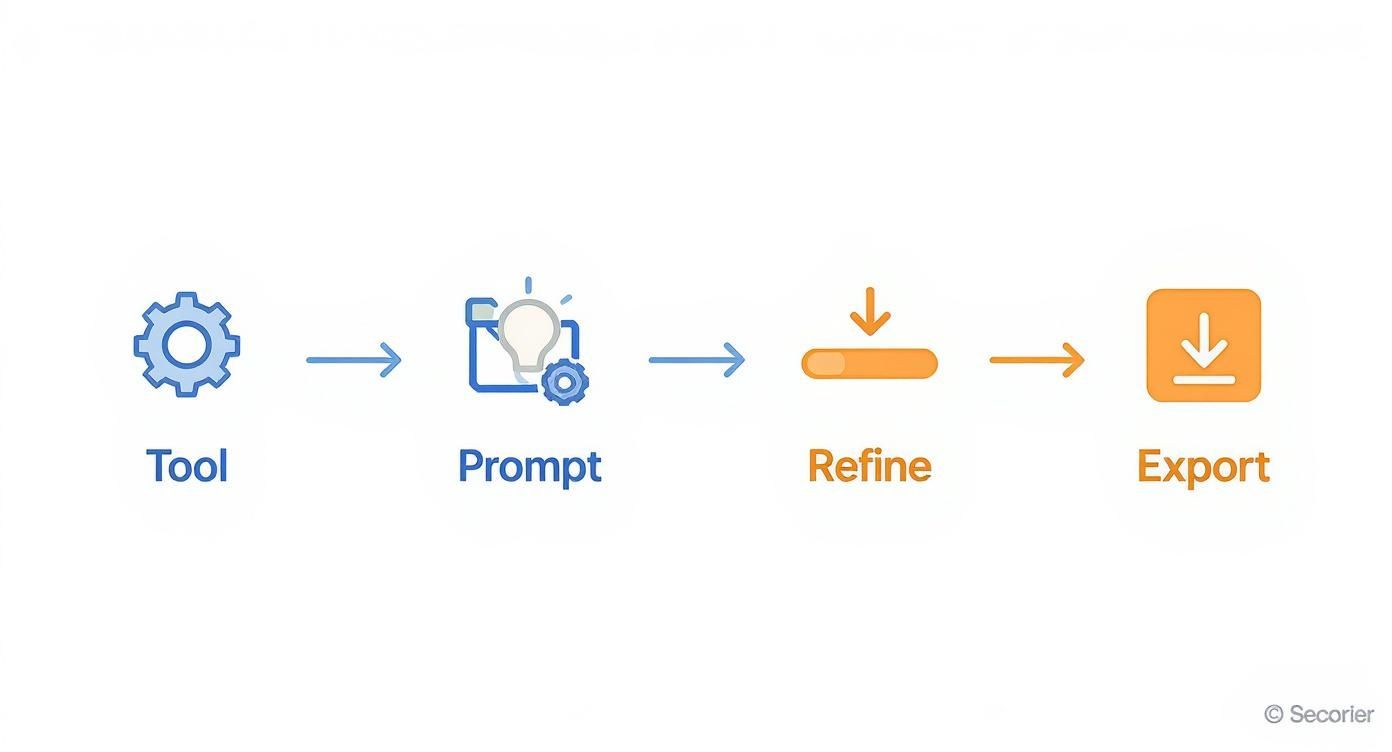
This four-step workflow—Tool, Prompt, Refine, Export—is the foundation for basically every AI image you'll ever create.
Key Factors for Your Decision
Before you sign up for anything, think through these key points. They’ll help you filter out the noise and find a generator that feels like a natural part of your workflow.
- Ease of Use: Some tools, especially those built into platforms like ChatGPT, are incredibly simple to start with. Others, like running a local version of Stable Diffusion on your own machine, offer way more control but demand a lot more technical know-how.
- Artistic Style and Cohesion: Does the generator have a "look" you like? Midjourney is famous for its dramatic, almost painterly vibe, while DALL-E 3 is a master at following complex instructions with literal precision.
- Pricing and Usage Limits: You can find everything from free tools (with strings attached) to pricey monthly subscriptions. Figure out if you just need a handful of images here and there or if you're planning to generate thousands for a major project.
- Advanced Features: Do you need special tools like inpainting (editing just one part of an image) or outpainting (making an image bigger by adding to the scene)? Not all generators have these tricks up their sleeve.
Getting clear on these points first will save you from sinking time and money into a tool that just doesn't fit.
Comparing the Top Contenders
To give you a better idea, let's look at the big names in the game. Each has its own personality and is built for a slightly different type of user.
AI Image Generator Feature Comparison
Choosing the right tool is the first step in any successful AI image project. This table breaks down the leading generators to help you quickly identify which one best aligns with your goals, whether you prioritize artistic flair, ease of use, or ultimate control.
| Generator | Best For | Key Strengths | Pricing Model |
|---|---|---|---|
| Midjourney | Artists, designers, and creatives seeking high-quality, aesthetic visuals. | Produces stunning, artistic, and often cinematic results with a strong, recognizable style. | Subscription-based |
| DALL-E 3 | Marketers, content creators, and beginners needing precise outputs from text. | Excellent natural language understanding; follows complex prompts accurately. Integrated into ChatGPT. | Included with ChatGPT Plus subscription |
| Stable Diffusion | Developers, researchers, and advanced users who want maximum control and customization. | Open-source, highly flexible, allows for custom model training and local installation. | Free (open source), with paid cloud versions available |
Each platform offers a unique approach. For instance, Midjourney is the undisputed king of artistic quality. It runs through Discord, which is a bit quirky if you're not used to it, but the community is fantastic and the results are often breathtaking. It's the go-to for anyone wanting visuals that feel like they belong in a gallery.
DALL-E 3, on the other hand, is all about simplicity and accuracy. Since it's baked right into ChatGPT Plus, the barrier to entry is incredibly low. Its biggest advantage is its ability to understand long, detailed prompts without getting confused. This is perfect for marketers who need a very specific scene and don't have time for guesswork.
Pro Tip: If you need to include text in your image, like a sign or a logo, DALL-E 3 is currently your most reliable bet. It handles words and letters far more accurately than most of its competitors.
Then there's Stable Diffusion, the open-source powerhouse. This one is for the tinkerers. It gives you complete control, letting you train your own models on specific styles or subjects and even run the whole thing on your own computer. It's a favorite among developers and advanced users who really want to push the limits of what AI can do.
These tools aren't just for hobbyists anymore; they've become serious business. The professional segment already makes up over 74% of the market value, as more companies rely on AI to generate images at scale. North America leads the charge, holding about 40% of the market share, which shows just how deeply this tech has been adopted. Generating images with AI has officially moved from a novelty to a core business tool.
Writing Prompts That Actually Work
Having a brilliant idea is one thing, but turning it into a stunning AI image? That all comes down to the prompt. Think of it as the bridge between your concept and the final picture. Mastering this skill is what separates those generic, slightly off results from visuals that look professionally made. It’s how you learn to have a productive conversation with the AI.
A basic prompt is like a rough sketch—it leaves way too much up to interpretation. A detailed prompt, on the other hand, is a finished blueprint. It gives the AI clear, unambiguous instructions, guiding it toward the image you actually have in your head. The real art is being descriptive without boxing the AI in completely, leaving just enough room for it to surprise you.
The Anatomy of a Powerful Prompt
An effective prompt isn't just a single instruction; it's built from layers of detail. Just asking for "a cat" will get you a cat, sure, but probably not the dynamic, specific image you were hoping for. You need to stack instructions to guide the AI to a precise result.
I've found that a solid framework for building prompts boils down to four key parts:
- Subject: This is your "who" or "what." Be specific. Don't just say "a dog"—try "a golden retriever puppy." The more precise, the better.
- Action & Setting: What's the subject doing, and where? "A golden retriever puppy" becomes "a golden retriever puppy chasing a red ball across a lush green lawn."
- Artistic Style & Mood: This is all about the vibe. Do you want a photorealistic image, a moody oil painting, or a bright cartoon? Adding phrases like "cinematic lighting," "moody atmosphere," or "vibrant watercolor style" completely changes the outcome.
- Technical Details: These are your director's notes. Think about camera angles ("low-angle shot"), lens types ("wide-angle lens"), or even the time of day ("golden hour lighting").
When you weave these elements together, you stop making vague requests and start writing detailed creative briefs. The AI can execute these with surprising accuracy.
From Vague to Vivid: A Practical Example
Let’s put this framework into action. Say you need an image of a futuristic city for a sci-fi blog post.
Before (The Basic Prompt):
futuristic city
This is way too simple. The AI has to guess the style, the time of day, the mood—everything. You'll likely get something that looks like a generic, uninspired stock photo from the future.
After (The Detailed Prompt):
Expansive futuristic cyberpunk city at night, neon signs glowing in the rain, towering holographic advertisements, flying vehicles weaving between megastructures, dramatic low-angle shot, cinematic lighting, photorealistic, 8k resolution.
The difference is night and day. We've defined the style (cyberpunk), the setting (at night, in the rain), key details (neon signs, flying vehicles), and crucial technical specs (low-angle shot, cinematic lighting, 8k). The result will be a dynamic, atmospheric scene that actually feels alive.
Key Insight: Every specific word you add is a direct instruction that narrows down the possibilities for the AI. Think of yourself as an art director guiding a team of incredibly fast, literal-minded artists. Your clarity is their command.
The Power of Negative Prompts
Sometimes, telling the AI what you don't want is just as important. That's where negative prompts come in. Most advanced AI image generators have a field where you can list terms you want to exclude from the final picture.
This is a lifesaver for cleaning up common AI mistakes or refining the overall aesthetic. For instance, if you're generating portraits and the AI keeps giving you people with distorted hands, a negative prompt can fix that right up.
Common Uses for Negative Prompts:
- Correcting Artifacts:
--no deformed hands, extra fingers, blurry face - Refining Style:
--no cartoon, illustration, watermark, text - Removing Elements:
--no cars, people, clouds
Think of it as putting up guardrails. You're stopping the AI from wandering into creative territory you want to avoid, which saves a ton of time on redos and edits down the line.
Finding Prompt Inspiration
Even with a solid framework, you'll eventually hit a creative wall. The good news? Inspiration is everywhere. One of the best ways to get better at prompting is to see what other people are creating.
If you need a great starting point, this guide to the 25 best prompt ideas for an AI image generator is packed with creative concepts, from fantasy art to product mockups.
Here are a few other places I constantly check for high-quality examples:
| Platform/Resource | What to Look For |
|---|---|
| Midjourney Community Showcase | See what prompts are trending and how top creators build their requests. |
| Pinterest & ArtStation | A simple search for "AI art" or a specific style will show you a huge range of outputs. |
| Lexica.art | This is a search engine built specifically for AI images and their prompts. |
Studying successful prompts is like reverse-engineering a great recipe. You start to notice patterns and learn which word combinations produce certain effects. It will dramatically speed up your learning curve and make crafting a powerful prompt your single most important skill.
Turning Good AI Images into Great Ones
Getting that first AI image feels like a win, but it’s rarely the final product. The real magic happens in the refinement stage. This is where you take a promising concept and polish it until it perfectly matches your vision, turning a good output into a truly great one.
This is what separates the pros from the beginners. They don’t just accept the first generation; they treat it as a starting point. By learning a few key refinement techniques, you can gain incredible control over the final image and fix small flaws without having to start your prompt from scratch.
Replicating Success with Seed Numbers
Ever generated an almost perfect image, tweaked one tiny word in the prompt, and gotten something completely different back? It’s a frustratingly common experience, and it happens because the AI starts with a random "noise" pattern for each generation.
A seed number is simply the starting point for that random pattern.
By using the same seed number, you’re telling the AI to start from the exact same initial noise. This lets you make small changes to your prompt while keeping the core composition of the image consistent. Honestly, it’s the single most powerful tool for creating controlled variations.
For example, your prompt a red sports car on a coastal road might produce a great layout, but maybe the car is the wrong model. Just lock in that seed number and change the prompt to a blue convertible on a coastal road. The AI will generate a new image with a similar camera angle and background, but with the specific car you actually wanted.
Pro Tip: Not all platforms make seed numbers visible, but most advanced tools like Stable Diffusion and Midjourney do. Always look for this feature when you want to fine-tune an image instead of just rolling the dice again.
Fine-Tuning with Model Parameters
Beyond the prompt and seed, you can often adjust the technical settings that influence how the AI interprets your request. Think of these like a photographer’s camera dials—they give you another layer of control over the final look.
Three of the most common parameters you'll run into are:
- CFG Scale (Classifier-Free Guidance): This controls how strictly the AI follows your prompt. A lower value gives the AI more creative freedom, while a higher value forces it to stick to your instructions more literally.
- Steps: This is the number of refinement steps the model takes to create the image from noise. More steps can add detail, but they also take longer and can sometimes lead to over-baked, strange-looking results. 20-40 steps is usually a good sweet spot.
- Sampler: This is the specific algorithm the model uses for the denoising process. Different samplers can produce subtle variations in style and sharpness. Experimenting with them is a great way to find a slightly different aesthetic for the same prompt.
Getting comfortable with these settings is a huge part of learning how to generate images with AI that have a professional polish.
Fixing Flaws with Inpainting
Even the best prompt can produce an image with a small flaw—a weird-looking hand, a misplaced object, or a strange facial expression. Instead of regenerating the entire image and hoping for the best, you can use inpainting.
Inpainting lets you mask a specific part of the image and have the AI regenerate only that area based on a new, more specific prompt.
Imagine you generated a perfect portrait, but the person's eyes are closed. You can simply:
- Mask over the eyes using the inpainting tool.
- Provide a simple prompt like "beautiful open blue eyes."
- The AI will fill in just the masked area, leaving the rest of the image completely untouched.
This technique is a massive time-saver and is essential for detailed work. It’s particularly useful for professional product photography. In fact, our guide on AI product photography digs into how inpainting can be used to perfect product shots without expensive reshoots.
When to Use External Editors
AI is incredibly powerful, but it's not always the final step. Sometimes, the smartest move is to take your AI-generated image into a traditional photo editor like Adobe Photoshop, Affinity Photo, or GIMP.
These tools are perfect for post-processing tasks where manual control is just better:
- Color Correction: Precisely adjusting brightness, contrast, and color balance.
- Adding Text and Logos: AI still struggles with typography. Adding text overlays in a dedicated editor is far more reliable.
- Compositing: Combining elements from multiple AI generations into a single, cohesive image.
- Final Retouching: Cleaning up minor blemishes or artifacts that the AI missed.
Knowing when to switch from AI generation to manual editing is a crucial skill. A great workflow often involves generating the core visual with AI and then using an editor for those final, precise touches.
Creating AI Art Ethically and Legally
Once you get the hang of generating images with AI, you quickly realize the technical side is just the beginning. The real journey leads you into a maze of important ethical and legal questions. Using this tech responsibly means knowing the rules of the road—both written and unwritten. The goal isn't to scare you off, but to help you create in a way that’s both respectful and legally smart.
The conversation around AI ethics is getting louder, especially as it weaves its way into our daily work. The generative AI market is absolutely booming, with projections showing 45% of companies will be experimenting with it by early 2025. Marketing teams are leading the charge, with 73% already using AI to churn out images and text faster than ever. You can dive deeper into these generative AI adoption statistics on mend.io. This isn't just a trend; it's a fundamental shift, which makes getting the legal stuff right more critical than ever.
Who Owns an AI-Generated Image?
This is the million-dollar question, and frankly, the answer is still a bit murky. Right now, in places like the United States, copyright law is clear: it protects works created by humans. An image spit out by an AI from a simple text prompt often doesn’t clear that "human authorship" bar.
So, you probably can't claim exclusive copyright over an image you generated in the traditional sense. But here’s the critical part: the terms of service of the AI tool you're using are your bible. They spell out exactly what you can and can't do with the images—whether you can use them commercially, sell them, or put them on a billboard. Always, always read the fine print.
Key Takeaway: While you likely won't hold the copyright to a purely AI-generated image, the platform's license is what matters. It usually gives you broad rights to use what you create. For any commercial project, double-check those terms to stay out of hot water later.
The Ethics of Mimicking Artistic Styles
This is where things get really heated. One of the biggest debates in the AI art world revolves around training models on the work of living artists. Is it okay to prompt an AI to create an image "in the style of" a specific artist who is still working today? It's a practice that sits on a very shaky ethical foundation.
Many artists feel this is just a high-tech way of copying their signature style—a style they may have spent a lifetime perfecting. It can devalue their work and their unique creative voice. While it might not always be illegal, it’s a gray area you should navigate with care.
Here’s how to approach it thoughtfully:
- Respect the Creator: Instead of plugging in a living artist's name, try describing the style you're after. Use terms like "impressionistic," "bold linework," "surrealist," or "pastel color palette."
- Support Human Artists: If you love someone's work, the best thing you can do is hire them or buy their art. That's how we keep the creative ecosystem healthy.
- Check the Platform's Rules: Some AI tools are already taking a stand on this, actively blocking prompts that reference specific artists by name to sidestep these ethical minefields.
At the end of the day, using AI image generators responsibly is about more than just writing a clever prompt. It's about being mindful of copyright, respecting the hard work of human artists, and committing to using these incredible tools in a way that adds to the creative world, rather than taking from it. If you stay informed and act with integrity, you can be part of a community that’s pushing boundaries while honoring the people who laid the groundwork.
Got Questions About AI Image Generation? We’ve Got Answers.
Even after you get the hang of the workflow, questions are going to pop up. This world of AI is deep and moves incredibly fast, so it’s only natural to wonder about the little details. Here are some straightforward answers to the questions I hear most often from other creators.
Can I Actually Use These Images for My Business?
This is the big one, and the short answer is a firm "it depends." The real answer isn’t hiding in general copyright law—which is still a massive gray area for AI art—but in the terms of service of the specific tool you’re using.
Some platforms, especially the open-source ones, are pretty relaxed about it. Others, like many subscription services, grant you a broad commercial license to use your creations for marketing, products, or whatever else you need. But be careful with free or trial versions, as they often come with strings attached. It is absolutely critical to read their policies before you put an AI image on a commercial project.
Key Takeaway: As a general rule, an image made entirely by AI without significant human creative input probably won't get traditional copyright protection. Your right to use it comes directly from the license the platform gives you. When the stakes are high, checking that license is your first and most important move.
Why Do My AI Images Have Such Weird Hands and Faces?
If you’ve run into this, you’re not alone—it’s a classic AI quirk. These models learn by spotting patterns in billions of images, but they don't understand things like anatomy. Hands are ridiculously complex, with so many joints and possible positions, making them statistically a nightmare for an AI to get right every time.
The same goes for faces. While the models are getting way better, they can still fumble subtle expressions or struggle to keep a face looking consistent across several images. This is where you get that slightly "off" or uncanny valley look.
Here's how I fight back against the weirdness:
- Use Negative Prompts: This is your best friend. Add terms like
deformed hands, extra fingers, malformed limbs, blurry faceto your negative prompt field to tell the AI exactly what not to do. - Fix It with Inpainting: Got an image that's 99% perfect except for a mangled hand? Don’t throw it out. Use an inpainting tool to mask the bad spot and regenerate just that tiny area with a prompt like
perfectly formed human hand. - Just Roll the Dice Again: Seriously, sometimes all you need to do is regenerate the image with a different seed number. A little bit of randomness can solve the problem. Don't be afraid to click that generate button a few more times.
What's the Difference Between a GAN and a Diffusion Model?
You definitely don't need a computer science degree to make cool art, but knowing a little about the tech under the hood can be useful. GANs and Diffusion Models are the two main technologies that kicked off this whole creative explosion.
A GAN (Generative Adversarial Network) works like a constant battle between two AIs: a "generator" and a "discriminator." The generator makes images and tries its best to fool the discriminator into thinking they're real photos. The discriminator’s only job is to call out the fakes. They go back and forth, each getting smarter, until the generated images are good enough to pass as real.
On the other hand, Diffusion Models—the tech behind modern powerhouses like DALL-E 3, Midjourney, and Stable Diffusion—take a totally different approach. They start with a canvas of pure static, or "noise," and then slowly clean it up, step-by-step, until it becomes a clear image matching your prompt. This method tends to create much higher-quality, more detailed results and gives you way more control over the final picture.
Ready to stop making one image at a time and start scaling your creativity? Bulk Image Generation lets you create up to 100 professional-quality visuals in seconds using the power of Flux 1.1. Just describe your goal, and our AI handles everything from style to composition, freeing you up to focus on the big ideas. Start creating for free at https://bulkimagegeneration.com.