How to Change Aspect Ratio of Image Like a Pro

Aarav Mehta • September 29, 2025
Learn how to change aspect ratio of image for any platform. Master simple cropping, resizing, and padding techniques for perfect social media and web photos.
Ever uploaded a perfect photo, only for Instagram to chop off the best part? We've all been there. That’s a classic aspect ratio problem, and learning how to change the aspect ratio of an image is the secret to making your visuals look sharp and professional everywhere you post them.
Why Your Image Aspect Ratio Really Matters
Think of aspect ratio as the unspoken rule for every digital platform. It’s simply the relationship between an image's width and its height, but it’s what determines whether your photos look crisp or get mangled. Get it wrong, and you’re stuck with awkward automatic crops, stretched-out subjects, or those ugly black bars on the sides.
For instance, that stunning wide-angle landscape shot you took (probably a 16:9 ratio) just isn't going to play nice with a square Instagram frame (a 1:1 ratio) without some serious adjustments. Ignoring that difference can completely ruin a great photo and make your entire feed look amateurish.
The Real-World Impact
When you get a handle on aspect ratios, you reclaim total creative control. You get to decide exactly how your work is seen, preventing platforms from making clumsy decisions for you.
This control is crucial for nailing your visual game:
- Social Media: You can make your posts pop by using every available pixel, like a 4:5 vertical image that fills up more of the screen on an Instagram feed.
- Website Design: It ensures your hero images and product photos look slick and uniform across every device, from a desktop monitor to a smartphone.
- Brand Consistency: It’s key to maintaining a cohesive look across all your channels, whether it's a YouTube thumbnail or a LinkedIn banner.
Ultimately, understanding aspect ratios isn't just a technical skill—it's about protecting your brand's visual integrity and making sure your story gets told exactly the way you intended.
Decoding Common Aspect Ratios for Any Platform
Before you start tweaking images, it helps to know the language of aspect ratios. Think of them as the native dialects of different platforms—using the right one makes your content fit in and look professional, while the wrong one can get your message lost in a bad crop.
A sweeping, cinematic 16:9 ratio, for instance, is perfect for a YouTube thumbnail or a website banner. It just feels right. But try to squeeze that wide rectangle into a square Instagram profile picture frame, and you'll see the problem. That space is built for a perfect 1:1 ratio, and it won't accept anything else without a fight.
This image gives you a quick visual breakdown of where each ratio tends to show up.
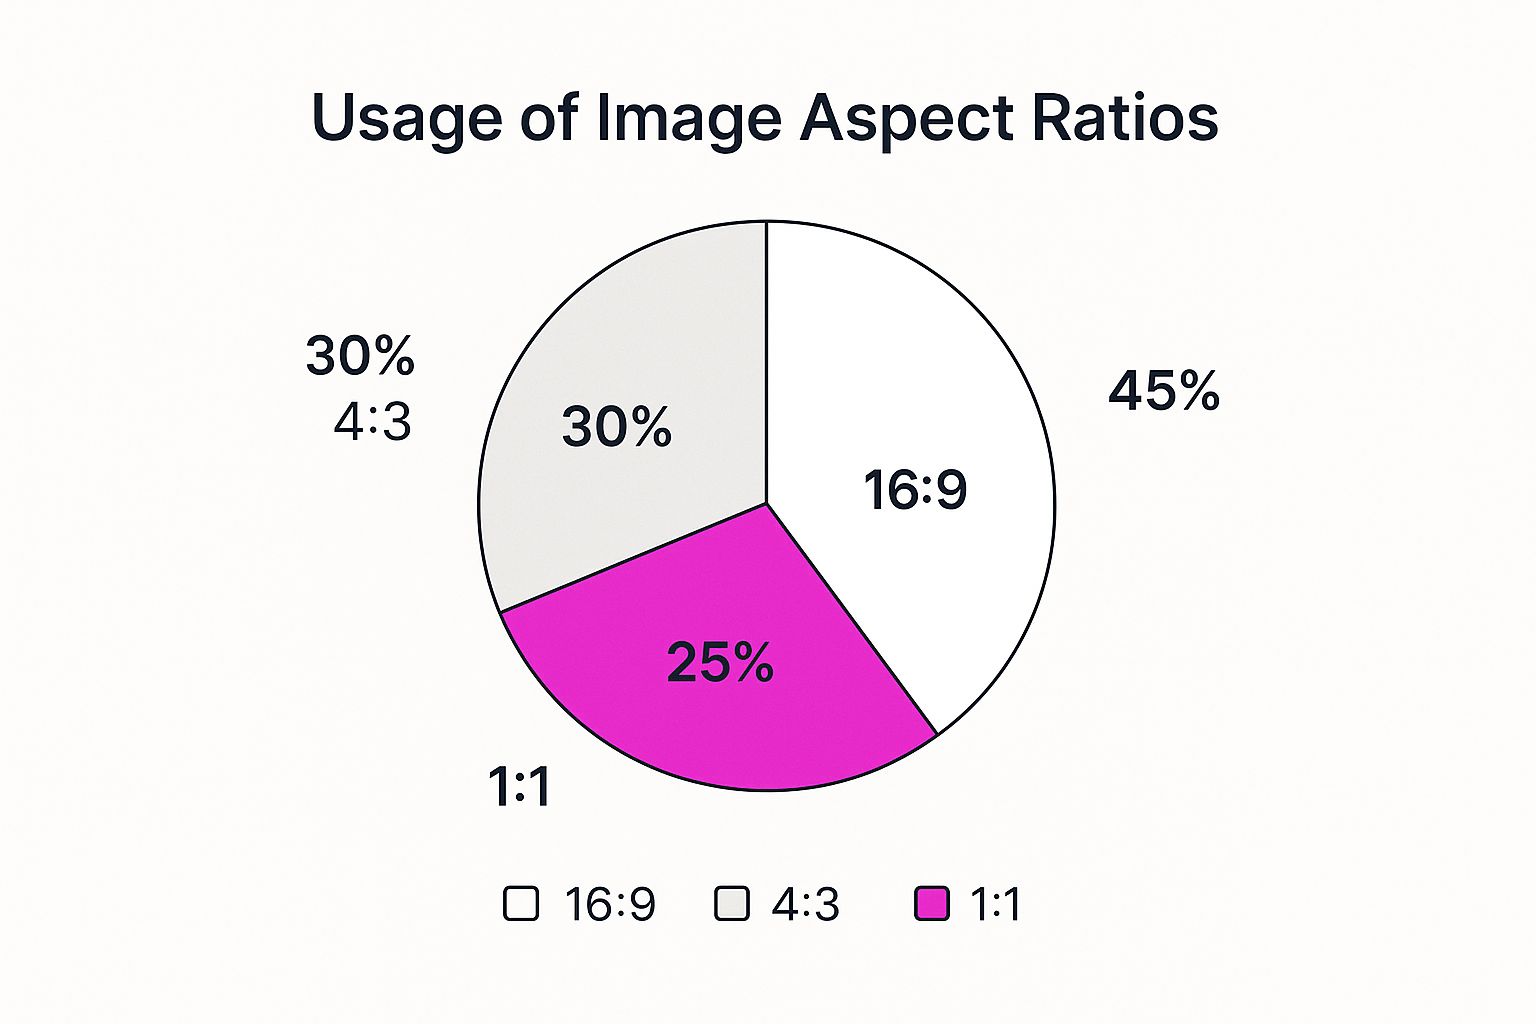
As you can tell, the wide 16:9 format still reigns supreme, mostly because it’s the standard for video and just about every desktop monitor out there.
To save you the headache of re-editing your images later, it pays to know the most common aspect ratios and where they work best. Here’s a quick-reference table I put together to keep things simple.
Quick Guide to Common Aspect Ratios
| Aspect Ratio | Example Dimensions | Primary Use Case |
|---|---|---|
| 1:1 (Square) | 1080 x 1080 px | Instagram grid posts, profile pictures |
| 4:5 (Portrait) | 1080 x 1350 px | Instagram & Facebook feed posts |
| 9:16 (Vertical) | 1080 x 1920 px | Instagram Stories, Reels, TikTok |
| 16:9 (Landscape) | 1920 x 1080 px | YouTube thumbnails, website banners |
| 3:2 (Photography) | 1080 x 720 px | Standard for digital cameras, prints |
| 4:3 (Standard) | 1024 x 768 px | Older displays, some presentations |
This table should cover about 99% of what you'll need for social media, web design, and general marketing.
The Ratios You'll Use Every Day
While there are dozens of ratios out there, you'll probably find yourself defaulting to just a few key players. Here are the ones that matter most in today's digital world:
- 1:1 (Square): This is the undisputed classic for Instagram grid posts and profile photos. It’s clean, balanced, and forces you to think about central composition.
- 4:5 (Portrait): My personal favorite for feed posts on Instagram or Facebook. This vertical format simply takes up more real estate on a phone screen, which is a huge advantage when you're trying to stop someone from scrolling.
- 9:16 (Vertical): The king of full-screen mobile content. This is the go-to for anything immersive, like Instagram Stories, Reels, and TikTok videos.
- 16:9 (Landscape): Still the standard for most video content you see on YouTube, website hero images, and even some posts on X (formerly Twitter).
If you’re creating video-centric content, it’s absolutely worth your time to check out the perfect Instagram Reel sizes and aspect ratios to make sure every second of your work is seen as intended.
Pro Tip: Choosing the right aspect ratio before you start editing is a non-destructive way to frame your content. It ensures the most important parts of your image are never awkwardly cut off by a platform's automatic cropping tool.
Of course, the tools we use to change an image's aspect ratio have gotten a lot smarter over the years. Most modern software comes with presets for these common standards, so you can just click "Instagram Post" or "YouTube Thumbnail" and be done with it.
And if you ever need to do a quick conversion or find the exact pixel dimensions for a specific ratio, our free aspect ratio calculator is a real lifesaver.
Mastering the Art of Cropping Your Image
Cropping is easily the most straightforward way to change an image's aspect ratio. But don't think of it as just trimming the edges—it’s about completely reframing your subject, cutting out distracting noise, and sharpening the story you want to tell.
Yes, it’s a subtractive process, which means you’ll lose parts of the original image. What you gain, though, is often far more valuable: a tighter, more powerful composition.
Imagine you snapped a fantastic horizontal photo of your product, but you need to post it on your Instagram feed, where vertical content rules. By cropping, you can instantly turn that wide shot into a compelling 4:5 portrait that takes up more screen real estate and grabs more attention. The secret is to crop with a clear purpose, not just to squeeze it into a box.
A Practical Cropping Example
Let's walk through a scenario I run into all the time. You have a great high-resolution square (1:1) photo, but you need a thumbnail for a new YouTube video, which demands a widescreen 16:9 format.
Using a simple online tool, here’s how you’d tackle it:
- First, upload your square photo into your image editor of choice.
- Next, look for the predefined aspect ratios and select the 16:9 preset. This will instantly give you a crop box with the perfect proportions.
- Now for the creative part: reframe your subject. Drag and resize that crop box over your image. Your goal is to position the main subject—whether it's a person's face or a product detail—in a way that feels balanced and intentional. Think about classic composition rules, like the rule of thirds.
- Once you're happy with the new framing, hit apply. Your image is now perfectly formatted for YouTube.
By thoughtfully adjusting the crop box, you're doing more than just meeting a technical requirement. You're actively guiding the viewer's eye exactly where you want it to go.
This exact same process applies to any platform. Need a square image for a new profile picture? Go for the 1:1 ratio. Creating a vertical pin for Pinterest? A 2:3 ratio is your best friend. Cropping gives you the control to adapt one image for dozens of uses, improving its focus every single time.
If you're looking to round out your skills, it's also worth exploring these essential basic photo editing techniques that work hand-in-hand with good cropping.
Resizing and Stretching Without Distortion
While cropping changes an image’s frame, resizing alters its actual dimensions. This is where things often go wrong. There’s a world of difference between scaling an image proportionally and just stretching it to fit a new shape—the latter almost always ends in a distorted, unprofessional-looking mess.
The secret is to always lock the aspect ratio when you resize. Think of it as your best friend for avoiding distortion. This little feature, usually a chain link or lock icon in most editors, makes sure that the width and height scale together, preserving the original proportions perfectly.
Proportional Scaling vs. Unproportional Stretching
Let’s walk through a quick, real-world example. Imagine you have a professional headshot taken in a standard 3:4 ratio, but you need a smaller version for a website's "About Us" page.
- Proportional Scaling (Locked Ratio): You enter your new desired width, and the height adjusts automatically. The photo gets smaller, but the person in it still looks completely normal. Mission accomplished.
- Unproportional Stretching (Unlocked Ratio): You try to force that 3:4 photo into a wide 16:9 container by grabbing the side handles and pulling. The result? A comically wide, stretched-out face that looks like it belongs in a funhouse mirror.
Stretching is almost always a bad idea for photographs of people or recognizable objects. The distortion is immediately obvious and just looks amateurish. That said, it can sometimes be a handy creative effect for abstract backgrounds or textures where the distortion isn't a dead giveaway.
For consistent results without any of the guesswork, a dedicated tool is the way to go. You can learn more about keeping your images crisp with a reliable bulk image resizer, which handles all the proper scaling for you.
Using Padding to Fit Any Frame Perfectly
Sometimes, cropping just isn’t an option. What do you do with that sprawling landscape photo where every single pixel tells part of the story, but you have to cram it into a square Instagram frame?
This is where padding comes in. Think of it as your best non-destructive tool for changing an image’s aspect ratio.
Instead of slicing away parts of your photo, padding places your original image onto a new, larger canvas set to your desired aspect ratio. The empty space is then filled—or "padded"—with a background. It's a fantastic method that keeps your original composition totally intact, letting you meet platform requirements without killing your artistic vision.
Creative Ways to Use Padding
Padding doesn't have to be a boring compromise. While simple black or white bars are a classic look, you can get much more creative with that background space to make your image pop.
Give these a try:
- Clean and Minimal: A solid white or black background gives off a timeless, gallery-like vibe. It’s clean, simple, and puts all the focus on your photo.
- Brand-Aligned: Why not fill the space with one of your primary brand colors? This is a great trick for creating a cohesive, professional-looking social media feed.
- Blurred Background: This is a hugely popular technique you’ve probably seen everywhere. Just use a stretched, blurred version of the original image as the background. It creates a soft, professional frame that perfectly complements the main photo.
This approach is the only way to change the aspect ratio of an image without altering a single pixel of the original. It's the ultimate preservation technique.
Ultimately, whether you choose to crop, stretch, or pad often comes down to where the image is going. Social media platforms are all about square (1:1) or vertical (9:16) formats. But for widescreen displays, the 16:9 ratio is still king, with the 1920x1080 resolution holding a huge share of the global market. You can dive into more data on popular screen resolutions over at StatCounter.
And if you're juggling multiple social media accounts, a bulk social media image generator can be a lifesaver. It automates this whole padding process, letting you adapt one image for every single platform's unique specs in just a few clicks.
Your Questions About Aspect Ratios Answered
Once you get the hang of the basics, a few common questions always seem to surface. I've been there. This section is all about tackling those tricky bits head-on, giving you direct answers so you can get back to creating.
What Is the Best Aspect Ratio for Instagram Posts?
This really boils down to where on Instagram you're posting. The classic 1:1 square (1080x1080 pixels) is always a safe bet for the main feed, but honestly, you can do better.
For feed posts, I almost always go with a 4:5 portrait ratio (1080x1350 pixels). Why? It simply takes up more vertical real estate on a phone screen, which is a huge advantage when you're trying to stop someone from scrolling right past your content.
For anything full-screen, like Stories and Reels, it’s 9:16 all the way (1080x1920 pixels). Don't compromise here—it's the only way to get that truly immersive feel.
Will Changing the Aspect Ratio Reduce Image Quality?
This is a big one, and the honest answer is: it all depends on how you do it.
- Cropping doesn't technically degrade quality, but you're literally throwing away pixels. The final image will have a lower resolution than the original.
- Stretching is a definite no-go. It's the fastest way to get a blurry, distorted, and unprofessional-looking image. Avoid it at all costs.
- Resizing an image to be larger than its original dimensions will almost always lead to pixelation and a loss of sharpness.
- Padding is the only method that keeps your original image completely untouched. You're not changing the photo itself, just the canvas around it.
The key takeaway? If you need to change an image's aspect ratio with zero quality loss, padding is your best and only real option. It’s a non-destructive method that keeps your original photo perfectly intact.
Can I Change the Aspect Ratio Without Cropping?
Yes, absolutely—and this is exactly where padding comes in handy. To switch up an image’s aspect ratio without chopping off a single pixel, you just need to place it on a new background that has the dimensions you want.
Let's say you have a landscape photo but need a square post. You'd create a new 1:1 canvas and then center your original image on it. The empty space above and below can be filled with a solid color, a subtle gradient, or even a blurred version of the photo itself, which is a really popular and slick-looking effect on social media right now.
What Is the Difference Between Aspect Ratio and Resolution?
It's easy to get these two mixed up, but the difference is pretty simple when you think about it this way:
Aspect ratio is the shape, and resolution is the detail.
An aspect ratio, like 16:9, just describes the proportional relationship between an image's width and its height—in this case, a wide rectangle. Resolution, on the other hand, tells you how many actual pixels are packed into that shape (e.g., 1920x1080 pixels).
You can have tons of different resolutions that all share the same 16:9 shape, but the one with more pixels will always be sharper and more detailed.
Tired of all the manual tweaking? Let Bulk Image Generation do the heavy lifting for you. Generate and edit hundreds of perfectly formatted images for every platform in seconds. Try it now and see how easy it can be.