
A Guide to Mastering Image to Prompt AI Generation

Aarav Mehta • August 24, 2025
Unlock the power of AI art. Learn how to turn any image to prompt with our step-by-step guide, covering the best tools, techniques, and pro tips.
So, you’ve stumbled upon an image that just clicks. It has the perfect vibe, a style you’ve been trying to nail down for ages, and you wish you could just tell your AI art generator, "Make more like that."
Good news. You can.
The process is called image-to-prompt, and it's like reverse-engineering a piece of art. You feed an image to an AI tool, and it spits back a detailed text prompt describing everything from the content and style to the composition. It’s a brilliant way to peel back the curtain on visuals you love and learn the exact language to create similar magic yourself.
The Magic of Turning Visuals Into Prompts
Ever felt like you're just guessing with your prompts? Throwing words like "cinematic" or "hyperrealistic" at the wall and hoping something sticks? Image-to-prompt tools cut right through that guesswork. They act as your personal art translator, converting visual data—colors, subjects, lighting, mood—into the precise vocabulary AI models crave.
This isn't just a neat party trick; it’s a massive creative shortcut. Instead of spending an hour trying to describe the unique brushwork of a particular artist, you can just upload a reference image. In seconds, you get a detailed, ready-to-use prompt that you can tweak or use as-is. It saves a ton of time and, honestly, it’s a fantastic way to learn the lingo that gets you the results you want.
Unlocking Your Creative Potential
The real power here is in deconstructing visuals that seem impossibly complex. An AI might analyze a painting and pull out terms you’d never think of, like "impasto oil painting," "volumetric lighting," or even specific artist influences like "in the style of Caspar David Friedrich."
Suddenly, you have a whole new set of keywords to play with. This opens up countless new directions for your art and helps you keep a consistent aesthetic across an entire series of images.
For me, the ability to reverse-engineer an image's style was a total game-changer. It turns passive inspiration—just scrolling and saving images—into a concrete starting point for creating something new. It’s the bridge between the art you admire and the art you can actually make.
It's easy to think this tech just appeared out of nowhere, but it’s built on some serious history. We're talking decades of AI research, starting with foundational ideas in natural language processing from the 1960s. Key breakthroughs like Generative Adversarial Networks (GANs) in 2006 and OpenAI’s DALL-E in 2020 paved the way. By 2024, these models became incredibly sophisticated, capable of handling high-resolution images and understanding subtle artistic nuances. If you're a history buff, you can dive into the complete history of artificial intelligence to see just how far we've come.
This brings us to the tools themselves. Let's look at the advantages they offer.
Key Benefits of Using Image-to-Prompt Tools
Using a dedicated tool to convert images into text prompts can seriously level up your creative workflow. Instead of guessing at keywords, you get a data-driven starting point that’s often more detailed and accurate than what you could write on your own.
Here's a breakdown of the main advantages:
| Benefit | How It Helps You | Best For |
|---|---|---|
| Discover New Styles | Identifies specific artistic terms, techniques, and artist influences you might not know. | Artists and designers looking to expand their creative vocabulary and experiment with new aesthetics. |
| Save Time | Instantly generates detailed prompts, cutting out the trial-and-error of manual prompt writing. | Creators working on tight deadlines or producing content in bulk, like social media managers. |
| Improve Consistency | Creates a reliable base prompt to ensure a cohesive style across a series of images. | Branding projects, character design, and creating themed image collections. |
| Learn Prompting | Acts as a learning tool by showing you which keywords correspond to specific visual outcomes. | Beginners who want to get better at writing effective AI art prompts. |
Ultimately, these tools are about making the creative process smarter, not just faster. They empower you to turn any image you find into a launchpad for your own unique creations.
Picking the Right Image-to-Prompt Tool
Not all image-to-prompt tools are created equal. Far from it. The right one for you really boils down to what you’re trying to accomplish. Are you just looking for a quick stylistic spark, or do you need a forensic-level breakdown of every single element in a picture?
Take Midjourney, for instance. If you're already living in that ecosystem, the built-in /describe command is your fastest path forward. It's incredibly convenient and does a fantastic job of capturing the artistic vibe and overall mood of an image. You get four unique prompt ideas, which is perfect for kickstarting your own creativity without drowning in technical jargon.
Comparing Top Options
Then you have heavy-hitters like CLIP Interrogator. This is a completely different beast. It's built to be far more granular, identifying specific artists, obscure styles, and even technical details with startling precision. This is the tool I turn to when I want to replicate a particular look as closely as humanly possible, since it provides a much more exhaustive list of keywords.
Many of us find that a mix-and-match approach yields the best results. As you explore, it’s helpful to understand the broader world of Brainstorming AI Tools, as they can seriously level up your entire creative process.
Pro Tip: Don't get locked into one tool. I regularly run the same image through two or three different analyzers. I get a blend of artistic suggestions from one and technical descriptors from another, then I cherry-pick the best bits from each to build my master prompt.
To make the choice easier, let's break down some of the most popular options out there. Each has its own lane and is better suited for certain creative projects. If you want to dive right in and experiment, our suite of free tools includes a handy image-to-prompt converter to get you started.
Comparison of Top Image-to-Prompt Tools
To give you a quick lay of the land, here’s a table that stacks up the leading platforms. This should help you find the perfect fit for your workflow without a ton of trial and error.
| Tool | Best Feature | Ease of Use | Ideal Use Case |
|---|---|---|---|
Midjourney /describe | Provides four unique, creative interpretations of an image. | Very Easy | Quickly capturing the mood and style for artistic inspiration. |
| CLIP Interrogator | Offers a highly detailed and technical breakdown of styles and artists. | Moderate | Precisely replicating a specific aesthetic or learning advanced keywords. |
| Web-Based Converters | Simple drag-and-drop interface for fast analysis. | Very Easy | Casual users needing a quick and straightforward prompt without platform integration. |
Ultimately, the choice comes down to your project's specific needs—speed and inspiration versus detail and precision. Don't be afraid to experiment with a few to see which one clicks with your creative style.
Your Guide to Turning Pictures Into Prompts
So, you've found an image that perfectly captures the vibe you're after. The trick is turning that visual inspiration into a text prompt an AI can actually work with. It's less about just describing the picture and more about reverse-engineering its DNA—the style, subject, mood, and the way it's all put together.
Let's walk through it. I’ll show you how to take a cool photo of a vintage cityscape and pull a powerful prompt from it.
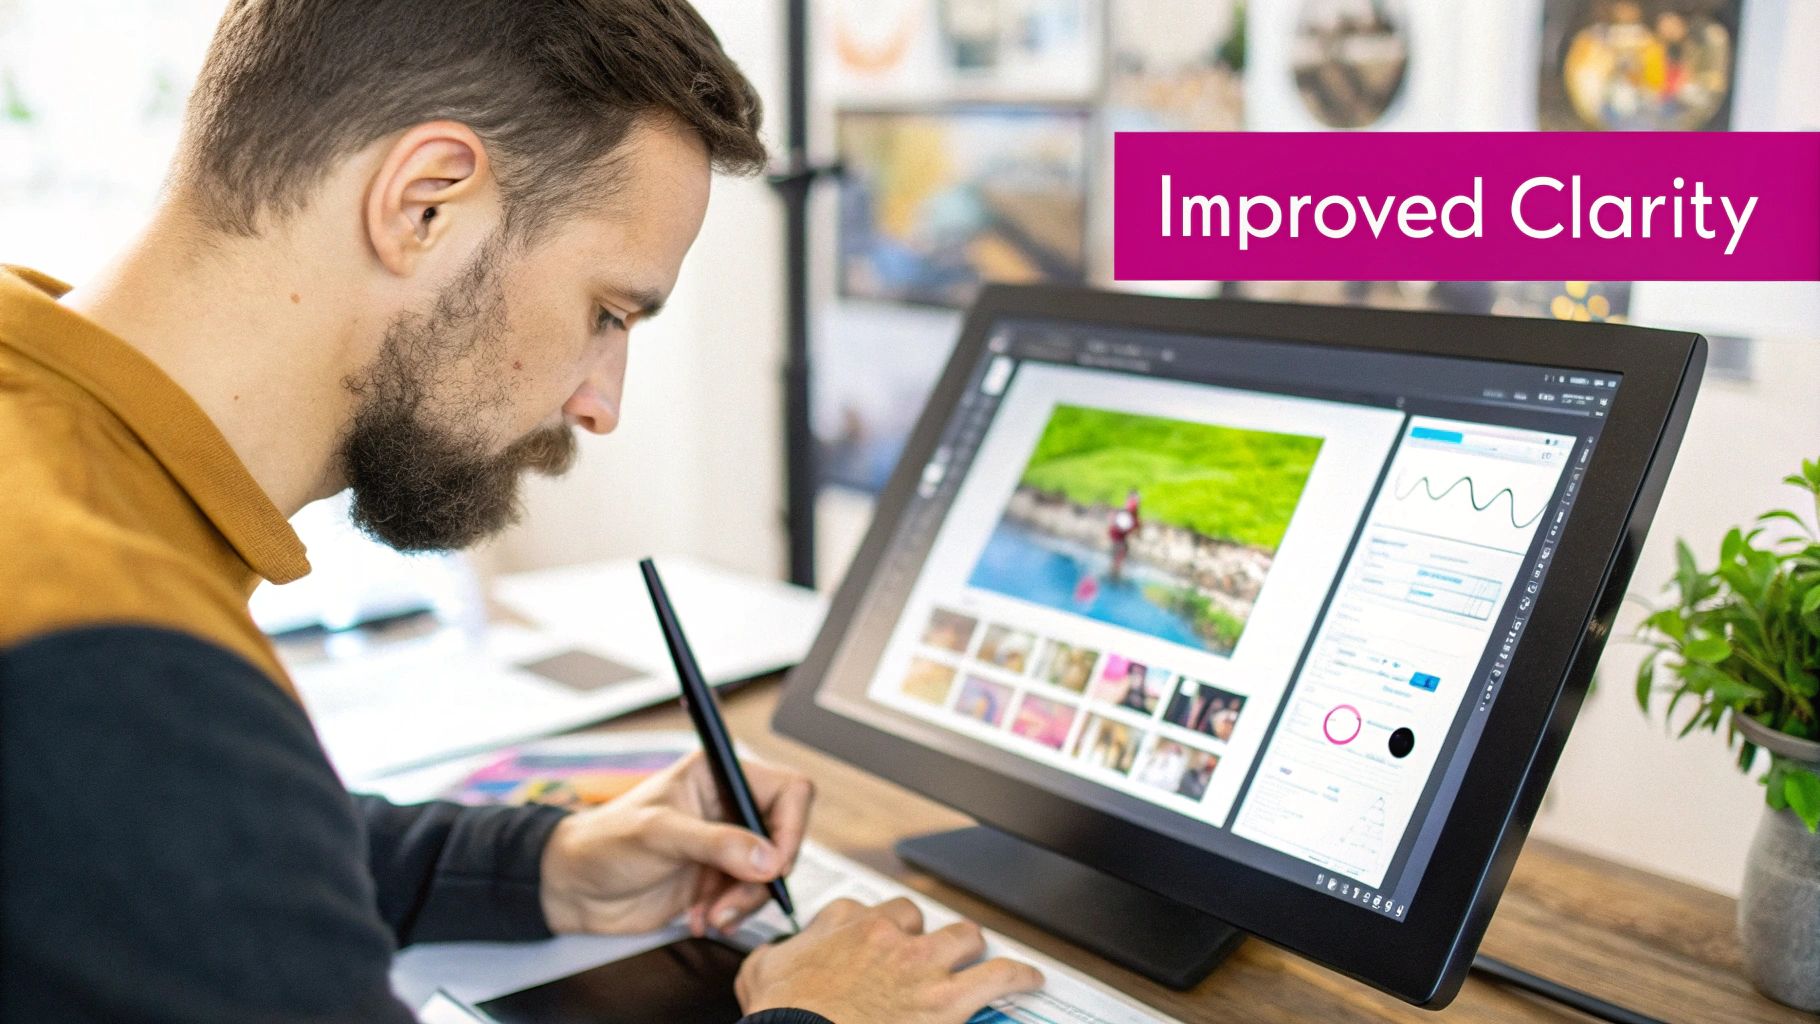
First things first, pick a good source image. Clarity is everything. If you feed the AI something blurry, low-res, or visually noisy, you’ll get a muddled, generic prompt back. A sharp picture with a clear subject and a distinct feel will give you the best shot at success.
Got your image? Great. Now you’ll upload it to your tool of choice. For this little walkthrough, we'll be using Midjourney's /describe command. It’s pretty intuitive and known for its creative, sometimes surprising, interpretations.
Uploading and Analyzing Your Image
Inside Midjourney, just type /describe into the chatbox. A little upload window will pop up. Drag your vintage cityscape photo in there, hit enter, and let the AI do its thing. It’ll start breaking down the image into its core visual components.
It’s pretty wild to think about the journey to get here. The tech that powers this process has been cooking for years. The first text-to-image models from the mid-2010s were spitting out tiny 32x32 pixel images. The real leap forward came in 2016 with Generative Adversarial Networks (GANs), which started producing much more believable pictures. It’s these early breakthroughs that paved the way for the powerful tools we have today. If you're a history nerd, it's fascinating to read about how text-to-image models developed over time.
This infographic breaks down what's happening behind the scenes when the AI gets to work.
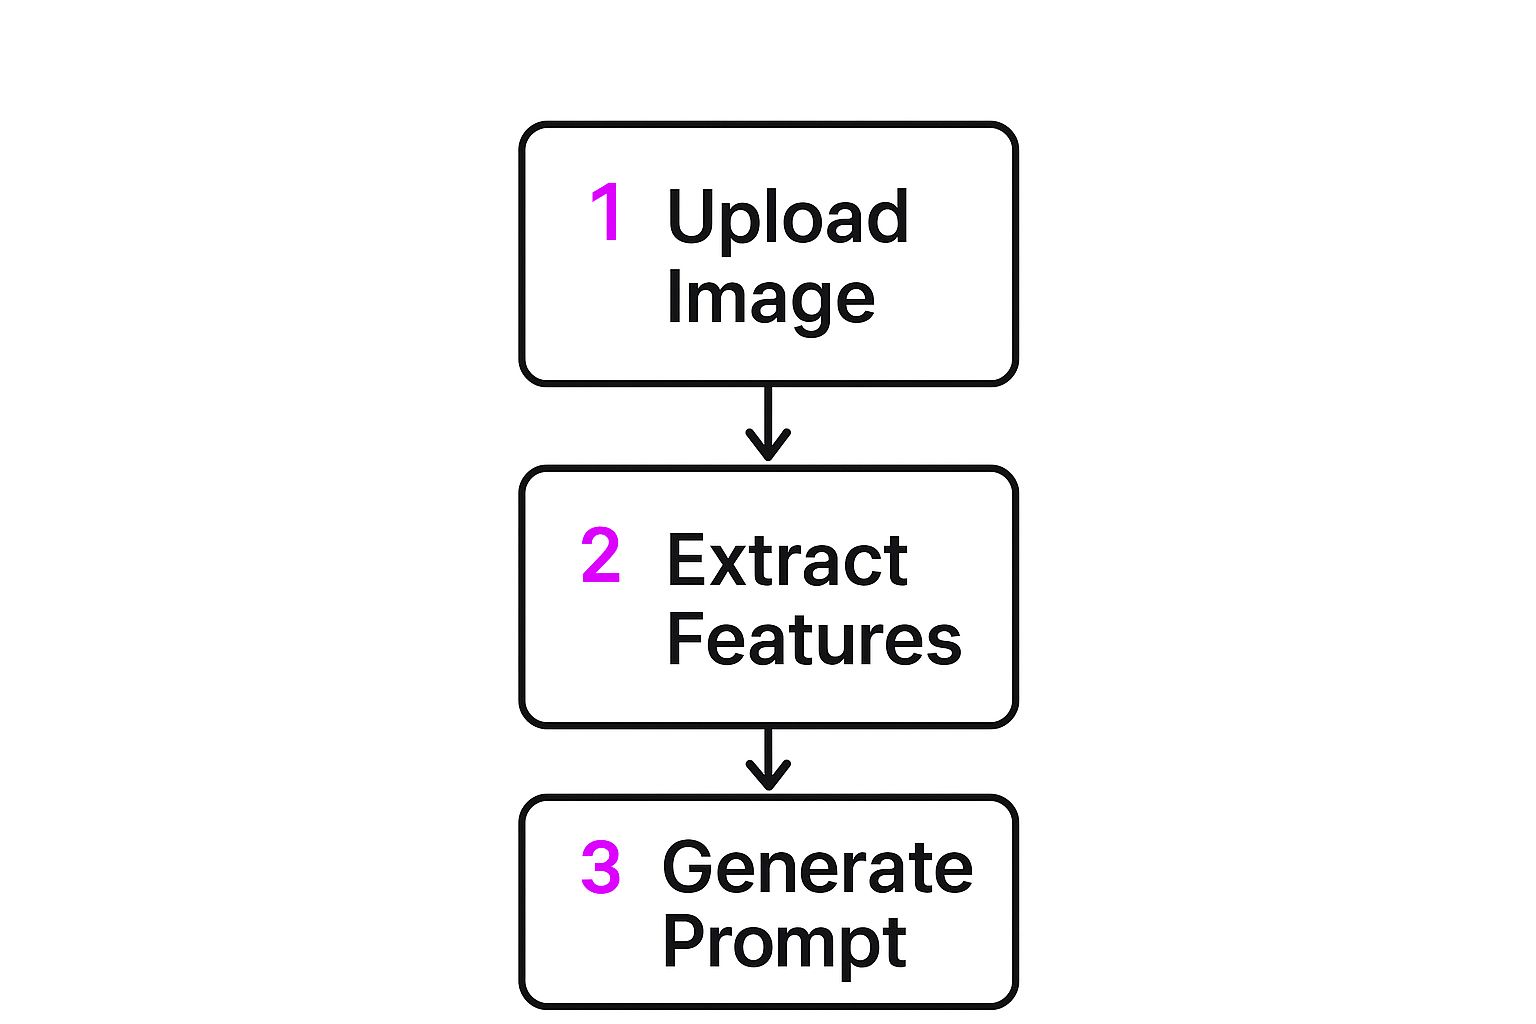
It’s a simple visual, but it nicely shows how the AI deconstructs an image before it even thinks about generating a text description.
Making Sense of the AI's Output
After a moment, Midjourney will serve up four different prompt variations it cooked up from your vintage cityscape. This is where your own eye and creative instincts take over.
The interface gives you several options, each with a slightly different take on your original image.
Don't just grab the first one and run with it. Think of these prompts as expertly crafted starting points, not the final word. You’ll probably see a few different angles, something like this:
- Prompt 1: A vintage photograph of a bustling 1950s city street, sepia tones, classic cars, in the style of documentary photography.
- Prompt 2: Old cityscape with towering art deco buildings, pedestrians in fedoras, cinematic lighting, black and white.
- Prompt 3: Retro futurism, a city from the past, moody atmosphere, film grain, wide-angle shot.
See how each one zeroes in on a different aspect of the original? One might focus on the era, another on the architecture, and a third on the overall mood. Your job is to pick the one that fits your vision best—or even better, cherry-pick the best phrases from a couple of them and Frankenstein them together. This is the moment you go from just using a tool to truly creating something new.
Refining and Customizing Your AI-Generated Prompts
Getting a prompt from an image to prompt tool is the starting line, not the finish line. The initial output is often a brilliant but unpolished collection of ideas. The real art begins when you start to mold this raw material into something that perfectly matches your vision.
This is where you shift from just using a tool to actually creating with it. Think of the AI's suggestions as raw ingredients. Now it’s your job to step in as the chef, adding a pinch of this and a dash of that to bring the final dish to life.
From Vague Idea to Sharp Vision
Let’s say your tool spits out a prompt like: "serene landscape, green hills, soft sunlight, in the style of impressionism." It’s a nice start, but what if you're picturing something with more mood and energy?
This is where you can start swapping keywords. Change "serene" to "dramatic" and "soft sunlight" to "stormy clouds, bolts of lightning." Right away, the entire feel of the potential image has shifted from peaceful to intense.
- Original Keyword:
serene - Modified Keyword:
dramatic - Original Keyword:
soft sunlight - Modified Keyword:
stormy clouds
This simple act of substitution is incredibly powerful. You can also add specific artist names to steer the style. Tacking on "in the style of J.M.W. Turner" will give your stormy landscape a completely different texture and color palette than "in the style of Bob Ross."
The small tweaks make all the difference. I've found that changing just one or two words can completely transform the final image from something generic into a piece with a distinct personality.
The Power of Negative Prompts
Telling the AI what you don't want is just as important as telling it what you do. This is where negative prompts come in. If your landscape generations keep including modern elements like buildings or roads, you can add --no buildings, roads to your prompt.
This technique is a lifesaver for cleaning up your images and getting rid of distracting elements that clash with your theme. It gives you another layer of control, ensuring the final output is focused and clutter-free. To really get the hang of this, it helps to understand the general principles of crafting effective prompts using AI, as many of the core concepts apply here, too.
Finally, don't forget the technical details. Adjusting the aspect ratio with --ar 16:9 can create a cinematic widescreen look, while tweaking stylization levels can control how artistic or photorealistic the image becomes. And if you're looking for more creative sparks, check out our list of the 25 best prompt ideas for AI image generators to see how different elements can be combined for stunning results.
Advanced Techniques for Professional Results
Okay, you've got the basics down. Now it's time to really push what these image to prompt tools can do and start creating some truly professional work. This is where we move beyond simple analysis and into real prompt artistry.
One of my favorite advanced strategies is prompt blending. Instead of just pulling from a single image, you generate prompts from two or three completely different visuals. Imagine taking the intricate architectural details from a photo of a Gothic cathedral and combining them with the color palette and dreamlike mood of a surrealist painting. You then weave those keywords together into a hybrid prompt that creates something entirely new and unexpected.
Achieving Stylistic and Character Consistency
Consistency is everything, especially in branding and storytelling. It's also one of the biggest headaches when generating AI images.
If you need to create a whole series of images with the same character, start by running your original character design through an image to prompt tool. This gives you a baseline prompt that captures all their key features. From there, you can reuse and tweak that base prompt to drop your character into different scenes and poses, all while keeping their look locked in.
This method is an absolute lifesaver for creating cohesive visuals like:
- Branding materials that need to look the same across an entire campaign.
- Storyboards where a character can't suddenly change their appearance.
- Themed social media content that sticks to a specific aesthetic.
For a deeper dive into making your visuals consistent, check out our guide on https://bulkimagegeneration.com/blog/en/tutorials/how-to-create-stunning-digital-product-images-using-ai-generators-5-digital-product-image-prompt-examples.
This image is a nod to Stability AI, whose models like Stable Diffusion have been at the heart of this creative explosion. The pace of change in this space is just wild, with new models constantly raising the bar.
In fact, by 2023, newer models radically improved how well AI could follow a prompt and handle high-resolution images. This opened the door for everything from complex game assets to professional design work.
Adding Technical Details for Finer Control
You can also get much finer control over your output by speaking the language of photography and art. Adding specific technical terms to your prompt acts as a powerful director for the AI.
For photographic styles, try adding details like "shot on 35mm film" or "85mm portrait lens." For more artistic results, you can use terms like "impasto oil painting" to dictate texture or "volumetric lighting" to control the atmosphere.
If you're curious about the deeper mechanics of how prompts work and some of the system-level quirks, understanding prompt engineering vulnerabilities can offer some fascinating context.
Got Questions? We've Got Answers
Can I really use any image to generate a prompt?
Pretty much, but your mileage will absolutely vary. Think of it like this: garbage in, garbage out. If you feed the AI a high-quality, clear photo with a distinct subject and style, you’re going to get back a beautifully detailed and accurate prompt.
On the other hand, a blurry, low-res, or overly chaotic image will probably spit out something generic or just plain confusing. For the best results, always start with a strong, clear visual reference. It gives the AI the best possible chance to work its magic.
How Accurate Are These AI-Generated Prompts, Really?
Honestly, it all comes down to the tool you're using and how complex your source image is. Something like Midjourney's /describe command is fantastic at nailing the overall mood, style, and composition. But it might completely miss the tiny, subtle details that make an image special.
Think of the generated text as a strong starting point or an artistic interpretation, not a perfect, literal description. You will almost always need to jump in and refine it to match your exact vision.
Will I just get an exact copy of the original image?
Nope, and that’s where the real creative power comes in. The AI isn't a copy machine; it uses the prompt to create a totally new, unique image inspired by the original's vibe and content. It doesn't copy it pixel for pixel.
This is a huge advantage. It lets you:
- Replicate a cool artistic style without plagiarizing someone's work.
- Borrow a specific color palette and apply it to a completely new subject.
- Use a powerful composition for a totally different theme.
This turns the whole image-to-prompt process into a powerhouse for inspiration and exploration. You’re not just copying what’s been done—you’re building on existing ideas to create something brand new.
Ready to stop guessing and start creating? With Bulk Image Generation, you can turn your ideas into hundreds of unique images in seconds. Let our AI handle the complex prompt writing so you can focus on your creative vision. Try Bulk Image Generation today and scale your content creation.