How to Create a Collage With AI

Aarav Mehta • September 6, 2025
Learn how to create a collage using powerful AI tools. This guide covers everything from generating images to final artistic touches for stunning results.
Creating a collage is all about bringing different images and materials together to make a single, cohesive piece of art. When you learn how to create a collage with today's tools, the process still follows that same core idea: you find your visual elements, arrange them on a digital canvas, and add some unifying touches to bring it all together. This guide will walk you through doing just that, leaning on some incredible AI tools to make the creative process faster and more flexible than ever before.
From Cut-and-Paste to AI Creation

Before we jump into the "how-to," it's worth taking a second to appreciate just how far collage has come. What started with actual paper, scissors, and glue has exploded into a digital playground where your imagination is pretty much the only limit. Honestly, understanding this journey gives you a powerful dose of inspiration for your own work.
The technique really found its modern footing in the early 20th century. Artists like Pablo Picasso and Georges Braque started challenging traditional art by mixing everyday stuff right into their paintings. Their Cubist experiments with newspaper clippings and bits of wallpaper completely broke the mold, turning collage from a simple craft into a serious artistic medium. If you're curious, you can discover more about the historical evolution of collage and its pioneers.
The Digital Shift
Then came technology, which completely redefined what was possible. Digital tools swapped out physical materials for pixels, giving artists an undo button, infinite layers, and access to a worldwide library of images. This shift made the art form way more accessible, letting anyone with a computer play around with complex compositions that used to be incredibly tedious to create.
Now, AI is sparking the next big leap. Instead of just finding images that already exist, you can now create them from scratch with a simple text prompt.
The real magic of modern collage creation lies in this blend of human curation and AI generation. You can direct the AI to produce specific styles, subjects, and textures that perfectly match your vision, giving you an unprecedented level of creative control.
This new workflow empowers you to:
- Generate custom assets: Why settle for stock photos when you can create visuals that are perfectly tailored to your theme?
- Explore impossible concepts: You can blend photorealism with abstract art or mash up historical styles with futuristic elements. The weirder, the better.
- Accelerate your process: The time you used to spend endlessly searching for the right images is drastically cut down.
Sourcing Your Visual Ingredients
Every great collage starts with a collection of strong visuals. This isn't a new concept—the idea of pasting elements together has roots in early 20th-century Cubism and even goes back to ancient China around 100 AD. You can dive deeper into the long history of collage art on Wikipedia. But what's different now is that AI has completely supercharged this process.
Instead of spending hours scrolling through stock photo sites, you can generate the exact images you need in minutes. Tools like Midjourney or Leonardo.Ai act as your creative partner, ready to produce unique visuals that perfectly match your theme.
Crafting the Perfect AI Prompt
The secret to getting what you want from an AI generator is all in the prompt. Think of it as giving directions to a very literal-minded artist—the more specific your instructions, the better the final image.
A simple prompt like "a sad robot" might get you something interesting. But a detailed prompt like "a lonely, rusted robot sitting on a rainy cyberpunk street, neon signs reflecting in a puddle, detailed, cinematic lighting" will give you a much richer, more usable starting point.
Here's a look at the kind of stylistic range AI can achieve based purely on text prompts.

As you can see, the AI can nail everything from photorealism to classic painting styles. To get results like this, experiment with describing not just the subject, but also the mood, style, lighting, and composition. If you're hitting a creative wall, a free AI image prompt generator is a great way to find inspiration and kickstart the process.
Beyond just AI, don't forget about other great sources for your collage materials:
- High-Quality Stock Photos: Sites like Unsplash or Pexels are goldmines for beautiful, free-to-use images that can work as backgrounds or secondary elements.
- Personal Images: Nothing adds a unique touch like your own photos. They can make the collage deeply personal and one-of-a-kind.
One of the most critical steps for a clean, professional-looking collage is isolating your subjects. I always use a free background removal tool to create clean cutouts of my main elements. This lets you layer them seamlessly without any distracting or clashing backgrounds.
Think of this prep work as laying the foundation for your final piece. When you gather high-quality, relevant, and well-prepared images from the start, the actual creation process becomes much smoother and more creatively satisfying.
Putting It All Together on Your Digital Canvas
Alright, you've got a folder brimming with AI-generated art and your own hand-picked photos. Now for the fun part: making the collage. This is where you bring all those separate pieces together to create a single, cohesive story. You don't need fancy, complicated software for this—user-friendly tools like Canva or Figma are perfect. They give you a flexible space to work without a massive learning curve.
First things first, set up your workspace and get your assets loaded. I like to think of this as spreading out all my cutouts and photos on a giant desk before I even think about reaching for the glue. Just drag and drop everything onto your canvas, maybe off to the side, so you can see your entire inventory at a glance.
Before you get too far, it’s a good idea to make sure your images are ready for the web. Knowing how to optimize website images is crucial. It keeps your final piece looking sharp without creating a massive file that takes forever to load.
Arranging Your Composition
Time to start arranging. I always begin with the background element; it sets the mood for the entire piece. Next, I bring in the focal point—the main subject that’s meant to grab the viewer’s attention right away. Don’t be afraid to just play around at this stage. Resize, rotate, and move things all over the canvas to see how they feel together.
A huge mistake I see people make is trying to make every single element the star of the show. A powerful collage needs a clear visual hierarchy. Pick one dominant focal point and let everything else support it, not compete with it.
As you build out your scene, keep these core ideas in mind:
- Balance: You want to distribute the visual weight evenly. If you have a heavy object on the left, you need something to balance it out on the right. This creates a feeling of stability.
- Flow: Arrange your elements to guide the viewer’s eye through the artwork. You can create a path using lines, shapes, or even the direction a character is looking.
- Scale and Perspective: Play with the size of your elements to create depth. Making something larger makes it feel closer, while smaller objects will naturally recede into the background.
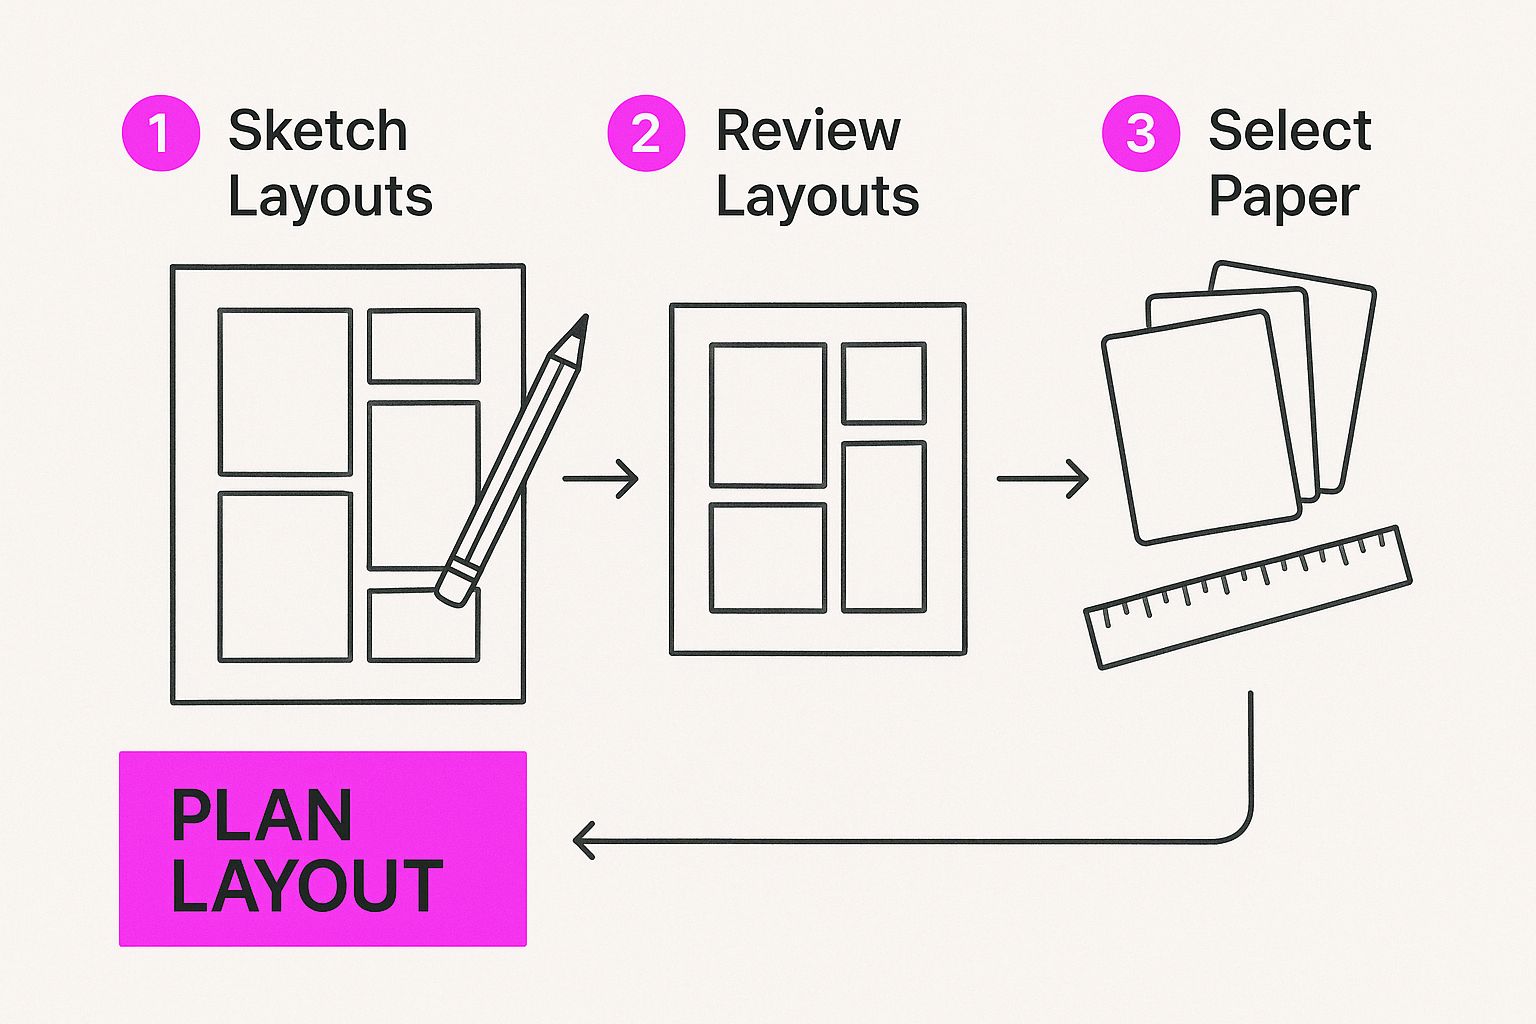
This little infographic breaks down the basic flow for planning your layout before you commit to the final details.

As you can see, sketching out a rough idea first really helps organize the final assembly process.
Building Depth Through Layering
Layering is the secret sauce that turns a flat collection of images into something dynamic and three-dimensional. When you place elements on top of each other, you create relationships and a sense of depth.
A great trick is to adjust the opacity of certain layers. This can create a see-through, almost dreamlike effect, blending images together in a really beautiful way. I use this technique all the time to add subtle textures or ghostly figures that just dial up the mood.
Interestingly, these same principles of composition apply whether you're piecing together a collage or using a dedicated AI art generator to create a scene from a text prompt. The goal is always the same: guide the viewer's eye. By layering with intention and focusing on a strong composition, you can turn a simple pile of pictures into a truly impactful piece of art.
A good collage combines images. A great one feels like a single, unified piece of art.
So, what's the secret? It almost always comes down to the finishing touches—those subtle adjustments that make all the individual parts sing in harmony. This is how you take your work from a simple mashup to something genuinely compelling.
It all begins with color and light. If one of your AI generations has that warm, golden-hour glow and another has cool, blueish tones, they're going to clash right away. Jump into your design tool’s color adjustment features. Tweaking things like temperature, saturation, and contrast can bring everything into the same visual world. A quick hack? Applying a subtle, consistent filter across the entire canvas can work wonders.
Giving Your Collage a Handcrafted Feel
Let's be honest, digital art can sometimes feel a bit too clean. Almost sterile. I love fighting that by adding textures to give the work a more tactile, handcrafted quality.
Think about layering a faint paper texture, a subtle canvas grain, or even some digital brush strokes over the whole piece. It’s a small detail, but it makes a massive difference, giving the final artwork an organic and intentional feel.
You can find tons of free texture overlays online or just generate your own with AI. A prompt like "subtle crumpled paper texture, light gray, high resolution" usually does the trick.
Here's the thing to remember: the goal of these advanced techniques isn't to be obvious. The best lighting adjustments and texture work are often the ones you don't immediately notice. They just make the whole piece feel more cohesive and professional.
Mastering Blending and Integration
To truly make your images feel like they belong together, you have to get good at managing how they interact at the edges. This is where the magic of blending modes and masking comes in.
-
Blending Modes: Don't just stack layers on top of each other. Experiment with blending modes like "Multiply," "Screen," or "Overlay." These settings completely change how the pixels of one layer interact with the layers underneath, creating far more interesting and seamless integrations. "Multiply" is fantastic for shadows, while "Screen" can create some beautiful light effects.
-
Soft Brushes and Masking: Nothing screams "cut and paste" like a hard-edged cutout. Use a soft-edged eraser tool or, even better, a layer mask with a soft brush to gently fade the edges of your elements. This is the go-to technique for blending a person into a new background or making clouds look like they're naturally drifting over a mountain.
These final steps are what separate a quick project from a polished piece of artwork. By thoughtfully tweaking color, adding texture, and seamlessly blending your elements, you create a collage that doesn't just show images—it tells a story.
Sharing and Repurposing Your Artwork
So, you've pieced together your collage, and it looks incredible. Now what? The final part of the creative journey is figuring out how to get your masterpiece out into the world. It’s not just about hitting "share"—a little strategy goes a long way.
First things first, think about where your collage is headed. Are you dropping it on Instagram? Framing it for your wall? Using it as a website banner? Each destination has its own technical needs, so exporting correctly is crucial.
- For Social Media: You’ll want a .JPG or .PNG file. For something like an Instagram feed, a resolution around 1080x1080 pixels is the sweet spot. It keeps the image sharp without making the file size enormous.
- For Printing: This is where high resolution is non-negotiable. Export your work as a PDF Print or a .TIFF file at 300 DPI (dots per inch). Anything less, and you risk a blurry, pixelated print. No one wants that.
Once you have the right file, you can take your digital creation into the real world. Ever thought about turning your art into wearable fashion? It's easier than you think, and there are plenty of ways for printing your digital artwork onto a t-shirt.
Breathe New Life into Your Creation
Don't just post your collage once and call it a day. The real magic happens when you start repurposing your work. Think of your finished collage not as an endpoint, but as a collection of assets ready for their next act.
The most creative artists I know rarely see a finished piece as the end. They see it as a new beginning—a collection of assets ready to be remixed, reanimated, and reborn into something entirely new.
A static image is great, but what about an animated one? By subtly moving a few layers, you can turn your design into an eye-catching GIF that stops the scroll on social media. It's a simple trick with a huge impact.
You can also slice and dice it for different formats. That square collage can easily become a vertical phone wallpaper or a wide banner for a website header, extending the life and reach of your original artwork.
And if you built your collage with products in mind, you’re already a step ahead. You can take those same elements and learn how to create stunning AI-generated digital product images to showcase your designs professionally. When you think beyond the initial creation, your art keeps working for you long after you’ve finished.
A Few Common Questions About AI Collage Creation
Whenever you dive into a new creative process, a few questions are bound to pop up. Making a collage with AI is no different. Let's get some of the most common ones answered so you can get back to creating.
What Are the Best Free AI Tools Out There?
For grabbing your initial images, a few free tools are genuinely fantastic. I usually start with Microsoft Designer (which runs on DALL-E 3) for top-notch image quality or Leonardo.Ai, which has a pretty generous free plan with a massive range of artistic styles.
Once you have your images, you'll need to isolate the subjects. For that, the free background removers in Adobe Express or PhotoRoom are my go-to's—they're incredibly fast and get the job done well.
How Do I Make My Collage Actually Look Cohesive?
This is the secret sauce. A great collage feels intentional, not just like a random pile of images. The easiest way to get that cohesive look is to start with a limited color palette or a very clear theme from the get-go.
Another pro tip is to unify all your separate elements by applying the same filter or a subtle texture overlay across the whole canvas once everything is in place.
Pay close attention to the lighting. Even if your source images have totally different light sources, you can work some magic. A final color grade or adding consistent, subtle shadows can tie everything together and make the final piece feel much more believable.
Can I Actually Use These AI-Generated Images Commercially?
This is a huge one, and the short answer is: it depends entirely on the AI tool's terms of service. You absolutely have to check before you start a project.
- Midjourney: If you have a paid plan, you're generally granted broad commercial rights to the images you create.
- Other Platforms: Many services draw a line between their free and paid tiers, with different rules for each.
The bottom line is simple: always read the terms and conditions of any AI service before you even think about using its creations in a commercial project. It’s a boring but critical step that ensures you can use your amazing new collage without any legal headaches down the road.
Ready to create stunning visuals in seconds? Bulk Image Generation lets you generate up to 100 professional-quality images from a single prompt, streamlining your entire creative workflow. Start creating at bulkimagegeneration.com.