
How to Cut Someone Out of a Picture with Easy AI Tools

Aarav Mehta • September 12, 2025
Learn how to cut someone out of a picture effortlessly using AI. Follow our simple guide to perfect your image editing skills today!
When you need to cut someone out of a picture, AI-powered editing tools are easily the fastest way to get it done. It's as simple as uploading your photo, using a brush to mark the person you want gone, and letting the software handle the rest. It’ll automatically erase them and intelligently fill in the background.
Why You Might Cut Someone Out of a Picture

Ever take what you thought was the perfect travel photo, only to discover a total stranger wandered into the shot? Or maybe you have a great group photo from years ago that includes someone you'd rather not see. We've all been there. The need to edit someone out of a picture is a super common problem, for both personal and professional reasons.
On a personal level, you might want a clean, focused shot for a new social media profile picture or need to remove an ex from an otherwise perfect memory. In a business context, getting distracting people out of product photos helps your customers focus on what you're actually selling.
Editing Made Easy
Not too long ago, a task like this meant firing up complex desktop software and having a lot of patience and technical skill. Today, AI has completely changed the game. The global photo editing software market was valued at USD 345.2 million in 2023 and is projected to hit USD 580.3 million by 2032, largely because of this shift. This explosion is fueled by social media and the incredible cameras we all have on our phones. You can find more data on this expanding market if you're curious.
The real goal isn't just about removing someone; it's about getting the photo back to its original purpose. Whether it’s a photobomber at a landmark or just a cluttered background, a clean edit lets the intended story of your image shine through.
This guide will walk you through how to get it done in minutes, no design degree required.
Picking the Right Tool for the Job

When you need to cut someone out of a picture, the tool you choose is going to make all the difference. Honestly, it defines the entire experience.
You could go the old-school route, firing up complex software and painstakingly tracing around your subject with a lasso or pen tool. It's a method that demands a surgeon's steady hand and a whole lot of patience. Sure, you get ultimate precision, but it comes with a seriously steep learning curve.
Or, you can lean into modern AI-powered editors that do all the heavy lifting for you. These tools are smart enough to spot and isolate a person with shocking accuracy—often in just a few seconds. It’s what makes high-quality photo editing something anyone can do, no technical wizardry required.
Manual Precision vs. AI Speed
So, which path should you take? It really boils down to what you’re trying to accomplish. Are you a pro graphic designer who needs pixel-perfect control over every single edge for a high-stakes project? Or are you just trying to clean up a family vacation photo without losing your entire afternoon?
For most of us, the sheer efficiency of AI is tough to argue with.
When you look at the industry, a tool like Adobe Photoshop is still the undisputed king, with about one-third of all users in the graphics and photo editing space. And even platforms like this are baking more and more AI into their features to make subject extraction faster than ever.
The biggest shift isn't just about making a task faster; it's about making a previously complex skill available to anyone. What once took an hour of meticulous clicking can now be done before your coffee gets cold.
Of course, there are plenty of dedicated creative studio tools out there that also offer slick features for object removal if you need more advanced options.
But when you're dealing with more than just one or two photos, AI becomes the no-brainer choice. If you’ve got a whole folder of images to process, our Bulk Image Generation tools can get the job done in a fraction of the time. In the end, it’s all about balancing that need for granular control against the massive time savings that automation offers.
Manual vs AI Photo Editing Tools
To make it even clearer, let's break down the core differences between the traditional, hands-on approach and the new wave of AI-powered editing.
| Feature | Manual Editing (e.g., Lasso Tool) | AI Editing (e.g., Automated Removal) |
|---|---|---|
| Speed | Slow; can take minutes to hours per image | Extremely fast; often just a few seconds |
| Skill Level | High; requires practice and a steady hand | Low; designed for beginners and non-designers |
| Precision | Pixel-perfect control possible | High accuracy, but may need minor touch-ups |
| Consistency | Varies by user and effort | Highly consistent across thousands of images |
| Best For | Complex professional edits, artistic composites | Batch processing, quick clean-ups, social media |
While manual tools give you the final say on every pixel, the reality is that for 95% of use cases—like preparing e-commerce product shots or creating social media content—AI delivers fantastic results with almost zero effort.
Removing a Person From a Single Photo
Alright, let's get our hands dirty and make that first edit. This is where you really see what modern AI tools can do. What used to be a tedious, pixel-by-pixel job in Photoshop is now just a few clicks. We'll start by simply getting your image loaded and letting the AI do the heavy lifting.
Your first move is to upload the photo you want to work on. As soon as it's in the system, the AI immediately scans the image to identify all the different elements, paying special attention to any people in the shot. It's surprisingly fast—usually, you'll see everyone highlighted with an overlay in just a second or two.
Selecting and Refining Your Edit
Once the AI has tagged the people in your photo, your job is simple: just click on the person you want to remove. Seriously, it's usually just a single click. The moment you make your selection, the AI erases them and starts intelligently generating a new background to fill in the gap.
But what about those tricky edges? We've all seen bad cutouts where stray hairs or fuzzy clothing edges get left behind. That's where a little refinement comes in. Most tools have a simple brush that lets you manually clean up those areas, ensuring the final image looks completely natural.
This visual guide breaks down the key steps for getting that precise, clean edit.
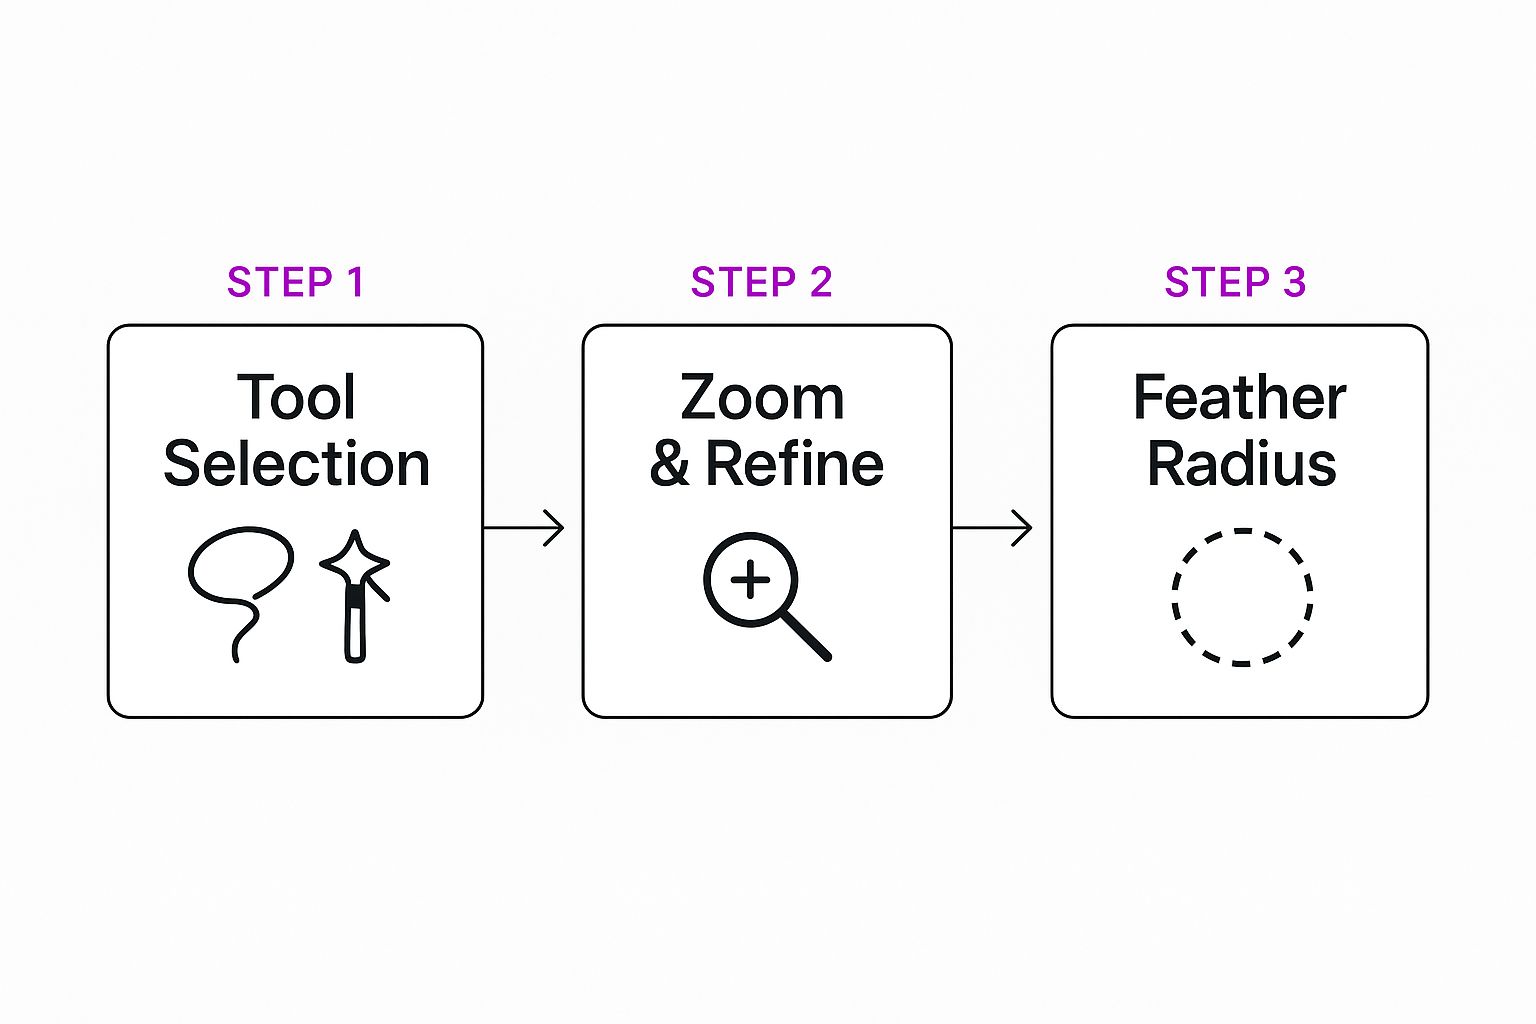
While the AI does almost all the work, knowing how to fine-tune a selection is what separates a good edit from a great one.
Handling the Empty Space
So, you've successfully cut someone out of the picture. Now you're left with an empty space and a few powerful options for what to do next.
-
Create a Transparent Background: This is your go-to if you plan on using the subject in another design. Think website banners, product collages, or social media graphics. Exporting with a transparent background gives you a clean cutout that's incredibly versatile.
-
Fill with a Solid Color: Sometimes, simple is best. Filling the background with a solid color is perfect for creating clean profile pictures or minimalist graphics where the subject needs to pop.
-
Generate a New Background: This is where the AI really flexes its muscles. Instead of just leaving a blank space, it can analyze the surrounding pixels and rebuild the scene. The AI creates a background that blends in perfectly, making it look like the person was never even there.
The magic of these tools isn't just in the removal; it's in the intelligent reconstruction of the image. The AI doesn't just delete pixels—it understands the context of the scene and rebuilds it. This feature alone can save you hours of painstaking manual work.
Editing Multiple Pictures with Batch Processing

Editing one photo is easy enough. But what about a hundred? Or a thousand?
Imagine you’re a wedding photographer with an entire album’s worth of shots where the same guest accidentally photobombed every key moment. Or maybe you run an e-commerce store and need to swap out the backgrounds on a whole new product line. This is where knowing how to cut someone out of a picture at scale becomes an absolute necessity.
Going through each image one by one isn't just mind-numbing; it's a massive waste of time. The smart move is batch processing, where you apply the same edit to an entire folder of photos all at once. With a tool like Bulk Image Generation, you can upload the whole set, tell the AI to "remove person" just once, and let it handle the rest.
Suddenly, a job that would’ve eaten up your entire afternoon is done in minutes. It’s a complete game-changer for anyone who deals with images in high volume.
How Does Batch Editing Actually Work?
It’s surprisingly simple. Instead of opening and editing each photo individually, you just select the entire group of images you want to process. From there, the AI takes your command—in this case, removing a person or cleaning up the background—and applies it to every single photo in the queue.
- Totally Consistent Results: Every photo gets the exact same edit, ensuring your entire image set has a clean, uniform look.
- A Huge Time-Saver: You set the rules once and then walk away. Let the AI do the tedious work while you focus on more important things.
- Built to Scale: The process is the same whether you have 10 photos or 1,000, making your workflow incredibly efficient as you grow.
The real magic of batch processing is that it multiplies your effort. One simple command accomplishes what would have taken hours of repetitive, manual clicking. You get to focus on the creative side of your project, not the grunt work.
This kind of efficiency is why the photo editing market is booming. The industry in North America alone pulled in around USD 377 million in revenue, partly because powerful, accessible tools have made complex tasks like this so much easier for everyone. You can check out more stats on the growth of photo editing solutions to see just how fast things are moving.
For pros and hobbyists alike, batch editing isn't just a feature; it's the key to working smarter.
Tips for a Flawless and Natural-Looking Edit
Getting a clean removal is just the first step. Honestly, the real art of cutting someone out of a picture is making the final image look completely believable—as if the person was never there in the first place. This is where a few subtle adjustments separate an average edit from a flawless one.
One of the biggest giveaways of a digital edit is a harsh, unnatural edge. It just screams "cutout." To avoid this, always look for a feathering or soften edge tool in your editor. Applying even a tiny amount of feathering, maybe just one or two pixels, can work wonders. It gently blends the selection into its new surroundings and gets rid of that sharp, fake look.
Handling Complex Details
Even the best AI can sometimes get tripped up by the tricky stuff. Think about fine details like wispy strands of hair, semi-transparent fabrics, or intricate patterns on clothing. This is where a little manual refinement makes all the difference.
Don't be afraid to zoom way in and use a small refinement brush to touch up these problem areas. You can easily add back missing strands of hair or clean up fuzzy edges around a jacket. A few seconds of manual cleanup can elevate your edit from good to great.
Remember, the goal isn't just to remove the person but to trick the human eye. Small imperfections are often what give an edit away, so paying attention to the tiny details is what creates a truly professional-looking result.
If you're swapping in a completely new background, lighting and shadows are everything. You have to make sure the light source on your subject matches the new environment. If the background has strong sunlight coming from the left, your subject can't be lit from the right. It’s an instant giveaway that something’s off.
These principles are key, whether you're just tidying up a personal photo or learning how to create stunning digital product images using AI generators for your business. An inconsistent shadow is the fastest way to make an image look fake.
A Few Common Questions About Removing People from Photos
As you start getting the hang of cutting people out of pictures, you'll probably run into a few questions that pop up time and again. Getting these sorted out will help you edit with more confidence and, frankly, get much better results, especially when you're letting AI do the heavy lifting.
Can AI Really Handle Messy Backgrounds?
One of the first things people ask is whether an AI can actually deal with a really busy or complex background. The answer is, surprisingly, yes. Today’s AI models have been trained on millions of images, which makes them incredibly good at telling a person apart from a crowded street, a detailed forest, or even a cluttered room.
Sure, an exceptionally tricky scene might still need a quick manual touch-up here and there, but you’ll be amazed at how well modern tools nail it right out of the gate.
What’s the Best File Format to Use?
This one’s important, and the right answer really boils down to what you plan to do with the image after you’ve removed the person.
-
PNG for Transparency: If your goal is to place your subject onto a completely new background or use it in a graphic design project, PNG is the only way to go. It’s the standard format that supports a transparent background, which is exactly what you need.
-
JPEG for Simplicity: On the other hand, if you've already replaced the background with a new color or scene and don't need transparency anymore, a JPEG is your best friend. It gives you great image quality with a much smaller file size, making it perfect for websites, emails, and social media.
Getting this right is especially crucial for things like e-commerce, where you need clean, consistent product shots. We dive deeper into this and other pro techniques in our guide on AI product photography.
What if the AI gets it wrong? It happens, but don't worry—fixing it is usually simple. Almost every editor has "keep" and "remove" brushes. If the AI selects the wrong person, just grab the "keep" brush to paint over who you want to save, and then use the "remove" brush to get rid of the right person.
Ready to stop editing one photo at a time and start creating stunning, clean images in seconds? Try Bulk Image Generation and see how easy it is to remove people and objects from your photos at scale. Get started for free at https://bulkimagegeneration.com.